I Hope You Feel Appreciated

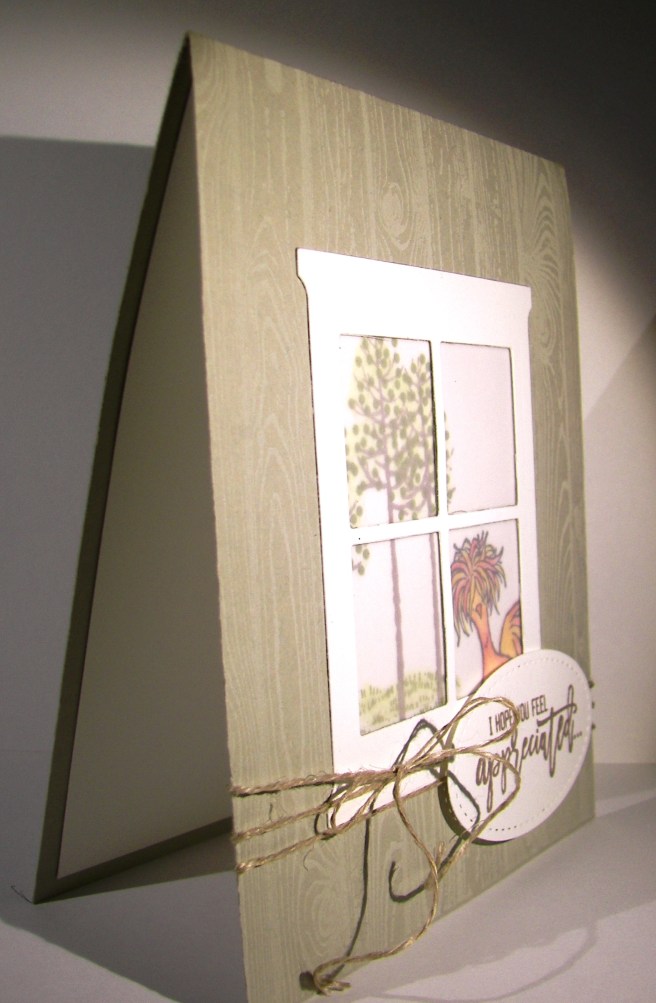
I don’t think I will ever find too many places to stamp this awesome chicken, ever.  There are two other adorable chickens and a little egg too, but this guy rocks!  So here he is peepin’ in a little window to say hello.  Too adorable.

2-3

For a very simple card, I sure did use a lot of different products.  Really though, it went together quite fast.  The card base became a one layer card.  I stamped with white stazon onto the card base using the hardwood stamp.  So cool.  It gave me a subtle woodgrain look that was just right.  I die cut the window out of the card base and again out of whisper white. I glued those two windows together so when I nested them back into the opening, the white one would layer up just ever so slightly.

I backed the window with velum to create the ‘glass’.  I traced the window pane openings on my inside piece of cardstock so I knew where to stamp the trees and chicken.  They got a little ink and a little water color pencil activity and then I glued them in place.  I could have left them on the inside back of the card, but I knew I wanted to cover up the back of the window and have plenty of space to write to my friend.  So I adhered it to the inside top flap of the card and put another blank piece down on the inside back.  Then I had double the space to write and my window stuff all covered up.  Total win!

2-3-1

Have a creative day!

Moana

For You

This was the third project we created at workshop last weekend.  I know this stamp and framelit set are about a whole lot more, but as yet I still haven’t gotten past the hydrangea. I think with fall and the holiday seasons coming I will enjoy more of the trees, but not yet.

8-26

I used the heavy weight whisper white card stock for the background.  I handles the deep impressions of the embossing folders much better.  Also, I had plans for spritzing some color and that would have made some warping sadness otherwise.  It isn’t easy to see, but there is a light tan speckling going on there.  Such an easy technique to employ.

I stamped on wisteria wonder with elegant eggplant for the different tones and accented with more elegant eggplant.  The ink, thick bakers twine, and border piece were all done in elegant eggplant.  It is a dark color, so I kept it under control.  I didn’t sponge anything, that was a challenge to be honest.  The die cutting was simple and then layered in place. The stamping was done last. It did give a bit of a crease line in the sentiment, but worth it.  I worried if I stamped and then spritzed the wording would bleed and I wanted it crisp.  Done.

8-26 (1)

Have a creative day!

Moana

You’re in My Thoughts

This is me getting more comfortable with this sassy paper stack.  I have to admit though, the colors are what make it work.  Aren’t they beautiful together?  I don’t think I would have paired them myself, but I will be now.

8-14

Sometimes a simple card works for me.  This one just has a few layers focusing on the patterns of the paper and a simple sentiment.  I left a bit of a gap at the top of the sentiment so I could wrap a bit of ribbon around it.  This ribbon, I love it.  It looked kind of funky in the catalog, but I went for it anyway to share it with my class.  Glad I did.

8-14 (1)

Have a creative day!

Moana

Thoughtful Branches Thankyou

This card comes from a limited time stamp and framelit bundle.  There are many options within, all kinds of trees and fun things, but this is why I bought mine.  I love hydrangeas so much.  I am so going to enjoy this set.

8-9

I put a new stamp pad to use.  Stampin’Up! has produced a few ombre pads, this one in particular is rich razzleberry.  I am usually a bit more traditional, wanting more self control over the colors I use.  But this was pretty darn fun.  I like how it turned out and I am glad I bought them.  I wanted the color to bleed some, so I spritzed the flower with water after it was die cut.  It softened the color without compromising the ombre effect.

I painted another piece of water color paper with almost artichoke and used the stem die cut.  I didn’t have to add any color afterwards, it turned out nice.  I knew I would be working in water color paper, so I made both flower parts and the card front from the same paper. That way the ink would react the same and have a uniform look.  The background was done with a light wash in crushed curry.  No distressing, just painting.

I stamped the sentiment directly to the card front and called it good.  I did layer it up on another piece of almost artichoke paper for a bit of interest and to help control curling of the card front.

8-9 (1)

Have a creative day!

Moana