You’re in My Thoughts

This is me getting more comfortable with this sassy paper stack.  I have to admit though, the colors are what make it work.  Aren’t they beautiful together?  I don’t think I would have paired them myself, but I will be now.

8-14

Sometimes a simple card works for me.  This one just has a few layers focusing on the patterns of the paper and a simple sentiment.  I left a bit of a gap at the top of the sentiment so I could wrap a bit of ribbon around it.  This ribbon, I love it.  It looked kind of funky in the catalog, but I went for it anyway to share it with my class.  Glad I did.

8-14 (1)

Have a creative day!

Moana

Love You More

Smudges and all, I love this card.  Leave it to me to use a stamp set that is filled with two step fruit images to use the flowers instead.  Like I said, I love flowers.  The fruits are great though, and I do plan on making fun projects with them too.  I actually used an old kit from nearly a year ago.  I love putting old kits to use.

8-12

The prior kit had patterned paper in these colors, but has been retired, so I thought I would make my own.  Making background images is so much fun to me.  It takes me back to the roots of my stamping, using quality tools for endless creativity.  This stamp set is made for just that thing.  You will be seeing it a lot I think.

The flowers were stamped first in calypso coral and then outlined with the coordinating stamp.  They match, but don’t have to be exact.  It goes with the artsy look it is designed with.  Works even better for me.  And the sentiment, how perfect is that.  I opted to center the flowers with large basic rhinestones instead of the stamped center.  Either would have been nice, but I wanted sparkle.  A finishing touch of solid bakers twine with a sweet bow. It actually came together pretty quick, it helps to have leftover kits to work with.  That makes me fuss less when I have last minute class cancellations because I know I will put the pre-cut kits to good use eventually.

8-12 (1)

Have a creative day!

Moana

Love…

Okay, a little time off is nice, but that wasn’t my intention here.  Life took a busy turn and I am trying to get back on track.  I am out of town trying to enjoy time with my son and his new bride, help my oldest daughter with wedding plans, and manage a little bit of business as well.  I would like to say I am on vacation, but a bit too busy for that.  No fussing, just enjoy the love through it all.

7-28 (2)

This simple card was made from an extra kit from a workshop last weekend.  Simple layers, this is all about those layers.  I wouldn’t have paired this particular embossing folder with items outside of nautical items, but I loved how it looked.  I made a large set of cards to blog ahead with and had the intention of sharing them with my new daughter in love.  She is adorable.  Living in a university town there are plenty of weddings to attend, so that is the job of this particular card.  They actually have three to go to in the next month or so.  Busy.

7-28 (1)

Have a creative day!

Moana

Wishing You Brighter Days…

Some days can be filled more struggles than others and it can be difficult to find the bright spots.  Being creative each day certainly does bring a lovely balance into my life.  It allows me to grow, share kindness and even teach a few people along the way.  Very nice indeed.

7-22

I tried a different product.  If I am honest, I have had it on my shelf for some time, but hesitated to use it.  I typically am Stampin’Up! exclusive, but was given a gift from my oldest daughter.  Some Ranger distress inks.  So, they are very lovely to water color with. Luckily I have a few to play with, otherwise I might be tempted to get into those.  They react differently than the inks I work with.

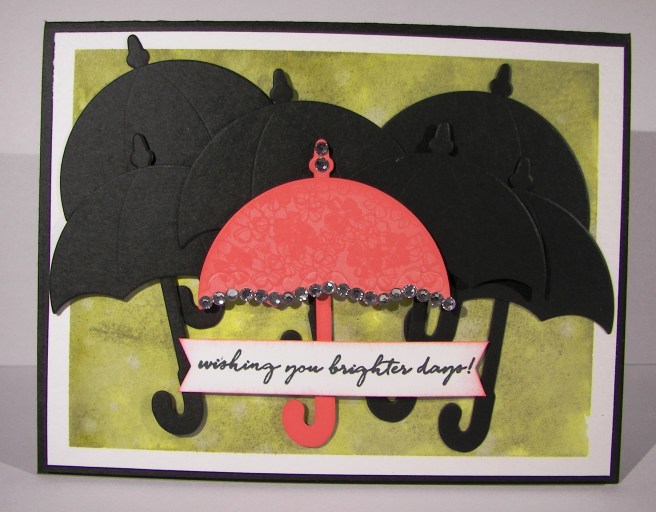
These umbrellas though, how adorable!  I have seen images like these for so long, often with the one umbrella being red.  Flirty flamingo works nicely here as a nice contrast to the black.  I created six black umbrellas and a fancy one for the front.  The basic rhinestones come in a few sizes as well as three strings that are connected by adhesive.  One string was just long enough to travel along the bottom of the umbrella leaving two left over that I placed on the top.  The umbrella framelits have so many fun options to make one creative look after another.  It was kind of tricky to choose, but I managed.

7-22 (1)

I layered these guys around for a while before I committed to their positioning.  The back ones were adhered directly to the water color paper with the front umbrellas being raised up on dimensionals.  What a lovely card to share with someone needing a little lift.

Have a creative day!

Moana

Joyful Season

This little red cardinal has eluded me a few times over, but today was my lucky day.  I wasn’t sure just which bird I wanted to create, but decided to stick with the cardinal.  Call it Christmas whimsy.

Joyful Season

The red inside was stamped first and then I added the outline in black.  It was easier for me that way.  I tried to do the outline first and then the inside, but wasn’t happy with my efforts.  I managed to get the extra front stamp pretty good giving the darker black around the face and I even got the beak color in the right spot.  Woo hoo!

 Joyful Season

The oval framelits worked nicely to frame the image.  I decided to frame it in early espresso to match the branch.  Again, nice results for sure.  These were layered up with dimensionals over another layer of real red.  That layer was put through the softly falling snow embossing folder and sanded a bit to add interest to the flakes.  A simple bow with a snowflake embellishment and the card was done.  How nice is that?

Joyful Season

Have a creative day!

Moana

Flowerpot Painted Petals Trio

Sometimes when you draw a blank, you still come out on top.  I was sure I had crafters block yesterday.  So I sat and read a novel instead.  When I made myself go back and sit down I decided to pull out a sheet of designer series paper and just design a bag and call it good.  As soon as I had this sheet of paper on my desk my brain got busy.  Cool right?

Flowerpot Painted Petals

I hadn’t paired this ribbon with rich razzelberry yet and I wish I would have.  They look great together!  And then a bit of glimmer paper to frame a tiny sentiment and we are off and running.

Flowerpot Painted Petals

I trimmed off a 4″ section from the whole 12 x 12 for a card front.  When I finished the other cut to give me the 4 x 5 1/4″ front I needed I was left with a choice.

Flowerpot Painted Petals

Make a second card, put the remainder back with its set, or make another tiny bag to go along.  The tiny bag won.  What a cute little baby bag.

Flowerpot Painted Petals

This set went together really quickly.  That is what happens when you have great product.  Just a little bit of stamping, some creasing, adhesive here and there and a ribbon on top.  I went to bed with a smile for sure.

Have a creative day!

Moana