Beautiful Banners

Well, I certainly got distracted today.  Here it is nearly evening and I forgot I had this half way done.  Suppose I could finish it after all.  I was tempted to just skip today and save this for tomorrow, but let’s just share it.

7-20

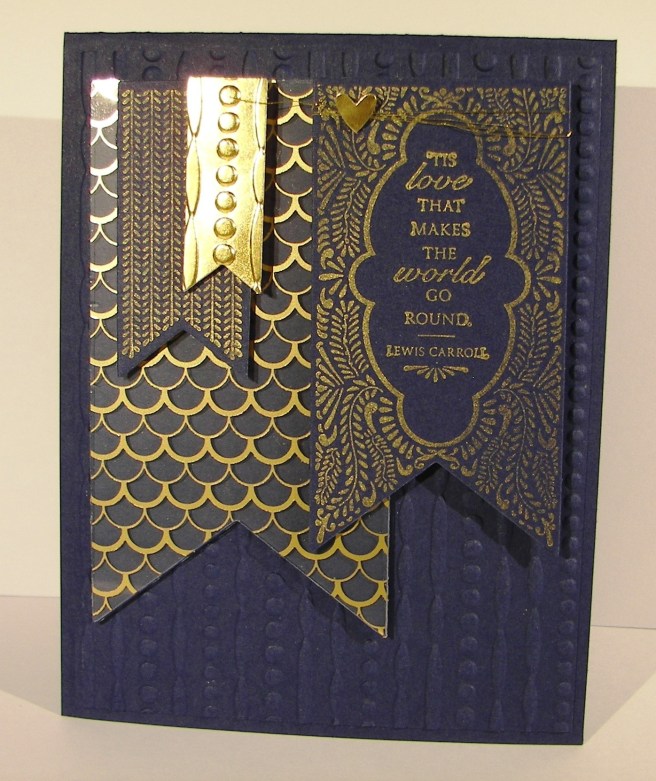
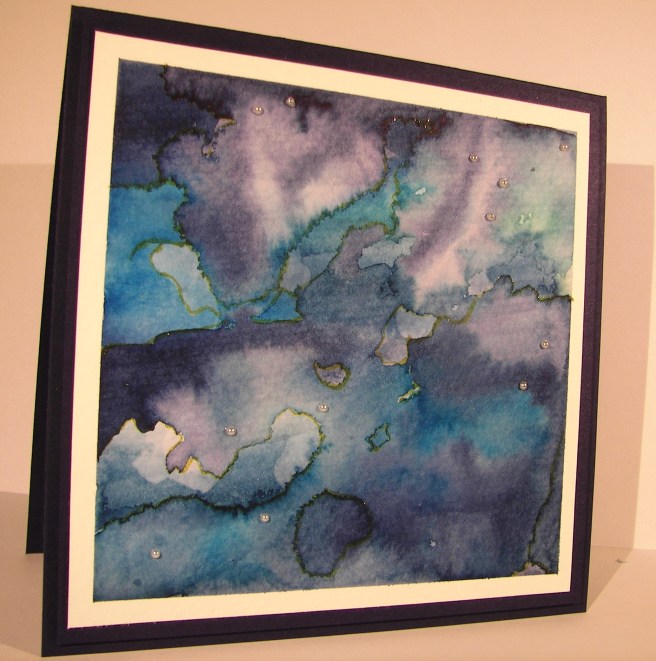
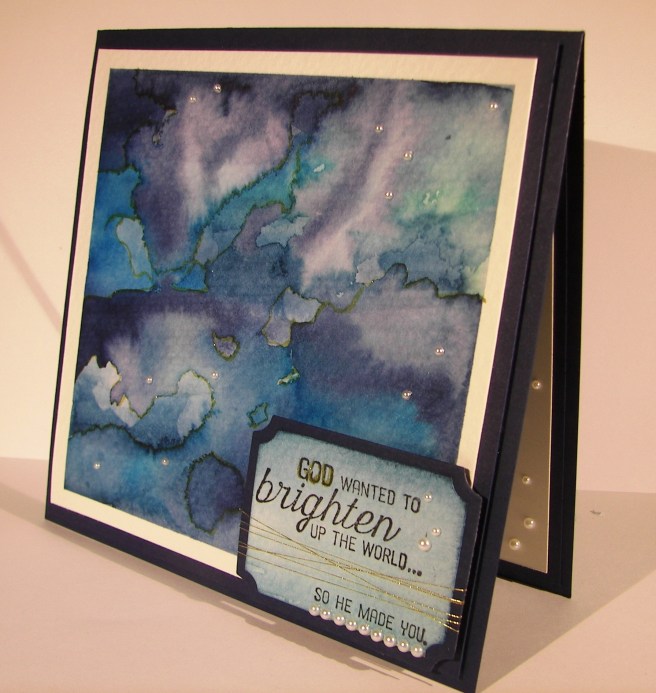
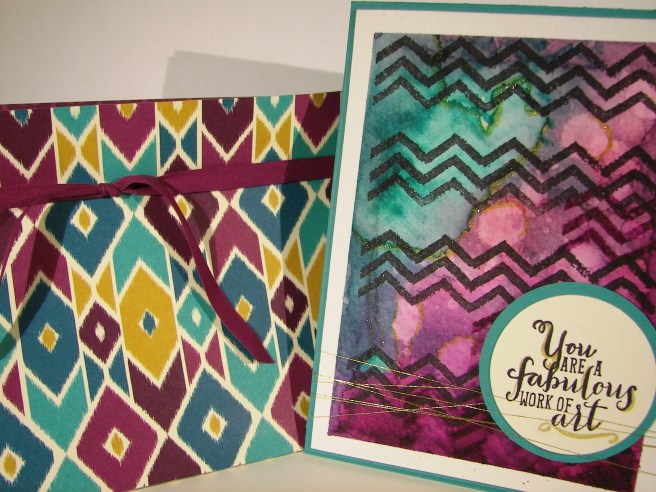
This project was all about the foil designer acetate that came out in this years catalog.  Not until I gave in to use it did I discover it was gold foil on one side and silver foil on the other. I was pretty darn pleased if I say so myself.  I do think I will try this project again with silver, because I do think I prefer blue and silver after all.  But this certainly is lovely.

I used four different banner thinlits and two of the banner stamps.  The layering was simple, just a little patience while I sorted out the positioning.  Both the silver and gold encore inks are so beautiful stamped on dark card stock.  I do tend to prefer the look of embossing powder when it comes to metallic ink, but it did just fine.  Such a beautiful sentiment.

7-20 (1)

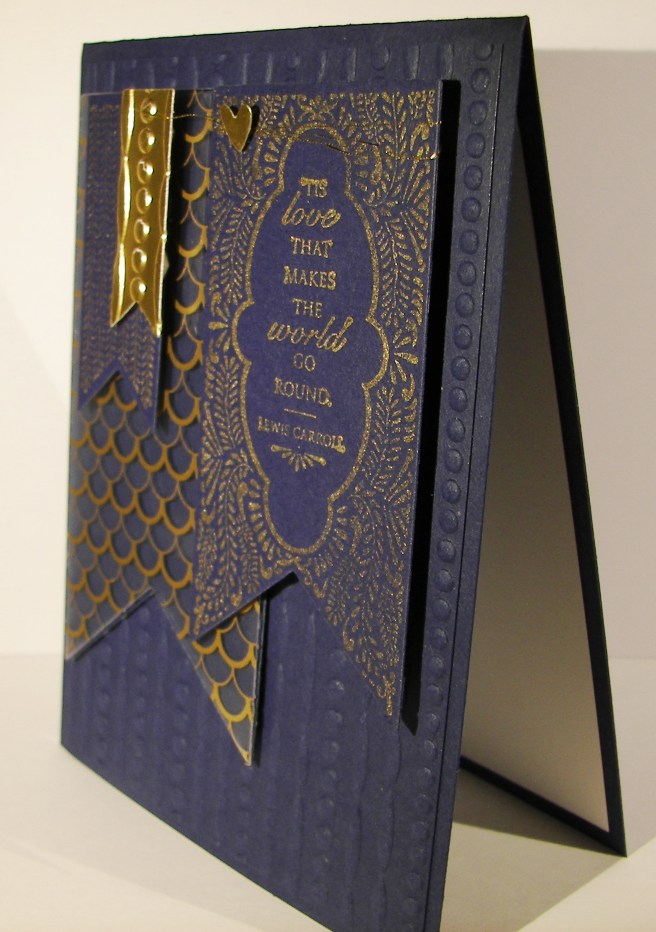
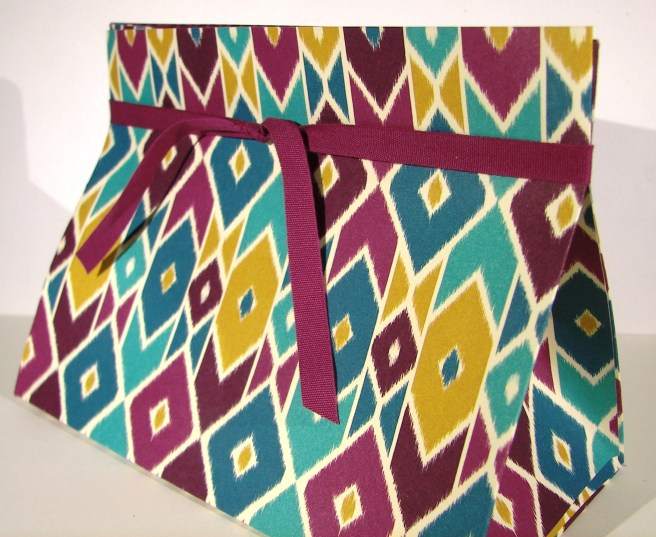
I started with the small banner cut in gold foil, but it was too smooth and shiny so I put it through the same embossing folder I used for the background paper.  And, it tied it together as well.

Such a lovely day of distractions, hope you had one too!

Moana

Hello Baby!

A good friend of mind is expecting her third child soon, a baby girl.  It was a huge surprise but it is finally getting exciting for everyone.  Thought it was about time I made a special card or two just for the occasion.  What is it about pink and sparkles anyhow?

7-11

I haven’t purchased much in the department of this years designer series paper department, nor do I have any current baby themed stamp sets, so I had to get a bit creative.  It may be on the elegant side, but I do like how it turned out.

I made a couple of layers of blushing bride card stock to add to the card base, with the top most layer being embossed for a little texture.  Love it! I then decided to break out the flourish thinlits set and cut a few of the images in glimmer paper.  Again, it was totally working for me.  When it came time for a sentiment, I really had to look.  I found this treasure in the beautiful banner set and thought it to be perfect.  The sentiment was layered on more card stock and both layers were edged in the banner style.  A little wrapping with metallic thread and one huge metal rimmed pearl later and I called this one done.  Yes!

7-11 (1)

Have a creative day!

Moana

Hang In There

Sometimes I am just so this little frog.  Good intentions, high goals and all kinds of good things seem just out of reach.  So, push on and hang in there.

7-6

I am absolutely in love with these jars.  The stamps and the framelits really are quite fun to create with.  I wish I had more time to sit and play, but the time I get is enough to keep me balanced.  I like stamping the jar in some blue tone, cutting it out and then cutting out another jar in velum to lay over the top.  It gives an opaque look and softens the stamping. I think I would like to use window sheets too, but for now I am all about the velum.

I painted this little frog with emerald envy and touched his eyes up with soft sky.  The fireflies were stamped in black stazon with the wings painted in soft sky and the body in gold wink of stella.  I love the sparkle.  You can’t see it, but trust me, it is so there. Adorable, just adorable.

7-6 (1)

I stamped a little of the frog in emerald envy just inside the card insert.  Kind of like he was peeking out a bit.  So there you have it!

Have a creative day!

Moana

Well, This Just Stinks

I think sometimes cards can just be funny and that is more than enough.  When I read the sentiment I used I knew I didn’t care what the rest of the stamps were like, I had to have it. Good thing it is really a great set with fun and sincere sentiments.  This phrasing, especially with the intro, is kind of an inside joke.  No pun intended…tee hee…

6-28

The background stamping was pretty darn easy.  I used an element stamp from the Basket for You stamp set and just stamped my way across the card front.  I could have been a bit more careful to keep some of the edges better in line, but my desk is such a mess I just went for it.  Really, my desk hasn’t ever been this bad.  I think it will be top of my to do list tomorrow.  Summertime really gets me out of whack.  As you can tell by this very late blog.

Anyway, then the fun die cut letter had to get done.  I didn’t want those huge letters to take over my funny phrase, even though they are so large.  So, I decided to stamp them lightly in gold.  It kept them not as strong and allowed the rest to really catch your eye.  In order to keep them lined up I arranged them on the card front how I wanted them and laid a piece of painters tape across them, lifted them up, turned them over to put on dimensionals, and then placed them right where I wanted them.  It worked out pretty good.  The tape lifted some of the ink, guess I should have heat set it first.  Oh well, you can hardly notice it.

6-28 (1)

I sponged all around the edges on the front and a touch on the inside panel.  All in all, this little project really makes me laugh.  There are times when life is great and sometimes it just stinks and it is more than okay to say so.  Even better to laugh about it.

Have a creative day!

Moana

Flourishing Phrases

This particular project went through a few different phases.  This is how it started out, all about blue.  I had the ocean on my mind and gave it a try.  I had intended on using a new embossing folder after I water colored, but to be honest, I forgot once I got all this going.

6-25

After I painted with all of the blue inks I have I did some detail work using my gold wink of stella.  I focused on some of the watermarks and edges of color.  The look it creates is really awesome.  It is tricky to know when to stop because it is so much fun.  Mission accomplished here for sure.

6-25 (1)

The next step was to add a special tag.  This one got a bit out of control and went to a busy style that really isn’t my own.  However, I decided to leave it and see how it balanced out with the huge butterfly addition I had in mind.  I water colored large areas of paper to provide both my tag area as well as the butterflies.  It is much easier to paint whole sheets instead of small specific die cuts.

6-25 (2)

When this butterfly combo came along I really began to wonder just what I was up to.  I think that is because I love decorative painted backgrounds so much I rarely cover them up. They are such great all occasion cards, but I pushed forward.  I did edge the butterflies with the wink of stella, which of course you cannot see in these photos.  It is there though, and it looks so pretty.  You can see it better in the lead featured image which is much more close up.  Basic pearls, gold metallic thread with a little more patience and this project was finally finished.  It measures 5 1/2 x 5 1/2 plus the butterfly hanging off the edge.  A custom envelope will definitely be in order here.

Have a creative day!

Moana

I am Much More Me When I’m With You

What do you do with a huge pineapple stamp?  Well, just about anything you want I guess.  I loved it, but probably had more questions than answers.  This is definitely one of those answers.  I asked my daughter to pick out a stamp from my stash of new product and give me a color.  She chose light green and this stamp.  Sometimes you just need a nudge in the right direction to get moving.

6-24

Yesterday, and well into the evening, I spent my time helping a good friend with a wedding photo shoot.  You never know how much you are needed, but judging how tired I am today, it would have been so hard for her without me.  And of course we had an absolute blast.  We work nearly seamlessly together, another plus.  I thought this would suit us nicely.

I went with light water color washing using only two colors.  I wasn’t sure how they would blend in the middle, hoping it wouldn’t make some kind of brown.  It turned out great.  I opted for minimal distressing and one single stamping.  The leaves needed a bit, so I used my aqua painter to blend them a bit, but left the pineapple pattern alone.  I stamped it again on the inside, but more in the corner for more interest.  Good stuff there!

6-24 (1)

The tags & labels framelit set fit perfectly around the sentiment and provided the perfect place for my favorite ribbon.  A few of the new enamel dots found there way as well.  The card front and inside panels were both layered with an additional piece of pear pizzazz card stock and the front was popped up with dimensionals.  There you go!

Have a creative day!

Moana

We’ll Weather This Together

A project can go through several phases, and some can be unexpected.  The original vision kind of got lost somewhere along the way, had some confusion, but ended up reasonably pleasing.  These ladybugs though, too much love there.

6-22

My daughters have a canvas in their bedroom that inspired this little card.  I was looking at it recently and thought of the new stamp and framelit set that could help me create my own version.  I pulled some of my favorite pastel colors for the background and started the process.  The more colors I use the longer it takes me to become satisfied with how they blend and flow together.  I went through this one three different times and then once more when I added in the yellow around my little bugs.

6-22 (1)

I water colored on a scrap piece a mix of pool party and blushing bride.  The umbrella was then cut out and hit again with more blushing bride.  The clouds and raindrops were cut from areas that just had pool party.  And yes, I did glue all of those parts down, even those little drops.  I love the dimension the thick water color paper gives to them. Before I stamped my sentiment I added a touch of wink of stella to the clouds and raindrops.  All the pieces were layered together and put in place.  And before the blog had even been finished I was able to use it to brighten someones day.  Wonderful.

Have a creative day!

Moana

Layering Love with Dapper Denim

When I got done complaining that they were changing out the square framelit set with another one I was pleasantly surprised.  Coordinating scalloped squares, how very thoughtful!  This also helped me not be so sassy about the wonderful scallop circle punches being retired.  There are always adjustments when it comes to new catalogs, products and plenty of favorites retiring.

101_1418

The card front was stamped with the Brushstrokes background stamp using the new dapper denim in-color.  I then spritzed it with water until the ink started to move around, let it sit for a bit, dabbed it with a paper towel and then dried it with my heat tool.  All done!

A quick stamp, but a lovely one, cut out with a new framelit, echoed with some more dapper denim in a scalloped framelit and layered up on dimensionals.  Of course I had to use more of that new wonderful ruched ribbon.  Dangerous stuff there.  I can usually control my ribbon purchasing for me and my club ladies, but I don’t know about this time.

The inside was stamped with a bunch of tiny little anchors to fill opposing corners.  It is also part of the same stamp set, which has several fabulous sentiments to be enjoyed.  I think today is a wonderful stamping day.

101_1419

Have a creative day!

Moana

God is Love

A quick stroll through my scrap pile kits and I found this treasure.  I swapped out the embossing folder and stamp sets and came up with something wonderful.  Before it was a different nature scene with a sympathy sentiment.  I like this one too.

5-26

The Trust God stamp set has finally reached retirement.  I cannot tell you how many times I have used this particular set.  This, along with yesterday’s Swallowtail, will join the special shelving unit of stay with me stamps.  I couldn’t part with it.  The new catalog has a couple of sets that are very nice, but in my opinion, won’t be replacing this one.

The tree was stamped in the center with early espresso and sponged with crumb cake.  That is the same treatment for the sentiment, which was punched with the also retiring extra large oval punch.  Dang, I am going to miss that one too.   I do enjoy trying new things, especially when it challenges my crafting.  Plenty of dimensionals and a touch of basic pearls finished this card off.

5-26 (1)

Have a creative day!

Moana

Love You

Love, love and love.  It is in the air like crazy and I can’t seem to get enough of looking at it, feeling it, and most of all, sharing it.  What a great thing in life to experience.  Less than two weeks now and my oldest will be married!  How exciting!!!

5-24

Simple layered card today.  I stamped the background paper with the floral heart from the Bloomin’ Love stamp set.  Real quick work there.  I did a tiny love you stamp on a scrap of whisper white and punched it out with the soon to be retired large oval punch.  Sad days there.  I matched it with the scalloped oval punch in bermuda bay.  That was sponged along with the card front and the card inside.  The inside also got a bit of stamping, my favorite. Then the ever so lovely, and larger than life, striped ribbon got to be used once more.  What a fun and huge bow.  Yes, this will need a custom envelope and extra postage, but it is worth it!  What a great project for today!

H5-24 (1)

Have a creative day!

Moana


Bohemian Work of Art

Rich colors and exciting patterns, that is the theme for today.  In between wedding reception planning I have managed to create this lovely due.  Now I get to add this to the collection of card sets and greeting cards I am donating for a cub scout fundraising event tonight.  I get to share my work and clean out my stash at the same time!  I call that a win.

5-14

The card began with the chevron stamp from the Work of Art set.  I didn’t really pay too close attention, just stamped it four times down a piece of water color paper.  The color pallet came from the bohemian designer series paper set, only leaving out the yellow tone. The focus was on bermuda bay and I started there.  Color was layered, sponged off, added, and distressed a ton until I was satisfied.  Then I did something that was new for me.  I hi-lighted some of the distress areas with my gold wink of stella brush pen.  That was super fun and I had a hard time stopping.

5-14 (1)

The gift bag was made from a whole sheet of designer series paper.  I went for a wide stocky bag instead of my usual tall slender ones.  It is nice to change things up a little bit here and there, don’t you think?  The ribbon I had in rich razzleberry was just long enough to go around the bag top.  I do love using up product that is retiring before it actually retires.  I am not often that lucky.

5-14 (2)

Have a creative day!

Moana

“Suite” Treats

People are placed in our lives for a reason.  It is so wonderful to realize those precious moments as they occur.  A simple, sweet thank you speaks volumes.  As does the kindness shown to me time and time again.

5-10 (1)

In my desk scrap file I looked for something pretty to make a gift bag for a friend.  I came across this wonderful foil velum.  I scored the long sides 1″ in, on both sides.  The bottom of the bag was scored at 5 1/2″ and 6 1/2″ to give a 1″ margin all around.  Folding, adhering, and then adding a bow all went very easy.  Deciding on a phrase took a moment, but as I have often enough, I turned to the Suite Sayings set and found just what I wanted.  The stamping was done in the soon to be retired blackberry bliss, I sure will miss that color, and then punched with the 1 3/4″ circle punch.  A layer of silver foil was punched with the 2″ circle punch and then layered in place.  The tag is stuck to the bag so the ribbon can be removed easily.  That is important for getting to those treats and even re-gifting the bag.

5-10

Have a creative day!

Moana

Tap Tap Tap into Retirement

Well, it has begun.  The retirement list has been published and I can start getting sad over some of my favorites.  This has been one of them.  I love the images, but really love the little tap tap tap tap stamp.  It is so adorable.  Some stamp sets I just keep because they make me smile, and I love to smile almost as much as making someone else smile.

4-20

This project was created with a few techniques.  I stamped my little typewriter  in cajun craze first, then did a bunch of stamping all around the base image with almost artichoke first and then moved on to delightful dijon.

When that was done I got out my sponge and went at the edges.  I aged the entire background by swirling around and around focusing on the edges to make them darker.  I added a little extra sponging around the edge to really darken it up.  I did the same on the inside, but left the center light for easy writing.

4-20 (2)

I stamped my front piece with cajun craze and then sponged in three different areas to keep the colors blended, but still very separate.  I fussy cut it, layered it to some more card stock, sponged that too and put it up on dimensionals.  I did a single wrap of striped cotton ribbon sticking it down with glue dots on the front and back.  The background piece was placed on another sheet of card stock with a tiny border and then layered it up again on even more dimensionals.  Love those guys, they make me so happy.

I don’t normally show the entire inside of a card, but it turned out so awesome that I had to. I thought it was nice enough it could be a card front all by itself.  Not today, but I gave an extra peek just for fun.

4-20 (1)

Have a creative day!

Moana

You Are My Everything

There are days when I really don’t know what I want to make, but that isn’t today and it shows.  When I know who I am creating for it shines through.  The awesome extra free stamp set in this months paper pumpkin kit had the stamps I had to use.  How beautiful are they?  Well, I will be using them excessively I am sure.

4-17

I knew I wanted to make a card for my husband with the two stamps  that share the phrase ‘You Are My Everything’.  It couldn’t be more perfect.  Once I knew that I knew the color pallet I needed and the medium as well.  Blues and water coloring are the perfect combination for him.

The technique of water coloring really doesn’t have a lot of guidelines.  I do start with a wet masked surface.  Then I begin to add and take away color, dry and wet again sprinkle and dab, and color all over again.  It is more of keep going til you get the results you want than a step by step process.  So much fun, really.

Then I stamped the large flower in bermuda bay, once stamped off first, here and there.  I added a fern stamp a few times, full strength not stamped off.  Then finished with the two stamps that make the sentiment.  I did a little echo stamping to coordinate the inside with the card front.  To complete the project I layered the art onto another piece of bermuda bay card stock and wrapped it several times in silver metallic thread.  Then up on dimensionals for a little extra style and sit back to enjoy the view.  I do love this card.  I think it looks like a beautiful batik fabric I would love to own and sew with.

4-17 (1)

Have a creative day.

Moana

Crazy About You at First Sight

Today has started no differently than many other Saturday’s, but I was not going to let another one go by without sharing a project.  I have let my weekends get carried away and it just bugs me that I don’t keep this blog current daily.  Sharing creative projects is my favorite thing and it really keeps me balanced.  So here we go!

101_1302

I get to attend a bridal shower today, how fun right?  Well, I have gotten into giving thank you cards as my bridal shower gift.  I think it is most appropriate, since the bride is going to need plenty of these.  Sometimes though, a special thank you is in order, when someone has really been kind or extra wonderful to you.  That is what these are for.

101_1300

The steps aren’t too complicated, you can really see them from just looking at the project.  I am really bad about tracking how I score my bags and boxes.  I make them different each time because you don’t always need the same size.  I love to say that I don’t have to toss my first attempt too often, almost never.  I do tell my classes that there are never mistakes, just opportunities, so there is always something you can work out.

I embossed my card base and the bag fronts with the same fluttering embossing folder.  The blushing bride glimmer paper is everywhere.  And yes, my desk is very sparkly just now. Good thing I love glitter.  The bag fronts are raised up on dimensionals, but the card fronts are adhered down flat.  I used liquid glue to place the ‘thanks’ phrase in the middle of the card.  The ‘so much’ phrase was stamped on a 1/2″ strip of very vanilla, punched on one end with the bitty banner punch and raised up on dimensionals again.  The bitty butterflies are placed with glue dots.

The card bases and bag base were made with pink pirouette, not blushing bride.  I honestly liked how it looked together rather than blushing bride to match the glimmer paper.  Hard to tell sometimes why I like what I do, but that is how it worked out.  The bag handle was made with a bunch of satin ribbon, so very elegant.  And there you have it.

101_1298

Have a creative day!

Moana

Helping Me Grow

I do love to water color, that much is more than obvious.  Since spring is everywhere I knew I had to do some flowers like the ones I see everywhere.  How about lupin?  Pretty sure I spelled that wrong, but they are the prettiest wildflower, next to the poppy of course, that are growing all around this time of year.  My husband even recognized the flower on the card, and that is saying something.

4-13 (2)

I stamped the large floral image on my masked piece of water color paper in black stazon. The flowers were initially painted in marina mist, letting the ink run lighter as I went up the flower.  After, I added in hi-lights of wisteria wonder in the centers and across some of the petals.  The stems were done in pear pizzazz.  I did a touch more with the gold wink of stella to give it a sparkle.  That was both on the petals and the stems.  I know, it is hard to see in the photo, but it is there.

I painted the background in so saffron, allowing it to be lighter and darker just here and there.  I didn’t have a specific rule in mind, I let it happen.  I then used my aqua painter to drop clean water across the card to make water spots.  I let the drops sit there for several minutes then came back and dabbed them up with paper towels.  That removed ink and left the fun spots behind.

A simple bow across the front finished it off.  I used a piece of very vanilla for the inside.  I decided not to leave it blank and opted for a repeated image of the front.  Instead of black, I used so saffron stamped off and placed it right in the middle just like the front.  The idea is that it is light enough to be written over, kind of like a water mark.  It looks great.

4-13 (1)

Have a creative day.

Moana

Mother’s Day Take Two

Earlier in the year I made a couple of cards with this darling little chick from a sale-a-bration stamp set.  I instantly fell in love.  So did my mother.  I decided she needed to have one of her own and not just a card.

4-12 (1)

A prior paper pumpkin kit had this frame along with pretty little things to make a wonderful decorative gift.  I couldn’t make it for my own mother since she gets the same kits each month and I didn’t want to give her something she already had.  It sat upon the shelf for some time.  Until last night when I needed it, the frame that is.  I also used the wrapping cardstock and ribbon to go around it.  Now I will send it away for an early mother’s day gift.  She will be super excited.

The little chick was stamped in black stazon on a 4 x 4″ sheet of water color paper.  I started pulling ink pads until I had everything painted just like I wanted.  I did use my heat tool a few times along the way to set color when I wanted to layer another.  The yellows I let all blend together without worry.  But I wanted the cheeks to stay pink and tried to keep the beak a little more under control.  The shadow needed to be dried before the background was applied, but that is about it.  After I put a touch of marina mist for blue eyes I used wink of stella to give them some sparkle.  Just a fun little project to make my mom smile.  So fun.

4-12

Have a creative day.

Moana

They Say It’s Your Birthday

Fun, fun and fun. That is what this birthday card says to me.  When you have a fun paper that isn’t just masculine or feminine, you are fortunate.  This card can be for just about anyone, regardless of age too.  I call that a super win!  The series I started is nearly to an end.  I can’t wait to share the cute box I made to hold the whole dozen cards for the gift set.

4-3

The tag was made using the triple banner punch.  Dang, I sure do love that tool.  When it first came out I thought it was a bit excessive, but I gave it a try.  I use it so much.  It makes layered banner tags so easy.  This one was whipped together super fast, layered up on dimensionals, given a tiny ribbon accent and slapped in place.  Honestly, this was one super fast card.  Again, the paper is a win.

4-3 (1)

Have a creative day!

Moana

Thanks to You I Grew Up Loved

What a sweet, tender card.  I was thinking of my mother as I put this one together.  She is all about flowers and everything that go along with them.  As I shared this one with her, we shared a few tears.  Having a wonderful mother that helped you grow up loved is more than a blessing, it is an absolute treasure that we both share.

3-31 (2)

This lovely card showcases the dsp almost as much as the sentiment.  It is hard to decide which is the focal point, so I will call it a draw.  I stamped the sentiment on whisper white and punched it with the most narrow portion of the triple banner punch.  I then created a border of calypso coral and repeated the punching  to give a nice quarter inch boarder that tied the entire card front together.  After a lovely bow tied with seam binding ribbon I decided to put the tag on an angle.  It turned out so adorable and yet so simple.  One of my favorite ways to work.

3-31 (1)

Have a creative day!

Moana

Peek-a-boo to Someone New!

Adorable and adorable.  With a sentiment like this, any project is bound to look adorable. However, the dandelion puffs do help tremendously.  This is the third in a gift series focusing on one set of paper from Sale-a-bration and just one stamp set.  With a few punches and some ribbon I was able to create a dozen cards and a container to hold them. Enjoy them like I have.

3-26 (2)

One piece of paper for the card front, one tag layered with a scalloped background, and a simple bow.  I do think of a new baby with this card, but it could work for other situations I suppose.  There are several ladies in my life who are expecting little ones, so this just might get made a few times over.  Easy and fun to do.

3-26 (1)

Have a creative day!

Moana