Bloomin’ Night of Navy

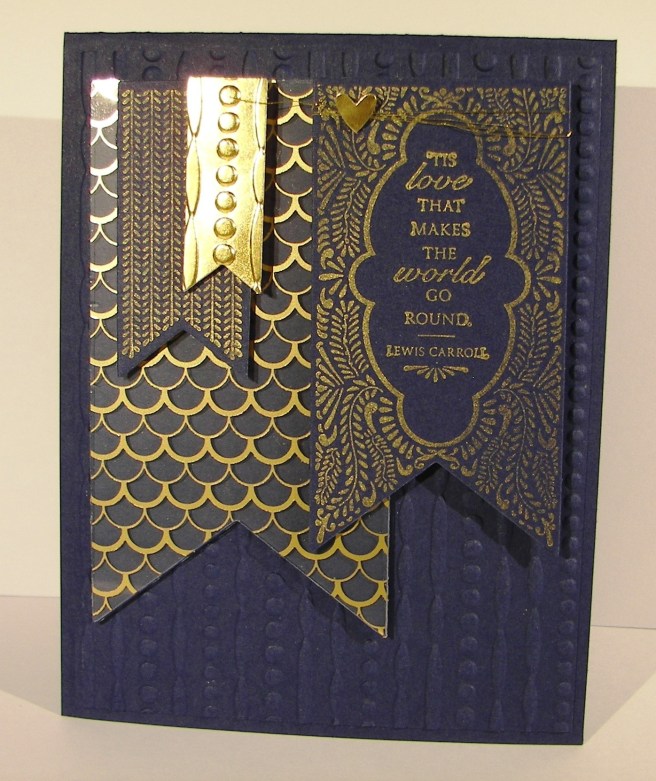
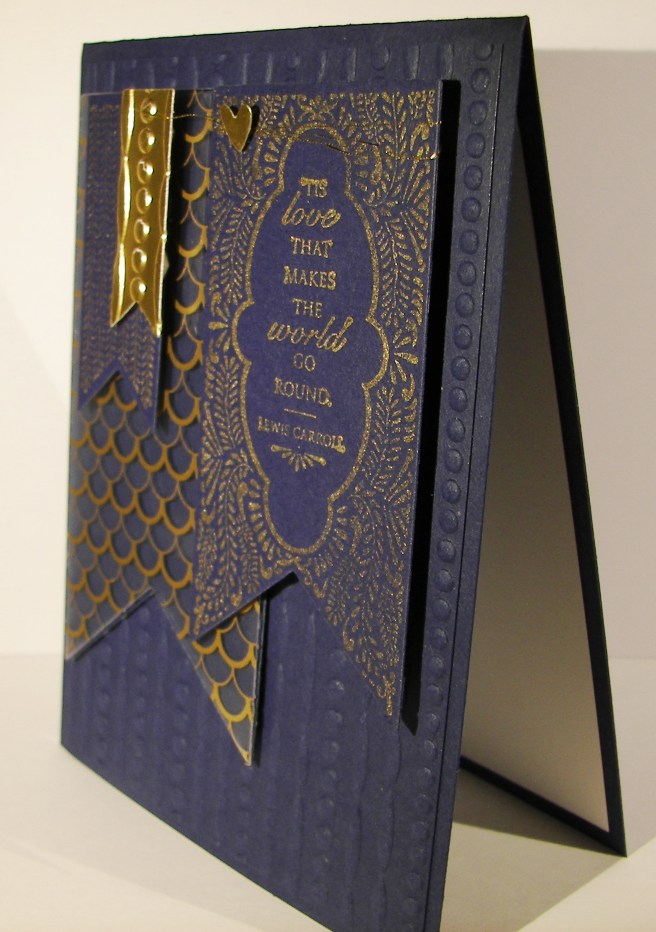
Working through a scrap pile can turn into something quite lovely.  This gold foil was left over from a Christmas card kit from nearly three years ago if you can believe that.  It worked well with another kit also left over.  Cleaning up and making a beautiful card, sounds like a win to me.

7-29 (2)

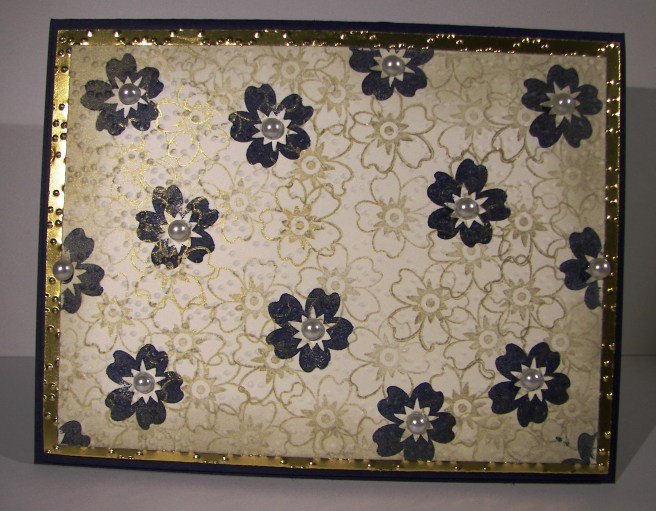
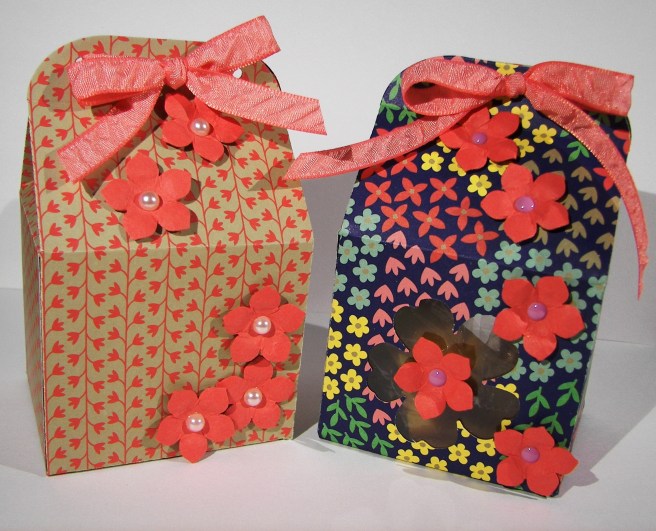
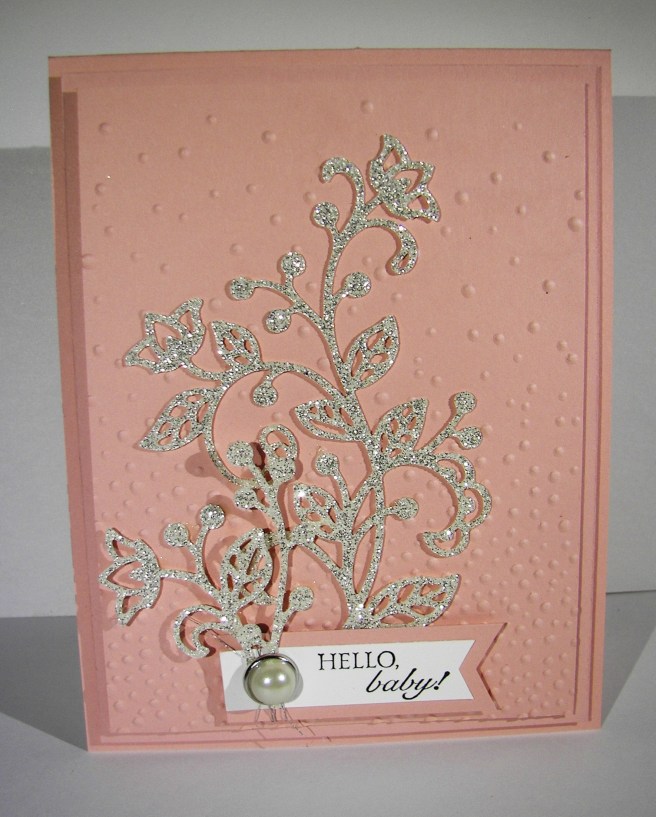
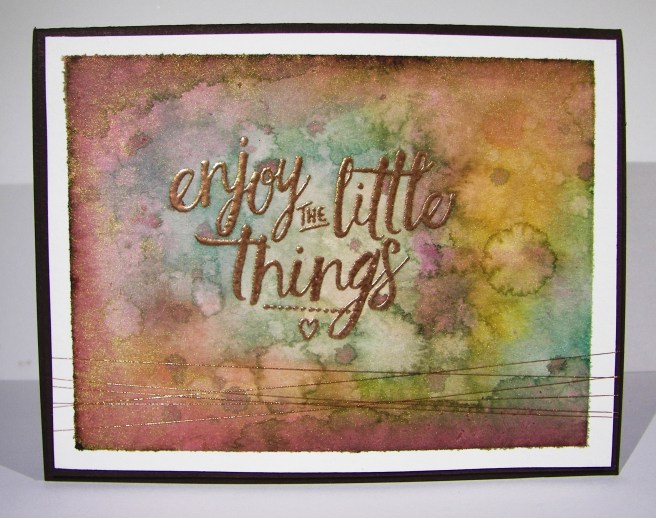
The card front was made with coordinating stamps from the Bloomin’ Love stamp set.  The solid flower was stamped first in night of navy fairly far apart.  That is a lot of dark ink there.  Then, with the outline stamp of the same flower I went all over the place using gold ink.  I knew it would even show up over the navy flowers.  I love the look of layered stamping.

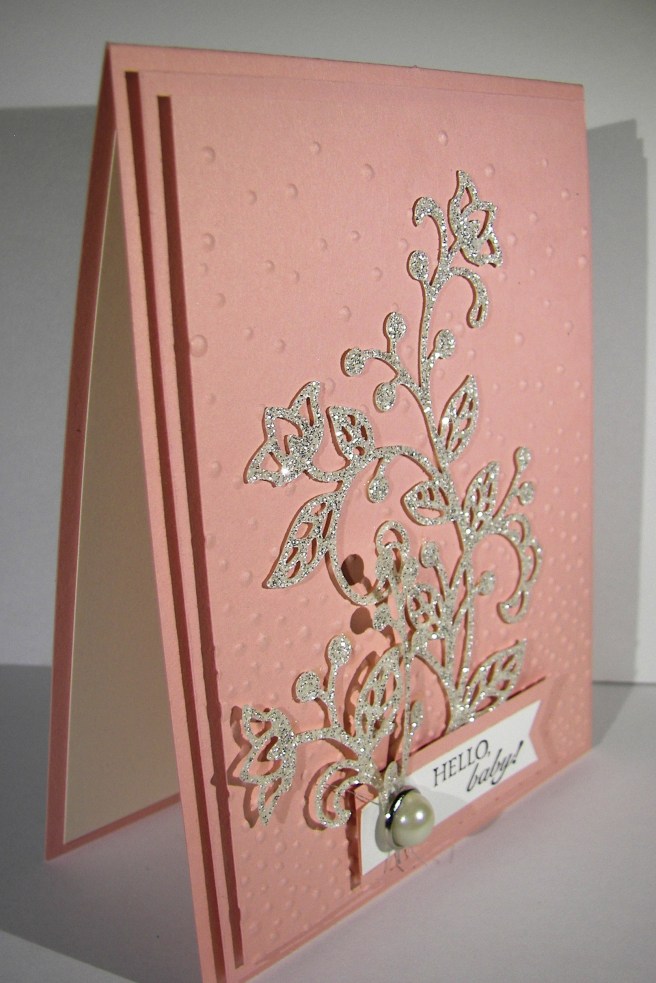
It wasn’t quite enough, so I continued with heavy sponging around the edges until I was satisfied.  The gold foil paper was put through the Big Shot using the elegant dots embossing folder.  A nice touch for sure.  Those two pieces were layered on top of another piece of night of navy and then placed on a navy card base.  The inside got a lighter version of the same treatment and I was nearly done.

I had to put a bunch of large basic pearls in the centers of the flowers, because I couldn’t leave well enough alone.  That ensured this would be a hand delivered card instead of mailed, but it was worth it.  They did have a difficult time sticking to the edge flowers that had already been inked.  But with a little first pressure they stayed put.

7-29 (1)

Have a creative day!

Moana

Love…

Okay, a little time off is nice, but that wasn’t my intention here.  Life took a busy turn and I am trying to get back on track.  I am out of town trying to enjoy time with my son and his new bride, help my oldest daughter with wedding plans, and manage a little bit of business as well.  I would like to say I am on vacation, but a bit too busy for that.  No fussing, just enjoy the love through it all.

7-28 (2)

This simple card was made from an extra kit from a workshop last weekend.  Simple layers, this is all about those layers.  I wouldn’t have paired this particular embossing folder with items outside of nautical items, but I loved how it looked.  I made a large set of cards to blog ahead with and had the intention of sharing them with my new daughter in love.  She is adorable.  Living in a university town there are plenty of weddings to attend, so that is the job of this particular card.  They actually have three to go to in the next month or so.  Busy.

7-28 (1)

Have a creative day!

Moana

Wishing You Brighter Days…

Some days can be filled more struggles than others and it can be difficult to find the bright spots.  Being creative each day certainly does bring a lovely balance into my life.  It allows me to grow, share kindness and even teach a few people along the way.  Very nice indeed.

7-22

I tried a different product.  If I am honest, I have had it on my shelf for some time, but hesitated to use it.  I typically am Stampin’Up! exclusive, but was given a gift from my oldest daughter.  Some Ranger distress inks.  So, they are very lovely to water color with. Luckily I have a few to play with, otherwise I might be tempted to get into those.  They react differently than the inks I work with.

These umbrellas though, how adorable!  I have seen images like these for so long, often with the one umbrella being red.  Flirty flamingo works nicely here as a nice contrast to the black.  I created six black umbrellas and a fancy one for the front.  The basic rhinestones come in a few sizes as well as three strings that are connected by adhesive.  One string was just long enough to travel along the bottom of the umbrella leaving two left over that I placed on the top.  The umbrella framelits have so many fun options to make one creative look after another.  It was kind of tricky to choose, but I managed.

7-22 (1)

I layered these guys around for a while before I committed to their positioning.  The back ones were adhered directly to the water color paper with the front umbrellas being raised up on dimensionals.  What a lovely card to share with someone needing a little lift.

Have a creative day!

Moana

Comfort & Healing to You…

There are so many talented people out there that love to share their projects like I do. Sometimes one will come along that I not only enjoy, but have to give it a try.  This project is a mix of a couple of different ideas with my own twist.  I do love how it turned out.

7-21

One of the projects I studied had the card base smooth, which was lovely, and no extra layers, just the circle tag.  The other had the same layers I used with a different embossing folder, but I didn’t want to use that one.  I decided on the brick wall folder, but thought it still looked a bit plain.  After it got a good sponging and distressing I was much happier.  I even sponged the die cut piece because it just didn’t match the rest.  A healthy dose of basic pearls finished everything off.

7-21 (1)

The inside of a card almost always gets a whisper white or very vanilla piece, but I went with the card front color of so saffron like another example showed.  The color is light enough to be written and stamped on equally well.  A very nice touch.

Have a creative day!

Moana

Beautiful Banners

Well, I certainly got distracted today.  Here it is nearly evening and I forgot I had this half way done.  Suppose I could finish it after all.  I was tempted to just skip today and save this for tomorrow, but let’s just share it.

7-20

This project was all about the foil designer acetate that came out in this years catalog.  Not until I gave in to use it did I discover it was gold foil on one side and silver foil on the other. I was pretty darn pleased if I say so myself.  I do think I will try this project again with silver, because I do think I prefer blue and silver after all.  But this certainly is lovely.

I used four different banner thinlits and two of the banner stamps.  The layering was simple, just a little patience while I sorted out the positioning.  Both the silver and gold encore inks are so beautiful stamped on dark card stock.  I do tend to prefer the look of embossing powder when it comes to metallic ink, but it did just fine.  Such a beautiful sentiment.

7-20 (1)

I started with the small banner cut in gold foil, but it was too smooth and shiny so I put it through the same embossing folder I used for the background paper.  And, it tied it together as well.

Such a lovely day of distractions, hope you had one too!

Moana

Yellow Brick Road

I have gotten a bit lost over the past few days over a different series.  It is a re-telling of The Wizard of OZ, very unique perspective.  It is actually a quite twisted tale of what happens after the story we all know.  Working with middle school aged children gives me permission to read young adult fiction and I must be honest, I love it.  This one is no exception.  Hence my yellow brick road card today.  Book three done, but it continues on…darn!

7-19

Either way, how about this fun, bright and cheery card!  Using my brayer to apply ink to the inside of my embossing folder really makes these bricks interesting.  However, I wanted more, so I distressed as well.  First, I gave the freshly inked paper a hearty spritz with water.  That got the ink moving nicely.  I knew I was going to work this over a bit, so I did start out with water color paper, quite necessary.  I added more ink with my aqua painter all around the bricks, sponged off with a tissue to lighten areas, then dripped water all around and dabbed to remove ink too.  Great look here at the end.

I also had a bit of fun with the tag.  I stamped and punched my sentiment on water color paper.  I then liberally rolled the edges and in a bit too in the ink pad.  Then I spritzed it too. That caused the ink to move to the middle, but not all of the way.  So much fun.  The leaf die cuts were smushed in the ink pad too and then spritzed as well.  Everything got the same kind of treatment.  It allowed a different but connected look for all of the elements.  Wheee!

7-19 (1)

Have a creative day!

Moana

Country Basics

This particular project really made me slow down and think.  My usual haphazard color selection just didn’t work out, as you can tell from the huge collection of colors I have listed. This might be the most color I have used on one project.  It ended up kind of cool in the end, but not sure what it will end up serving as.

7-18

One single stamp was the beginning, just the guitar.  The rest of the images were at the end and quite an afterthought to be honest.  I painted the guitar with cajun craze and the color adventure began.  I had thought it would have been fun to sew metallic thread in the guitar string area, but when I spent so much time on the painting I really wanted to walk away. Maybe next time.

Even though it can be a bit frustrating, it is also quite relaxing to work like this.  It also helps a lot with patience.  I know that if I just stick with it, eventually it will come together. Then, the next project doesn’t seem so daunting, because look at what I managed to pull out of the trash bin!

7-18 (1)

I left it clean of sentiment and all other embellishments.  The images speak for themselves and that guitar, I love that guitar.

Have a creative day!

Moana

Fear Not

This was something new for me.  I knew I wanted to have water colored bookmarks, but thought it would be smarter to make one large background piece and then trim it down to the sizes I needed.  Such a large piece of blank paper.  It was a bit overwhelming for some time.  Like the stamp says, fear not.

7-17 (1)

After a while I felt a little more comfortable, but not all the way there.  Distressing such a large piece was kind of confusing.  I stuck with it, dried it and took it to the cutting board. When they were smaller I knew they would be wonderful.  The edges got a gentle sponging along with light stamping from the same set.

Then a quick layering on elegant eggplant cardstock, the main color I painted with, and some new solid bakers twine to coordinate and it was all done.  These will be wonderful to share with the young women I teach.  Love those girls.

7-17 (2)

Have a creative day!

Moana

Marriage is a Journey

Time for something wonderful, like a wedding.  A white on white card with this much sparkle says wedding like nothing else.  It almost feels like a wedding gown.  So lovely.

7-16

The entire card was made from one sheet of heavy weight card stock, plus a piece of dazzeling diamond glimmer paper.  That stuff is so fantastic to work with, but I am a bit stingy sometimes.  This time, I put it to really good use.

The layers were simple, with just a 1/8″ border added along to each one.  I used the center of the glimmer paper to die cut the floral images I used to decorate the front and the inside. Since it was covered by the other layers, you can’t even see the holes.  Great use of paper.  I also stamped and die cut my sentiment from another layer of the white card stock that was covered as well.  Even with a card this glamorous you can still be practical.

I stamped the card front with versa mark ink, sprinkled with heat n stick powder and heated until it was ready to receive something more.  It was actually pretty by itself, but I did cover the freshly sticky flowers with iridescent ice powder and then heated again.  You can see how beautiful it looks.  Capturing sparkle on camera can be tricky, but not with this technique.  It is that much more in person, really beautiful.

7-16 (1)

Isn’t this sentiment set just so adorable for a wedding card?  I am looking forward to my 26th anniversary next month with my best friend, just fantastic!

Have a creative day!

Moana

Weather Together with Love

This is what I had in mind this morning, thinking of my recently married son and my soon to be married daughter.  Love is definitely in the air.  Then I read the news.  Seems like love is needed elsewhere today, and so much of it.

7-15

It doesn’t take a lot to show someone you care about them and sometimes it is the little things that mean the most.  Little treat boxes, little hearts, and a little love.  This kind of thing really brings me joy.  Something wonderful from something a simple as a piece of paper.  Yup, just one piece of paper.

7-15 (1)

The card was made with a half sheet, the front with one quarter and the box with the last quarter.  Hearts were stamped like crazy using the stamp from the weather together set. The word ‘Love’ also came from the same set.  I know I could have written it myself, but I don’t trust my writing all of the time and I wanted it embossed to really stand out.  After all, isn’t love the most important thing of all?

7-15 (2)

Have a creative day!

Moana

Affectionately Yours

One sheet of awesome designer series paper can really do so much.  These bakers boxes are made showing similar embellishments, cut from the same die cue, but just different sides of the paper.  That is one thing I really do like about Stampin’ Up! designer paper.  They are two sided, so even if you might not favor one pattern, odds are you will like the other side. I have not been disappointed over the years, so let’s keep that one going!

7-14

The bakers box thinlits die is so fun.  It also comes with a lot of other dies to add some fun, but I opted to not use them this time around.  I stuck with a floral theme throughout.  It has been a while since I pulled out my lovely little petite petals punch, such pretty little flowers. I like to give them a little texture by ‘coloring’ on them with a large rounded stylus on both sides.  Love that technique so much.

7-14 (1)

This one got two little pansy punch windows put in to show the treats inside.  I added small pieces of window sheet to keep the treats inside, but decided to add a flower to the middle as well.  Cascading flowers down a gift box really make me smile.  I guess that is why I have been doing them for so many years.  Flowers never go out of style.

7-14 (2)

Have a creative day!

Moana

You Are Awesome

The other day my daughter was wearing a fun pair of pants that were so colorful and had a bunch of fun patterns.  Every time I looked at them I thought I should make a card.  So, I literally went digging through her laundry to find them and give it a go.  Inspiration comes from a lot of different places, but the laundry bin was a first for me.

7-12 (1)

I went through my paper files pulling scraps of the different colors I wanted.  Most of the strips were fine, but some needed to be trimmed to give some diversity.  Once I had the color strips ready I cut a base from printer paper to adhere them too.  It was pretty easy to do because they were just stripes, nothing too tricky.

7-12

I used one of the elements from the butterfly basics set to put a few black stripes down as well.  The piece was then trimmed to 4″ x 5 1/4″ and put through an embossing treatment.  I was able to slide the piece around a bit lining up the patterns inside the stripes and along borders.  I liked that part quite a bit.

The sentiments were stamped and layered with more basic black, but something still wasn’t quite right.  The stripes were too stark.  So, I got my trusty sponges out and went at the whole card front with smokey slate ink.  It hi-lighted the embossed areas more and gave a bit of a distressed look.  That is what I needed and I called it done.

7-12 (3)

Have a creative day!

Moana

Hello Baby!

A good friend of mind is expecting her third child soon, a baby girl.  It was a huge surprise but it is finally getting exciting for everyone.  Thought it was about time I made a special card or two just for the occasion.  What is it about pink and sparkles anyhow?

7-11

I haven’t purchased much in the department of this years designer series paper department, nor do I have any current baby themed stamp sets, so I had to get a bit creative.  It may be on the elegant side, but I do like how it turned out.

I made a couple of layers of blushing bride card stock to add to the card base, with the top most layer being embossed for a little texture.  Love it! I then decided to break out the flourish thinlits set and cut a few of the images in glimmer paper.  Again, it was totally working for me.  When it came time for a sentiment, I really had to look.  I found this treasure in the beautiful banner set and thought it to be perfect.  The sentiment was layered on more card stock and both layers were edged in the banner style.  A little wrapping with metallic thread and one huge metal rimmed pearl later and I called this one done.  Yes!

7-11 (1)

Have a creative day!

Moana

Enjoy the Little Things

Yesterday was a very thoughtful day.  I was able to enjoy a day all to myself, which is quite rare in itself.  I had grand plans, a bit too grand, but decided to change them all around and enjoy it differently. This was one of my moments spent, a very indulgent chunk of time working ink all over this lovely card.

7-9

I was given some new paper and brushes for my birthday, so of course I had to get to work using them.  I took this beautiful paper to the brink of maximum absorption.  Sometimes it just takes more time to get the colors just the way you want them.  If you were to smooth your hand over the top of this card you would feel the difference in texture.  The edges of course kept their very smooth surface, but the inked area is actually raised up.  Cool, right?

I did start with the embossed phrase first.  Then I worked around the edges and started in with all of the color mixing.  This copper embossing powder is so fantastic, I absolutely love the color.  It gives a much more masculine feel and goes better with my kind of color pallet ideas for sure.  So, I basically just embossed my sentiment and then went to town on the ink til I was happy.  And I am so happy, so very happy with this one.  I tend to do my best work when I am creating for someone in particular, especially when that someone is my husband.  What more can I say?

7-9 (1)

Have a creative day!

Moana

My Happy Day

Yesterday was my birthday, and it was most certainly my happy day.  I made this project with that in mind.  Using my favorite go to ideas and things that make me happy.  Water coloring is awesome, both intricate and simple cards, and a myriad of other projects all bring me joy.  However, there is nothing more satisfying than a beautiful crisp gift box or bag.  I love making and sharing these, they really do bring me joy.  So I indulged myself a little bit here.

7-7

Using an entire piece of designer series paper goes against my “make it last” mentality, but it was my birthday after all.  So I pulled out a piece that I loved and created just what I wanted.  I like to maximize the height so it can hold more of whatever I have in mind.  This one did get a bit of switching around.  The top of the bag needed to have enough space to hold the large ribbon and bow I had in mind, so it ended up losing just a touch of volume, but it was well worth it.

This ribbon though…it is so very nice.  It looks great in a knot, a simple bow, and creates lovely larger bows just like this.  While I may hesitate using my paper, I do not hold back using ribbon.  I love large bows and could put them on everything.  Something I learned from my mother to be certain.  In a workshop situation I wouldn’t go this large, my ladies would just get frustrated trying to make it pretty.  Can’t have that, but since this was for me, I let it slide a bit.  Then of course a simple layered circle tag set, stamped off once and sponged around the edges.

7-7 (1)

Again, my favorite types of things.  Second only to sharing them that is.  The bow of course can just slide off so the box can be filled easily and used again.  I always try to make my gift bags and boxes that way.  They are too lovely to be used just once.  So, I make sure the recipient knows how easy it is to re-gift them.

Have a creative day!

Moana

Hang In There

Sometimes I am just so this little frog.  Good intentions, high goals and all kinds of good things seem just out of reach.  So, push on and hang in there.

7-6

I am absolutely in love with these jars.  The stamps and the framelits really are quite fun to create with.  I wish I had more time to sit and play, but the time I get is enough to keep me balanced.  I like stamping the jar in some blue tone, cutting it out and then cutting out another jar in velum to lay over the top.  It gives an opaque look and softens the stamping. I think I would like to use window sheets too, but for now I am all about the velum.

I painted this little frog with emerald envy and touched his eyes up with soft sky.  The fireflies were stamped in black stazon with the wings painted in soft sky and the body in gold wink of stella.  I love the sparkle.  You can’t see it, but trust me, it is so there. Adorable, just adorable.

7-6 (1)

I stamped a little of the frog in emerald envy just inside the card insert.  Kind of like he was peeking out a bit.  So there you have it!

Have a creative day!

Moana

Happiest of Birthdays!

Birthday cards for children are so fun to make.  I guess you wouldn’t have to put an age limit on these though, my oldest daughter would think they are just right.  Either way, these two bright and cheery cards will bring smiles to some darling little girls.

7-5 (3)

I used to make two cards at a time to show them differently, but I kind of got away from that.  I have had a request for some birthday cards and though it would serve well to make more than one.  I certainly had fun though.  I used a new stamp set and a couple of older ones that hadn’t come off the shelf for a while.

7-5 (1)

I was struggling a bit with the birthday block letters for a while until I decided to sponge the edges.  Sometimes the oldest techniques are the best.  I also did a bit of stamping off to get the different tones.  All of the shades were done from one ink pad.  The lighter rectangles were stamped off twice and the darker were stamped off once.  The letters were done full strength.  I do like these letters for sure.

7-5 (2)

Have a creative day!

Country Livin’ Rocks!

Living in the country has its perks, and wouldn’t this be just one of them?  I unfortunately do not have an adorable old truck like this, but it sure would be wonderful!  I will have to settle for the stamp and my imagination.

7-2

This image was stamped with black stazon ink on water color paper and then adorned with a whole bunch of ink colors.  I started with a pallet of six colors, but it didn’t stay there.  I ended up with ten, but it called for it.  That doesn’t include the colors that emerged from simple blending and colors flowing together.  This kind of work is my favorite.  No real rules, just lots of distressing.

The perfect companion to the card is the new copper metallic thread.  It almost reminded me of barbed wire or old fence wire.  I like a little of embellishment, but don’t want any distractions when I water color.  The thread works for me.  There was a touch of stamping on the inside panel.  The splat image from the perpetual calendar set with cherry cobbler stamped off once.  Yummy!   I do think it would be interesting to try and paint this stamp with flames and metallic chrome.  I will have to see on that.

7-2 (1)

Have a creative day!

Moana

It’s Your Birthday

Do you broadcast your birthday or not?  Well, I think birthdays should always be celebrated, even if you like it small, celebrate.  This is the kind of card that can certainly draw attention and that is totally what I had in mind.

7-1

The stamp set has the marquee image by itself and has different sentiments you can put inside the middle as well as the bottom arrow box.  It doesn’t have to be about a birthday, but that is how I chose to use it for the first time.  I kind of muddled through this project since I only knew I wanted to use embossing powder and a black card base.  Leaves a lot of steps to be followed, even if a bit off.

Most if the projects I have seen with this particular stamp set include stamping the image on different colored card stock papers, cutting the different parts out and then layering them to give a little diversity.  I wasn’t in the mood for that, so I went with my trusty water coloring.  I am not used to coloring around an image so specifically, but it all worked out pretty good in the end.

7-1 (1)

Touches of wink of stella helped make it the rest of the way, even though it is hard to see in the photo here.  Projects always look better in real life rather than photos, but what else can you do, right?

Have a creative day!

Moana

A Special Congratulations

When your daughter gets engaged it is a whole different feeling.  I don’t know how else to explain it, but it just is.  However, planning takes on a whole new level of excitement that is more than difficult to control.  Having two wedding receptions within seven months does slow you down though.  Creativity, don’t fail me now!

6-30 (3)

I finally broke out this bundle to see just what all the chatter is about.  Well, it is really that amazing.  I am going to have a ton of fun working this set.  So many bloggers have really done some amazing work so far, I am going to need to get to work to catch up.  I bet when my daughter sees this she might just get some shifty ideas about wedding invitations. Some things just aren’t fun when you have to make them by the hundreds though.  Perhaps the wedding invite and not the general reception invitation though, definitely manageable.

6-30 (2)

I went with metallic thread as to not distract from the detail of the die cut, but that won’t last long.  I see lots of different types and sizes of ribbon being wonderful here.  It makes me want to change this out right away, but I will leave it.  It matches the copper metallic embossing powder I used on the congratulations sentiment.  Simple and elegant.  Yummy.

6-30 (1)

Have a creative day!

Moana