Make a Wish

This last weekend was my card workshop and this was one of the projects we made.  Some of my ladies get intimidated easily, so I do try to keep it fun and simple.  This one fit the bill quite nicely.

3-20

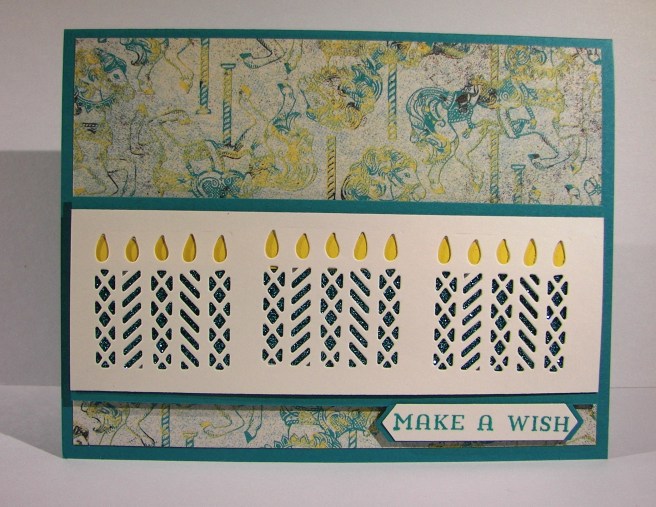
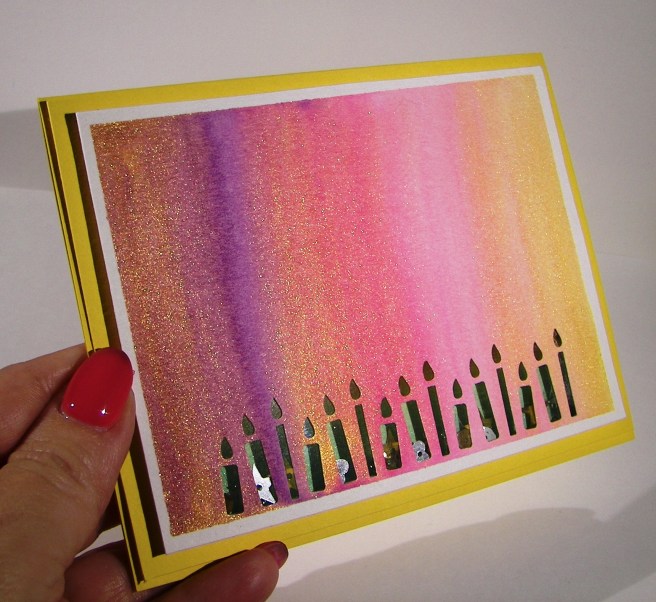
The card base and ink are bermuda bay, even the glimmer paper that is hi-lighting the candles.  That glimmer paper has been super fun to work with, I will be sad to see it go away at the end of sale-a-bration this month. I will probably get one more pack with my order this month.  Maybe it will be put into the new catalog this summer?  One can only hope.

3-20 (1)

I die cut the candle framelit three times along the strip of very vanilla and adhered a strip of glimmer paper and daffodil delight paper underneath.  Such a nice accent.  That little set was then added to another strip of bermuda bay for the top layer.  The sentiment was direct enough, stamp and punch, my favorite.

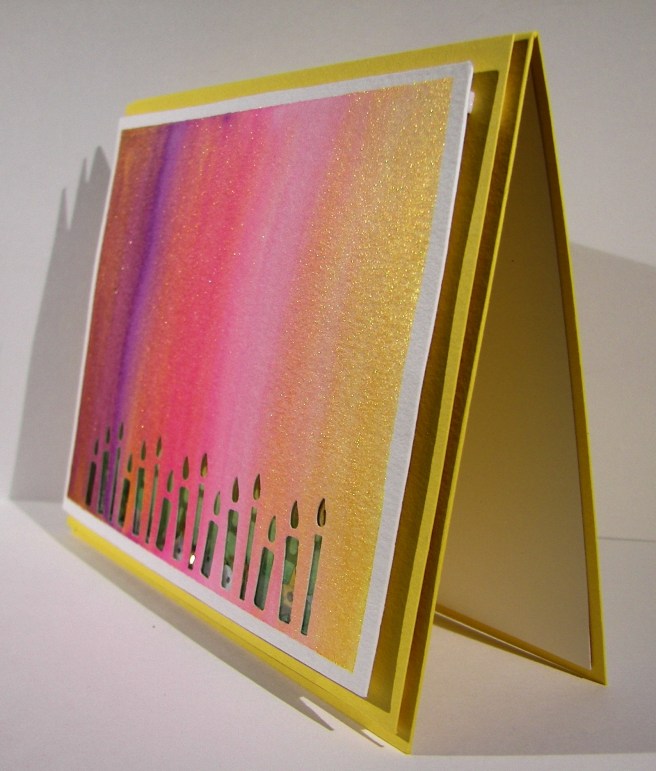
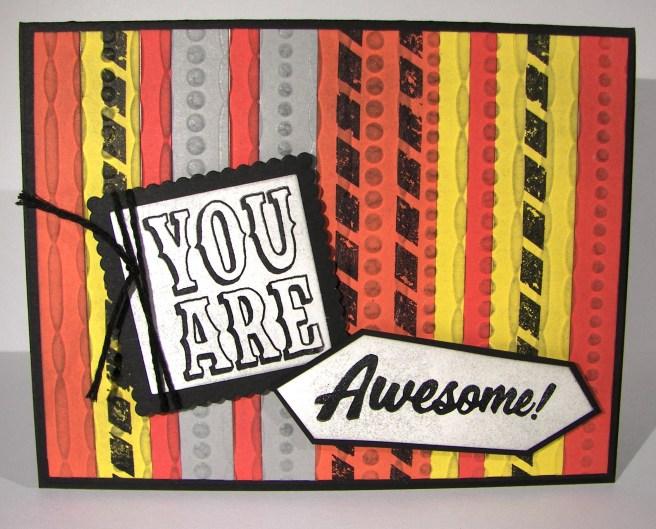
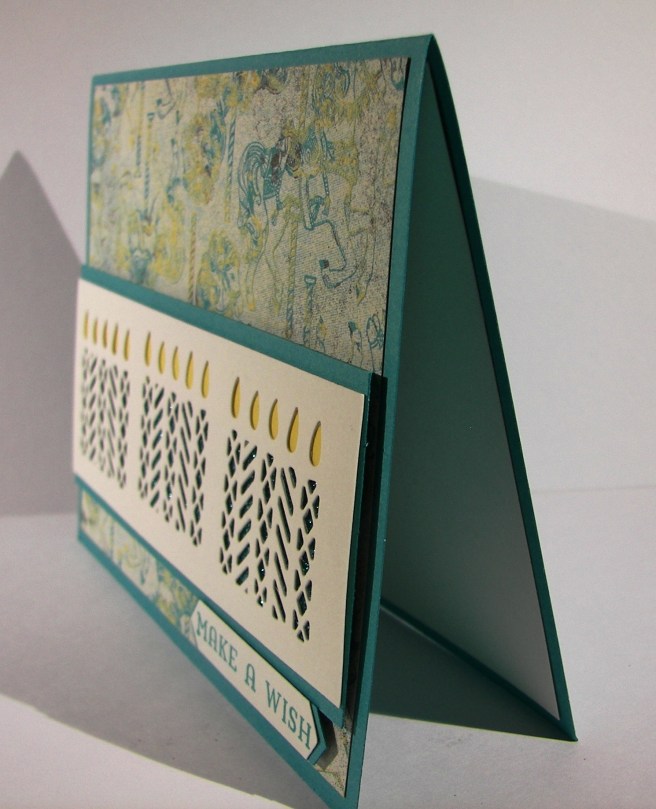
The background piece is from a great paper stack.  I must have used half of it so far.  That is unusual for me, I don’t always love so many of the patterns.  Yes for sure this time around. I gave the ladies several choices for their cards and they all looked so different depending on the background piece.  Fun stuff there!  The inside earned a stamping of ‘Happy Birthday’ from the coordinating stamp set, window shopping, because I didn’t like it on the front.  It was a distraction. Can’t have that!

Have a creative day!

Moana

Celebrate

A simple card can look quite complicated at the same time.  That is definitely the case with this project.  It is all about color, and only a few for the front.  That is the beauty of color blending, you always get more than you started with.

3-8 (3)

I grabbed a few distress markers from my stash that I liked together, a purple and two pinks.  I just scribbled them on a pallet and used an aqua painter to start painting wet on wet.  The purple was at the left, a bright pink in the middle with the lightest at the right.  I kept adding layers to each colors until they were vibrant enough and then began to blend. It was so fun to watch the pretty colors come together.

I had planned this card to be a shaker card with the candle border punch as a focus.  The inside color needed to contrast, so I chose green.  I tried to measure my coloring to have green candles with a yellow flame.  At certain angles you can see it, but not very easily. The acetate sheet distracts it, especially in the photos. I used liquid metal green and gold to give them a little extra sparkle.  Since the gold looked so nice I decided to do a quick overlay to give a lot of sparkle.  It worked wonderfully.

3-8 (1)

The shaker frame went just around the candle punch area and was filled with a small amount of sequins.  I think it turned out great.  I ended up stamping a birthday sentiment on the inside of the card because I couldn’t bring myself to add anything that would distract from the front.  With the candles there, it could be any kind of celebration card, I happened to make it a birthday card.

Have a creative day!

Moana


Crazy Cake with Balloon Adventures

Birthday cards are just the best!  This totally adorable stamp set builds one great cake, don’t you think?  And this card only shows about half of the stamps.  I love, love, love it!

1-18

The three bottom layers were done with two stamps.  Good thing they are photopolymer, or totally clear, for super easy placement.  There is no way I would be this patient or exact without great stamps like that.  And yes, the top stamp is a set of three candles that I stamped a little flame for each one.  Normally I don’t go for all the extra work, but I loved it and it was so easy!  Easy enough that I included this project in the lineup for this weekends workshop.

The embossing folder is another new product from the spring catalog.  It is shown with a bunch of manly stuff, and it is manly of course, but I loved it here too.  My daughter thought I should be stamping bees because it reminded her of a honeycomb.  Cute idea!

The sentiment is from another great birthday stamp set called Balloon Adventures.  Also from the spring catalog, but it has a great trick of its own.  That will be for another blog project for sure.  I stamped on a strip of cardstock and put the triple banner punch to work. Of course I had to layer it as well.  What is with me and layers these days?  Oh well!

1-18-1

I couldn’t resist.  I had to stamp all along the inside with those darn candles again.  And I didn’t even mind stamping all of the little flames.  I am telling you, it really was fun!

Have a creative day!

Moana

Blooms & Wishes

This stamp set sat in the annual catalog and teased me often.  I would try to pass by it saying that I surely did not need yet another floral stamp set.  Well, I broke down and bought it.  So very glad I did.  What a beautiful watercolor piece, right?  Great stamps make all of the difference.

1-15

I chose a few spring colors to work with, focusing on daffodil delight.  With all of the rainy, cloudy days we have had I wanted something bright and cheery. Mission accomplished for sure!  I stamped the large flowers from the set in different colors, stamping off as I went along.  The centers were all daffodil delight and more of an idea than a detailed center.  I sponged more yellow ink all around the flowers filling in most of the white areas before moving on to spritzing with water.  It was just a matter of managing the water spritzing to allow some ink movement, but not blurring too much.  It didn’t take long before I was satisfied.  A quick drying moment or two with my heat tool and it was ready for the sentiment.

That was stamped on a strip of velum cardstock and then wrapped around the bottom of the card front.  I used a lovely mint macaron satin ribbon to accent the bottom and layered it up with dimensionals.  Such a lovely spring card.  Of course I had to stamp a bit inside with a few yellow daisy images and one for the back too.

1-15-1

Have a creative day!

Moana

Hey, Chick, I’m Back!

Well, I guess that kind of sums it up!  With two children’s weddings within six months, and a heavy dose of regular life, I just found myself taking a few things out of my day to help get through it all.  I have so missed this, it really does help keep me sane and happy.  I have still created, but not at the same volume and just haven’t taken the time to share.  Enough of that, so I am back to stay.

1-12-17-2

What better way than to be greeted by this adorable chicken, right?  Last year during sale-a-bration there was a different chick stamp set.  Here is the new one, and it has taken my number one favorite spot once again.  There are others in the set, but this guy is the best! What makes it better than that?  The set is free with a $50 product order.  Free is cool, but I would have bought this one in a heartbeat.

1-12-17-1

I stamped the chicken in black stazon ink on water color paper.  I knew I wanted the feathers on top red and decided to make the tail feathers match.  It really was a painting process here.  That is usually how my water coloring goes, layer upon layer.  I put out my colors, real red, pumpkin pie, and daffodil delight, and painted until I was happy.  I used a black marker to add some wild feathers and then hi-lighted with gold wink of stella.  His little eyes were a bit tiny, so I used my marker to make them a bit larger.

The tag was stamped on a scrap of water color and punched with the classic label punch. The stamped area was smaller than the punch, so I punched it again on one side to shorted it up a bit.  One quick hole punch and a double wrap of gold and black metallic thread and I called it done.  The water color is adhered down with a heavy dose of fast fuse while the tag got layered up a bit with dimensionals.  I forgot to include a photo of the inside.  I tipped the chicken a bit sideways and stamped him as if he was peeking around a corner.  I lightly water colored him to match the front and just giggled.

It feels good to be back.  Now, to make sure I give myself time to enjoy this lovely process every day once again.  It will be tricky, but worth it.

Have a creative day!

Moana

Fruit Stand Delight

This project is a different take from a prior card I made.  The first one was a full water color card front, stamped and water colored.  This one uses the coordinating designer series paper with a single pear stamped and water colored.  I like the difference, and so did my card workshop ladies.  They are the best!

8-24

I added an extra layer, but the process was the same.  A single pear stamp in pear pizzazz, and water color the lighter areas of the image with daffodil delight and blend it together. The leafs and stem were done in garden green and blended a bit too.  The background was a light wash of daffodil delight.  Then, top the pear with a tiny bow of linen thread with a glue dot and grin at your work.  What a fun way to spend time with friends, making cards like this.

8-24 (1)

Have a creative day!

Moana

You Are Awesome

The other day my daughter was wearing a fun pair of pants that were so colorful and had a bunch of fun patterns.  Every time I looked at them I thought I should make a card.  So, I literally went digging through her laundry to find them and give it a go.  Inspiration comes from a lot of different places, but the laundry bin was a first for me.

7-12 (1)

I went through my paper files pulling scraps of the different colors I wanted.  Most of the strips were fine, but some needed to be trimmed to give some diversity.  Once I had the color strips ready I cut a base from printer paper to adhere them too.  It was pretty easy to do because they were just stripes, nothing too tricky.

7-12

I used one of the elements from the butterfly basics set to put a few black stripes down as well.  The piece was then trimmed to 4″ x 5 1/4″ and put through an embossing treatment.  I was able to slide the piece around a bit lining up the patterns inside the stripes and along borders.  I liked that part quite a bit.

The sentiments were stamped and layered with more basic black, but something still wasn’t quite right.  The stripes were too stark.  So, I got my trusty sponges out and went at the whole card front with smokey slate ink.  It hi-lighted the embossed areas more and gave a bit of a distressed look.  That is what I needed and I called it done.

7-12 (3)

Have a creative day!

Moana

Fiesta Like There’s No Manana

Here is one of the projects I made with my club ladies last Saturday.  Such a fun and interesting birthday card.  Plenty of color and who doesn’t just love an adorable llama?  Finally though, a project where I love the brightness of cucumber crush.  It is just one gregarious green there.

6-21 (1)

Framelit cutting made pretty darn quick work of the elements for this project.  A little stamping before and after doing the cutting.  The llama was really fun, but I felt he was a little on the whimsy side to worry about painting and making him look too real.  Besides, his teeth really aren’t accurate, they come from the bottom not the top like a bunny.  Still totally adorable though.  The banners were stamped afterwards though.  Since you can see through the photopolymer stamps there is not a worry to be found.  Fun and easy to do.

Everything was put on tipped one way or the other to add to the silly look.  Nothing about this card says slow down, just have a bunch of fun!  And my club ladies sure did.

6-21 (2)

Have a creative day!

Moana

Lots of Love

I had this little treasure ready for yesterday, but never got to share it.  I guess that is what happens when you are this close to throwing a reception for your child. And yes, that would be today.  I was obviously thinking about them and how sweet they are together.

6-11

This focal image is taken from a new host set called Love You Lots.  I am not usually one to go for whimsical images, but this set was way too cute.  I stamped these guys on water color paper and proceeded to take my time.  The background went through phases, several of them, then I finally just had to stop.  My girls were happy with how it turned out, but I am still a bit unsure.  Either way, here you go.

I wish I could just sit at my desk and water color my day away, but this household has a list of many last minute things to be done.  Some were pushed from other to do lists, but the day of the big event has things that can’t be done any earlier.  These are tasks of joy though, absolute joy.

6-11 (1)

Have a creative day!

Moana

City By the Bay

Wouldn’t you love a view of the city like this?  Well, my view is a whole lot more country, but I would one day love to be able to enjoy one like this.  I might have to settle for occasional holiday trips, but it would still be wonderful.

4-30

I put quite a bit of planning into this project.  I had to think backwards in order to keep the layers straight.  I embossed my whisper white piece with elegant dots and used the recessed side to make my ‘wall’.  I inked up my sponge and just pounced in here and there to create this look.  I kept going until it looked more like a textured wall than a piece of embossed paper.  The edges got sponged.

The hearth and home thinlit of the window was used twice.  Once to create the hole in the wall and again to make the window frame.  I glued the white one to the tip top taupe one with tombo liquid glue and nestled it back into place with the card front.  That way it looked raised up without a lot of fuss.

The skyline was created with the calling all heroes set.  It was stamped with black stazon onto water color paper.  The texture of the paper made it look really neat.  I went to work on the water line and then moved up to the sunset.  The windows were colored in with gold wink of stella, even though you can’t tell as much, they do sparkle.  That was centered in the window and got a heavy dose of dimensionals.  I am sure I could have worked it out easier if I had thought a bit more, but sometimes a creative journey takes a few extra turns.

4-30 (1)

Have a creative day!

Moana

June Weddings and a Sheltering Tree

Planning a wedding and the receptions to follow can be an exciting time, although very stressful.  Wanting everything to be wonderful, people to be happy, and a general feeling of love in the air.  Sometimes things, or even people, get in the way.  Everyone needs someone to shelter them from stress and frustration.  That is this tree this morning.

4-19 (1)

I am fortunate enough to have a son getting married this June to an absolutely wonderful woman.  It couldn’t be more wonderful.  The way this card looks is how I am attempting to transform my yard.  There will be other things too, really awesome stuff. but this look is all around.  My brain is full of wedding ideas these days.  No escaping it.

I stamped the tree base in black stazon and the leaves in mossy meadow.  The night sky is painted with night of navy.  I also painted the grass in mossy meadow.  I stamped sparkly flowers from the same set in versamark and added white embossing powder.  I added touches of daffodil delight around the ‘flowers’ to give them a bit of a glow.  They will be sparkly lights after all, and candles a plenty.  Wheeee!  There goes the wedding brain again.

I used tombo to glue the painting on another piece of night of navy card stock that has just a 1/8th” border.  Then that combination was layered onto a card base also in night of navy with plenty of dimensionals.  I left any sentiment off as well as additional embellishments. I couldn’t decide on any, so there you have it.

4-19 (2)

Have a creative day!

Moana

Mother’s Day Take Two

Earlier in the year I made a couple of cards with this darling little chick from a sale-a-bration stamp set.  I instantly fell in love.  So did my mother.  I decided she needed to have one of her own and not just a card.

4-12 (1)

A prior paper pumpkin kit had this frame along with pretty little things to make a wonderful decorative gift.  I couldn’t make it for my own mother since she gets the same kits each month and I didn’t want to give her something she already had.  It sat upon the shelf for some time.  Until last night when I needed it, the frame that is.  I also used the wrapping cardstock and ribbon to go around it.  Now I will send it away for an early mother’s day gift.  She will be super excited.

The little chick was stamped in black stazon on a 4 x 4″ sheet of water color paper.  I started pulling ink pads until I had everything painted just like I wanted.  I did use my heat tool a few times along the way to set color when I wanted to layer another.  The yellows I let all blend together without worry.  But I wanted the cheeks to stay pink and tried to keep the beak a little more under control.  The shadow needed to be dried before the background was applied, but that is about it.  After I put a touch of marina mist for blue eyes I used wink of stella to give them some sparkle.  Just a fun little project to make my mom smile.  So fun.

4-12

Have a creative day.

Moana

Gather Sunshine

It started with one stamp, ‘gather’, from the Seasonal Snapshot 2015 set.  I love it, just love it.  Then I began rooting around for word stamps or images that would go with it.

Gather Sunshine

I pulled out Crazy About You, because it has all of those phrases and word sets.  There it was, sunshine.  I immediately went to the Kinda Eclectic set because of the beautiful sunburst in it.  Great combo going on for sure.

Gather Sunshine

I wanted more than one yellow tone going on, so I have three.  The sunburst and the card base are So Saffron.  The base of ‘gather’ was done in Daffodil Delight and layered over in Hello Honey.  Sunshine was stamped in stazon and the inks were put away.  The paper layering is simple with a double layer of smooth whisper white put up on dimensionals.  No ribbon, nothing else, just clean and simple.  Not my usual style, but I rather like it.

Gather Sunshine

Have a creative day!

Moana

Thanks A Latte

Well then, how about these precious little cups!  Last Saturday a good friend of mine came over to paper craft with me and we just got out several of my paper pumpkin kits and went to work.  Some were partials and some were unopened, sorry to say.  Busy crafter here.

Thanks A Latte

But this one is actually the current July kit.  By itself it is absolutely adorable.  I really let myself play on this one.  The instructions showcase simple stamping and there you go, totally adorable.  I had to watercolor.

7-27

After making a lovely little wisteria wonder cup and a little plant set I knew I wanted to do more.  The next cup I took the flowering stamp, it could be a plant but I made them flowers, that would have been the plant growing out of the cup.  I created a pattern on the cup with it, colored them with markers, and then went to town with my aqua painter.  The cup is a little more than an inch square.

7-27 (2)

The new flowers were punched with the floral punch from the itty bitty accents punch pack and the stems were from variegated embroidery floss.  A bit tricky to put together, but lovely at the end.

If you have ever thought about a paper pumpkin subscription, just look at how much fun you can have with them!  There was enough material to make eight cards in this kit, plus totally adorable envelopes.  And, I now have the so cute stamps that came with.

Have a creative day!

Moana

Remarkable You

I think going on that pioneer trek took a little more out of me than I thought.  I tried to sit down at my usual 5:30 this morning, but I could hardly focus.  Time to get into a good summer routine.

Remarkable You

I absolutely fell in love with this stamp set when I saw it in the catalog.  The floral images are so elegant.  They cover several of my favorites.  I had to use this one first, because it is my absolute favorite.

Remarkable You

I started by stamping the image in garden green.  I got out my aqua painter and drew in the color for the stems and some of the outer lining.  I brought in daffodil delight and hi-lighted with so saffron.  Just a touch of color there.

Remarkable You

I used the oval framelits to make my layers with the third largest for the flowers and the second largest for the frame.  I stamped and sponged and put everything I could up on dimensionals.  I tried out the triple banner punch and it works like a champ.  That is going to get a lot of use.  Finally, I hid my glue dot under the velum with a rhinestone.  I used a section to curve around the top left of the frame and called it done.  I didn’t even stamp inside!  Scandalous,  I know.

Have a creative day!

Moana

Happy Father’s Day!

What more do you need to say than that?  I guess there are too many words to include in such an important day as this, but a card can only hold so many.  It is a special occasion, so I did a little more than normal for this project.

Happy Father's Day!

A friend of mind recently stepped out of her front door to a scene similar to this card front.  Of course hers was more accurate, and with a lot more trees, but you get the idea.  It was a beautiful sunset and I couldn’t wait to put it in a card somehow.  It worked out and was fun to arrange.

Happy Father's Day!


I hope you are all enjoying this special day in the way you would like.  We are actually all over the place, but doing good things either way.  I love all of the dads in my life!

Have a creative day!

Moana

Wildflower Meadow Watercolor

How about waking up to a ray of sunshine?  This feels like a spring sunrise.  The kind you wish you could get lost in, or just put on pause so you can stay there.

Wildflower Meadow

I was sulking over my blendabilities tragedy and wanted to play with color.  So I pulled out some watercolor paper and decided to make a mess.  I picked my colors, mushed some ink from my pads onto wax paper, sprayed them with water and started putting my paper on it to make patterns.  Those colors were too dark, so I switched to the ones you see.  Soft sky, daffodil delight and blushing bride.  I repeated the process and the colors were just right.  I dried it with my heat gun because I have no patience, sheesh…

Wildflower Meadow

I then stamped the wildflower meadow stamp in black stazon and went for it.  I love the texture that shows through the ink.  I finished it off with a tiny stamp from the Tap Tap Tap set to just say “hi”.  I used the tiny oval to punch it out, inked it and backed it with another oval punched in daffodil delight.

Wildflower Meadow

A healthy smattering of basic pearls and a big hug in seam binding ribbon and this guy was ready.  I raised it up on dimensionals and called it done.  Kind of simple, but has lots of interest at the same time.  Give it a try!

Have a creative day!

Moana