Celebrate

A simple card can look quite complicated at the same time.  That is definitely the case with this project.  It is all about color, and only a few for the front.  That is the beauty of color blending, you always get more than you started with.

3-8 (3)

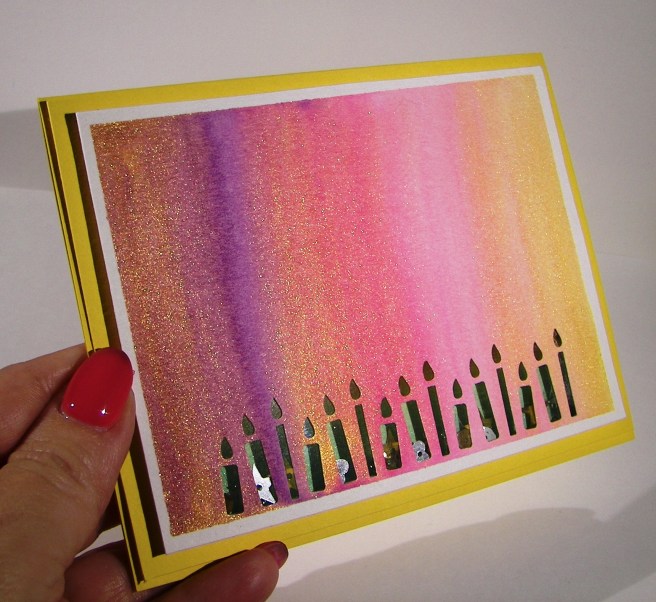
I grabbed a few distress markers from my stash that I liked together, a purple and two pinks.  I just scribbled them on a pallet and used an aqua painter to start painting wet on wet.  The purple was at the left, a bright pink in the middle with the lightest at the right.  I kept adding layers to each colors until they were vibrant enough and then began to blend. It was so fun to watch the pretty colors come together.

I had planned this card to be a shaker card with the candle border punch as a focus.  The inside color needed to contrast, so I chose green.  I tried to measure my coloring to have green candles with a yellow flame.  At certain angles you can see it, but not very easily. The acetate sheet distracts it, especially in the photos. I used liquid metal green and gold to give them a little extra sparkle.  Since the gold looked so nice I decided to do a quick overlay to give a lot of sparkle.  It worked wonderfully.

3-8 (1)

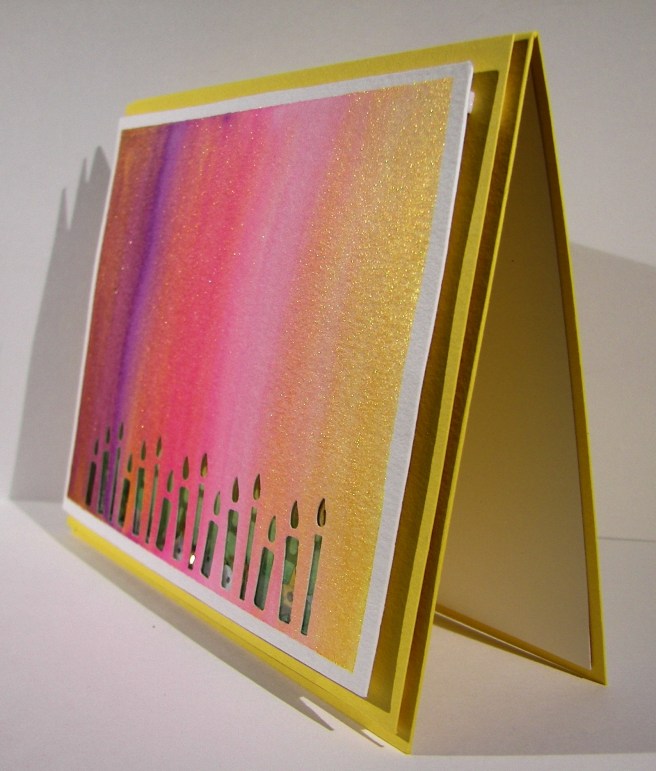
The shaker frame went just around the candle punch area and was filled with a small amount of sequins.  I think it turned out great.  I ended up stamping a birthday sentiment on the inside of the card because I couldn’t bring myself to add anything that would distract from the front.  With the candles there, it could be any kind of celebration card, I happened to make it a birthday card.

Have a creative day!

Moana


Nailed It!

How about a tiny tool kit for a gift bag?  These tool framelits are so fantastic, they really just make me giggle. This set is a little more elegant than others, but I still found myself playing with them before I put them in place.  I realized this photo makes it look like it could be a card, but it is a gift bag made from half a sheet of cardstock.  The tools were die cut from a piece of water color paper that had been painted with several ink colors and some liquid metal colors as well.  Love that look!

3-2

I tried to keep the whole hexagon theme going on here and it turned out nice. The paper is so great it speaks for itself.  What a great set of paper, really.  This piece is foiled and heavier than the others.  After I die cut the large hexagon piece, using a die from the same set, I embossed it for another layer of dimension.  The sentiment background was cut from another piece from the same set.  The classic label punch worked pretty great for the actual sentiment and kind of nestled as well.

A bit of ribbon for the handle was all it took.  I was trying to give it the look of a bucket handle.  Not sure if that happened, but it looked pretty good. The large hexagon was placed before the tools, raised up on a couple of dimensionals.  Then I just started wedging the tools in place and squished some tombo glue underneath to keep them in place.  Fun!

Have a creative day!

Moana

Elegant Botanicals

I started this lovely project yesterday, but got distracted by a shopping adventure with my mother-in-law and two sister-in-laws.  The weather was terrible, but the company was great, and who doesn’t need a shopping adventure once in a while!  This was waiting for me though, and I couldn’t wait to finish it.

2-21

On Sunday I created some favor handouts for a church lesson I taught and they were so cool. Nothing like this card, but the paper I painted for the die cuts had left overs I knew I could use again.  That is where all of these flowers came from.  Yes, a scrap pile.  You never know what those scraps could turn into.

I created a simple background with three liquid metal colors wet on dry.  They were too stark, so I gave a water wash over the top and was much happier.  I had some accidental splotches happen, so I gave a bunch more to disguise them and called it good.  Then the placement of all of these flowers.  Phew, it took some time.

I first layered the flowers together with different sized floral pieces and began my arrangement.  After I was done I began to adhere them down.  Since they were die cut from water color paper they were more pliable, even kind of molded.  The leaves really looked great with some curling and bending.  Little by little the arrangement came together.  Some pieces were adhered with dimensional foam, some with glue dots and several with tombo liquid glue.  Again, no worries because of the weight of the paper.  So very liberating!

I layered the front on another piece of water color paper and repeated the choice again for the card base itself.  It looks so clean and elegant.  It isn’t always easy to capture the different elements on camera, but this didn’t turn out too bad.  Just look at all of that metallic shine.  It took a bit of time, but was absolutely worth it!

2-21-1

Have a creative day!

Moana