Cloud Nine Birthday

Birthday gift sets really make me smile.  I love everything have a theme and coordinating, very satisfying.  Another workshop project all ready to go.  Should be a large group and this will be the detailed project for sure, not a hard one, but a bit time consuming.

2-10

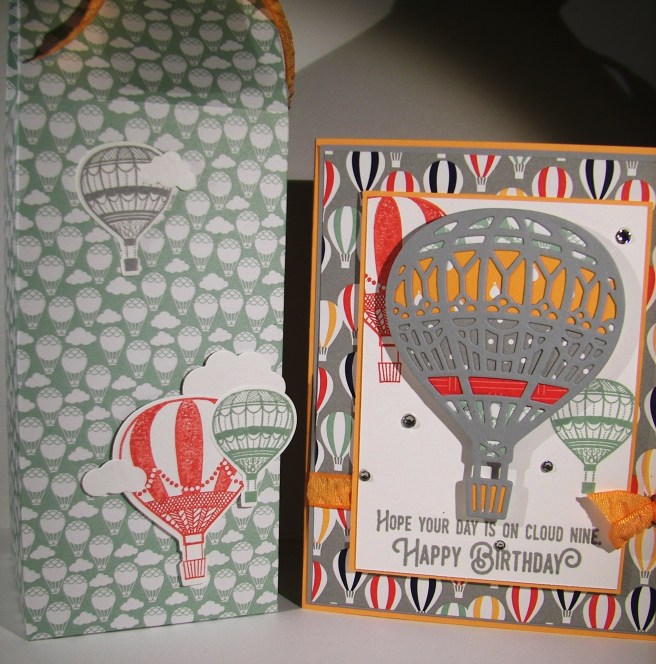
I have found myself staying away from peekaboo peach because it is so bright.  Almost too bright for my taste.  So, I thought I would take it head on and go for it.  Also, this main pattern of designer paper overwhelmed me like crazy.  Keeping the view controlled really made a difference and I love how it turned out!  Of course it helps to have such a wonderful die cut to focus on.  These balloons are so great.

2-10-3

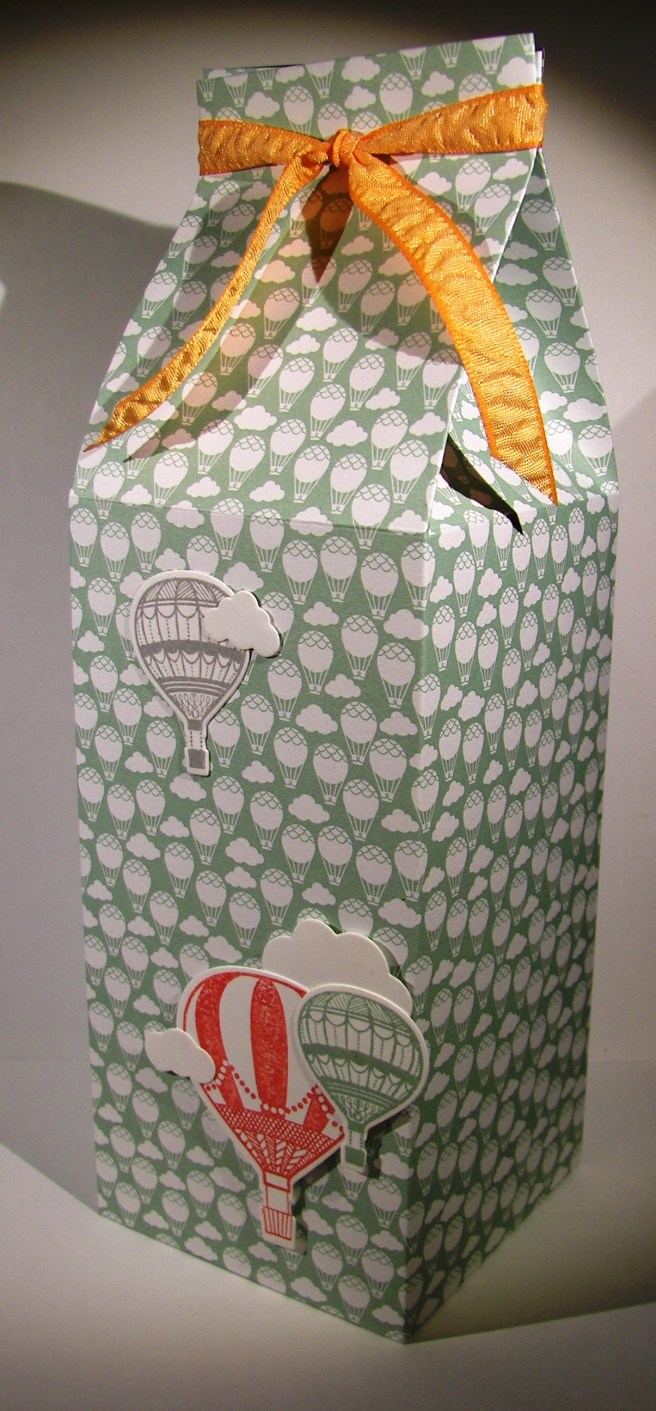
The matching gift bag used a whole sheet of paper.  I do try to use and not horde fun paper and this is one of the ways to do that.  Just use it!  It is a bit of therapy for my card group too, they aren’t the best about using up their paper either.  We all need a nudge now and again.  The gift bag is simple, letting the balloon accents take front stage.  The ribbon is a nice accent, but really just a closure.  No bow or focus up there, letting it all fall around the balloons and clouds.

2-10-1

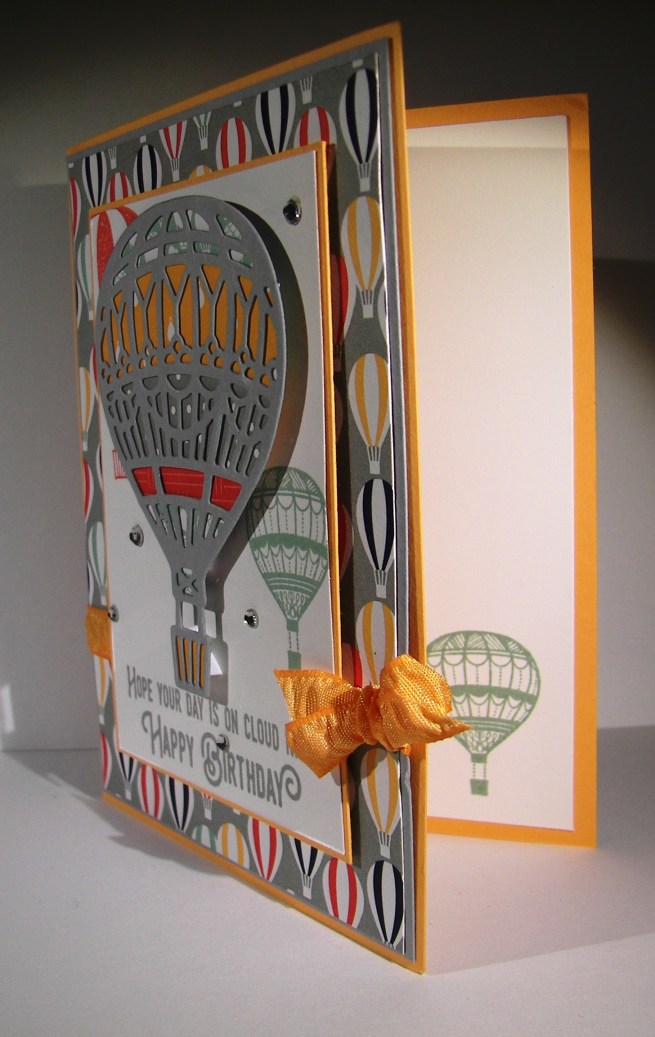
While this card requires some patience, I think it is worth it.  I love how the die cuts let me decorate the balloon as I would like.  I simply used portions of the same designer series paper that was more solid to fill those spaces.  That way it really coordinates well. I used tiny dots of tombo glue on the back of the balloon to adhere my pieces.  That way I had some wiggle room to put them just where I wanted.  I also used foam adhesive strips to layer it up.  That way there was an extra bit of adhesive to keep those pieces in place and the balloon got extra lift, more height than dimensions alone offer.  I thought that to be appropriate.  I didn’t plan on using basic rhinestones, but I had a tiny dot of ink in a spot I couldn’t get past, so I covered it up.  Job well done!

Have a creative day!

Moana


Suite Sentiments

Mornings don’t always go as planned, and that is okay.  This set of cards was ready to go, but I had to choose to be on time for my carpool, or blog.  Blogging in the afternoon can be good too, just not my favorite.

1-24-2

I wanted to use the cupcakes and carousel dsp stack for the focus on these cards.  The colors are so great.  They make me feel like having sherbet or frozen yogurt.  Yummy.  So I used two pieces of paper, trimmed them to size and used the extra pieces to accent the other.  Great way to use up the paper and get two cards done at once.

Suite Sentiments is an awesome stamp set.  So many great sentiments ready to be used, and all occasions covered too.  I went with a little more groovy ones to go with these odd colors and liked it.  I simply stamped with black stazon on velum cardstock and layered everything together.  All good and pretty darn easy.

1-24-1

Have a creative day!

Moana

Fear Not My Friend…

When I am wanting to convey more emotion in a card, I go directly to water coloring.  The softness it creates is perfect.  And with this card, I literally poured my heart into it.

8-20

I wanted more space to work with so I created a larger card than normal.  This one measures 5″ x 6.5″.  Big, but not too big.  I also created my inside writing panel at the same time.  This card wasn’t going to just get a blank insert, or even a nicely stamped one. Besides, I love writing on water color paper, so very satisfying.

I stamped my floral image and sentiment first so I could control the strength of color where they were.  Then I brushed the papers with clean water to allow plenty of color movement. I kept the background light and tried to keep mixing to a minimum.  The colors I choose don’t always blend nicely, but that doesn’t stop me.  I dried, distressed a bit, and dried until I was happy.

I painted the flowers with strong color, allowed them to dry clean.  Then worked them over properly.  This included adding, dobbing, and adding color on the flower petals for a bit.  I centered the flowers with a strong yellow, but kept the color from the edge of the flower center.  Then I hit that area with a water spritzer and watched the flower bloom all over again.  The color moved nicely and then was dobbed some more.  Gold wink of stella was brushed into the petals and blended with water again.  The overall effect was lovely.

A special card for a very special friend.  She is far more brave than I can imagine.

8-20 (1)

Have a creative day!

Moana

Building With Peekaboo Peach

The last days of summer are waning and I love spending a lazy morning with my youngest. We have had more laughs than tasks done, but I wouldn’t have it any other way.

8-4 (2)

I very much enjoyed giving myself a bit of a challenge with this one.  Working with one color can seem limiting, but can turn out more lovely than you might think.  The tone on tone stamping certainly made a difference and I think it is my favorite part of this card.

The floral die cuts did get put through some distressing with a large tipped stylus and a foam mat.  It helped lift them off the card front without obvious creases.  A simple yet effective technique.  I work the back side of the flower first then turn it over and hit the center.  It curls wonderfully, give it a try.

I hid my adhesive under the flowers and ribbon since it is not an attractive part of using velum card stock.  The inside of the card also got a bit of stamping to tie it together, but that was about it.

8-4 (1)

Have a creative day!

Moana

I am Much More Me When I’m With You

What do you do with a huge pineapple stamp?  Well, just about anything you want I guess.  I loved it, but probably had more questions than answers.  This is definitely one of those answers.  I asked my daughter to pick out a stamp from my stash of new product and give me a color.  She chose light green and this stamp.  Sometimes you just need a nudge in the right direction to get moving.

6-24

Yesterday, and well into the evening, I spent my time helping a good friend with a wedding photo shoot.  You never know how much you are needed, but judging how tired I am today, it would have been so hard for her without me.  And of course we had an absolute blast.  We work nearly seamlessly together, another plus.  I thought this would suit us nicely.

I went with light water color washing using only two colors.  I wasn’t sure how they would blend in the middle, hoping it wouldn’t make some kind of brown.  It turned out great.  I opted for minimal distressing and one single stamping.  The leaves needed a bit, so I used my aqua painter to blend them a bit, but left the pineapple pattern alone.  I stamped it again on the inside, but more in the corner for more interest.  Good stuff there!

6-24 (1)

The tags & labels framelit set fit perfectly around the sentiment and provided the perfect place for my favorite ribbon.  A few of the new enamel dots found there way as well.  The card front and inside panels were both layered with an additional piece of pear pizzazz card stock and the front was popped up with dimensionals.  There you go!

Have a creative day!

Moana

Artistically Asian

New stamps, new stamps, new stamps!  I love having new stamps!  This particular one caught my eye right away on my first browse through this seasons catalog.  I could easily get lost exploring the possibilities, there are so many.

6-17

But, I am totally in the mood for water coloring, so what else would I turn to just now?  I thought some of the new in-colors combined with gold would compliment the Asian feel of the stamp set.  And, I absolutely agree with myself.  Good thing too…

Flirty flamingo is the card base and the main color I painted with.  These colors go so very well together.  I used a lot of water and kept the color light building the intensity but not overdoing it.  Experimenting with this kind of painting is really something you just need to sit down and do it.  I have learned some things that work better for me, and of course there are tons of very talented people online that generously share their techniques to learn from.

I did stamp over the floral image again with both flirty flamingo and gold encore ink.  I wasn’t looking for a particular effect, just more of the image itself.  Then I hit it pretty hard with the gold wink of stella brush pen.  I accented the image quite a bit then followed along some of the water mark lines.  They ended up giving me a bit of a mound for the plant to rest on and maybe an interesting mountain or two in the background?  That wasn’t the intention, but I keep seeing that when I look at it.  Judge for yourself.

6-17 (1)

Have a creative day!

Moana

Thank You, Friend

Did I take a few days off?  Well, not really.  My son recently got married and just last weekend we had a reception in our backyard to celebrate.  I thought I could keep things going, but I just had to get a bit more focused. Family always comes first.  Then you have the lovely friends that support and make everything come together.  I have several such friends and I couldn’t be more grateful.

6-14

Could these two adorable friends be any more wonderful?  They come on one stamp and make the perfect pair.  I decided to put several of the new in-colors to work to show them off.  The elephant is painted in sweet sugarplum, the mouse in peekaboo peach and the ground painted in emerald envy.  The sky background needed something different, so I went with soft sky.  Yup, just what the card needed.  Nothing else was needed, no ribbon, no distressing or anything else.

I mounted the water color on a separate piece of sweet sugarplum cut to provide a narrow 1/8th inch border and then raised up on dimensionals.  This is just the type of card I would love to get, but even more, love to give.

6-14 (1)

Have a creative day!

Moana