Open Me Already!

These two guys do nothing but make me grin!  I haven’t used them together before, but here they are in all their glory.  Also, I changed up the big monster by turning his closed eyes into eyebrows and giving him some google eyes as well.  Thought that was cute.

4-4

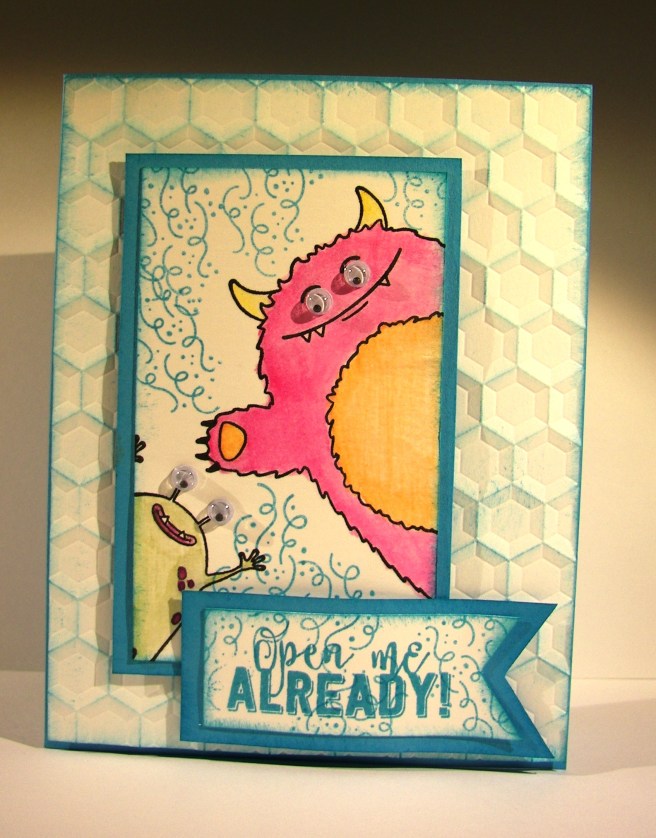
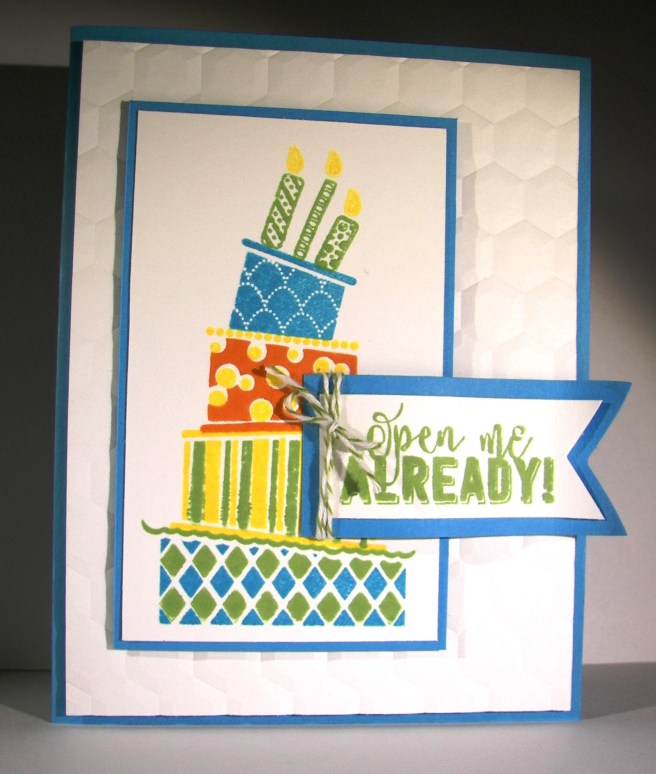
This kit was a birthday card and I think this one could work for that as well.  But any type of celebration could enjoy a project like this.  The hexagon dynamic texture embossing folder got to work in a different way.  I used the debossed side, the normal version has the hexagons raised up instead of recessed.  To bring in a little color I lightly sponged over the top of the embossed paper and look what happened!  What a great effect.  Also, I couldn’t wait to get my chicken stamps back out and use this background like it was chicken wire.  What a fun find.

4-4 (2)

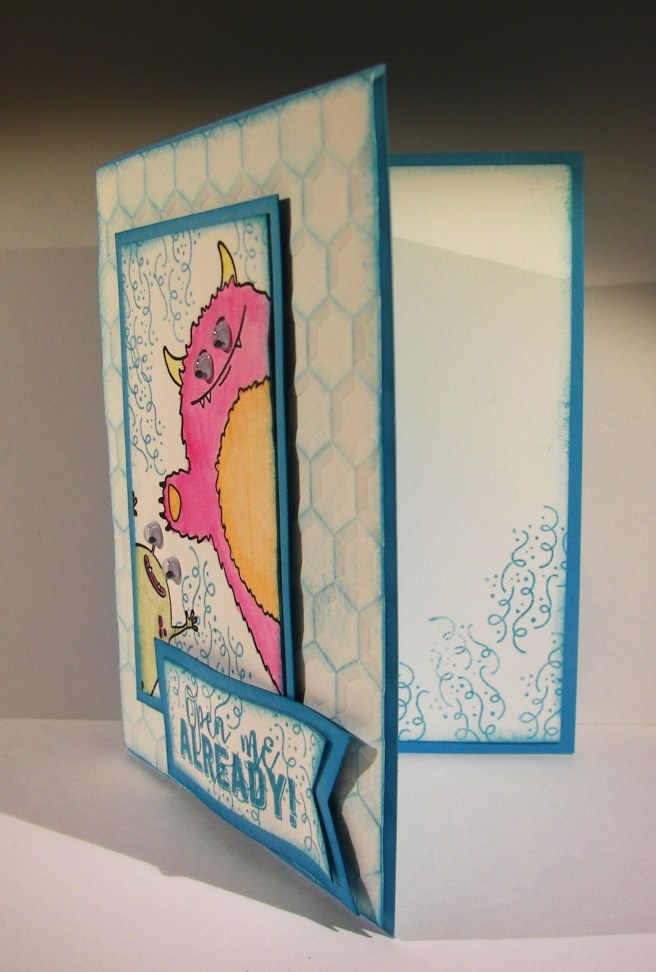
The confetti image from the balloon adventures stamp set really got some work.  It was used on the sentiment tag, the card front as well as the inside.  Pretty darn fun if you ask me.  I have another one of these kits left, I think I will get that put together pretty quick.

Have a creative day!

Moana

Everything Will Be OK

Where did yesterday go?  Well, just about everywhere, and it was a good kind of crazy.  I did create this little duo for yesterday, but really didn’t have time to sit down and share it. Oh well, it will work for today as well.

2-8

I had begun with a totally different card in mind, totally.  It wasn’t working, so here we are. The designer series paper was the only original idea that stayed put, so that became my focus.  The urban underground set is so cool.  I used one side for the card and the other to decorate the matching bag.

The stamp duo is from a free Sale-a-bration set called Designer Tee.  It actually has ten stamps, cool!  The problem came when I decided on the stamps actually.  They were too small to be by themselves and the paper wouldn’t lend my go to floral options.  It took longer for me to get it together.  But it got there!

I love embossing folders, but sometimes I forget myself.  When embossing velum card stock I use a lower tab on my big shot base, but forgot.  It embossed so deep there were some actual tears along part of the pattern.  They got put to work in making the tag look a bit more creative. I will have to remember that.

2-8-1

I also do love to use one half of a sentiment on the card while placing the other on a gift bag. It really makes for a nice gift.

Have a creative day!

Moana

Thanks For the Smile

I love using stamps and paper in a way that creates a new vision.  This background paper comes from a lovely set of paper called Falling in Love.  This particular sheet is actually an artistic view of glitter.  When paired with this amazing dragon fly stamp, from Dragonfly Dreams, is looks like a shimmery pond and sunset.  Wonderful.

1-30

The dragonfly was stamped three times on the front and once on the inside.  That is it.  I used basic black archival ink to give this strong, rich look.  Awesome!  The same ink was used on velum cardstock for the sentiment.  I used the triple banner punch to make this layered tag and wrapped it with some of the free ribbon I earned from my last Sale-a-bration purchase.  Love that stuff!  I hid my adhesive on the ribbon.  I used glue dots, small, strong and easy to hide.  And there you go!

1-30-1

Have a creative day!

Moana

Crazy Cake with Balloon Adventures

Birthday cards are just the best!  This totally adorable stamp set builds one great cake, don’t you think?  And this card only shows about half of the stamps.  I love, love, love it!

1-18

The three bottom layers were done with two stamps.  Good thing they are photopolymer, or totally clear, for super easy placement.  There is no way I would be this patient or exact without great stamps like that.  And yes, the top stamp is a set of three candles that I stamped a little flame for each one.  Normally I don’t go for all the extra work, but I loved it and it was so easy!  Easy enough that I included this project in the lineup for this weekends workshop.

The embossing folder is another new product from the spring catalog.  It is shown with a bunch of manly stuff, and it is manly of course, but I loved it here too.  My daughter thought I should be stamping bees because it reminded her of a honeycomb.  Cute idea!

The sentiment is from another great birthday stamp set called Balloon Adventures.  Also from the spring catalog, but it has a great trick of its own.  That will be for another blog project for sure.  I stamped on a strip of cardstock and put the triple banner punch to work. Of course I had to layer it as well.  What is with me and layers these days?  Oh well!

1-18-1

I couldn’t resist.  I had to stamp all along the inside with those darn candles again.  And I didn’t even mind stamping all of the little flames.  I am telling you, it really was fun!

Have a creative day!

Moana

Fiesta Like There’s No Manana

Here is one of the projects I made with my club ladies last Saturday.  Such a fun and interesting birthday card.  Plenty of color and who doesn’t just love an adorable llama?  Finally though, a project where I love the brightness of cucumber crush.  It is just one gregarious green there.

6-21 (1)

Framelit cutting made pretty darn quick work of the elements for this project.  A little stamping before and after doing the cutting.  The llama was really fun, but I felt he was a little on the whimsy side to worry about painting and making him look too real.  Besides, his teeth really aren’t accurate, they come from the bottom not the top like a bunny.  Still totally adorable though.  The banners were stamped afterwards though.  Since you can see through the photopolymer stamps there is not a worry to be found.  Fun and easy to do.

Everything was put on tipped one way or the other to add to the silly look.  Nothing about this card says slow down, just have a bunch of fun!  And my club ladies sure did.

6-21 (2)

Have a creative day!

Moana

They Say It’s Your Birthday

Fun, fun and fun. That is what this birthday card says to me.  When you have a fun paper that isn’t just masculine or feminine, you are fortunate.  This card can be for just about anyone, regardless of age too.  I call that a super win!  The series I started is nearly to an end.  I can’t wait to share the cute box I made to hold the whole dozen cards for the gift set.

4-3

The tag was made using the triple banner punch.  Dang, I sure do love that tool.  When it first came out I thought it was a bit excessive, but I gave it a try.  I use it so much.  It makes layered banner tags so easy.  This one was whipped together super fast, layered up on dimensionals, given a tiny ribbon accent and slapped in place.  Honestly, this was one super fast card.  Again, the paper is a win.

4-3 (1)

Have a creative day!

Moana

Thanks to You I Grew Up Loved

What a sweet, tender card.  I was thinking of my mother as I put this one together.  She is all about flowers and everything that go along with them.  As I shared this one with her, we shared a few tears.  Having a wonderful mother that helped you grow up loved is more than a blessing, it is an absolute treasure that we both share.

3-31 (2)

This lovely card showcases the dsp almost as much as the sentiment.  It is hard to decide which is the focal point, so I will call it a draw.  I stamped the sentiment on whisper white and punched it with the most narrow portion of the triple banner punch.  I then created a border of calypso coral and repeated the punching  to give a nice quarter inch boarder that tied the entire card front together.  After a lovely bow tied with seam binding ribbon I decided to put the tag on an angle.  It turned out so adorable and yet so simple.  One of my favorite ways to work.

3-31 (1)

Have a creative day!

Moana

Hello Bohemian DSP!

Guilty as charged.  I have loved this pack of paper and haven’t cut into one single sheet.  For shame, I know.  However, I have sorted that out and made something I quite like.  So much so that I think it will make it into this Saturday’s workshop.  I have a few ladies in particular that enjoy this paper as much as I do.

101_1164

I haven’t done a ‘z’ fold card for some time.  I saw some projects done by a few people I follow and thought I would give it a go.  The card turned out pretty darn good if I do say so myself.  Also, I love how I have been able to showcase so much of this fantastic paper.  The ribbon on the back of the card is also something new, but thought it brought a nice balance the the closed project.

101_1165

Have a creative day!

Moana

Sending Good Thoughts with Perfect Pennants

Everyone loves a fun surprise, especially me.  Last night my husband brought home some items from the store I asked for, and a few others to boot.  Several basic t-shirts, always need those, and this adorable top with my favorite colors.  Classic me, after my thank you’s were shared, my brain went straight to a card idea.  And that would be this little number.

2-17

It also works out that I am trying to build a small arsenal of birthday cards for my mother-in-law.  She is so diligent in her efforts to send cards to all of her family, all the way down to great-grandchildren.  So, she keeps me pretty busy sometimes.

2-17 (2)

This card was fairly simple by design and pretty easy to put together.  Only one stamp on a piece of very vanilla, punched and layered on some calypso coral which was punched as well.  Love that triple banner punch for fun like this.  The card front is made from very vanilla and layered with a strip of chocolate chip.  I put them together and ran them both through with an embossing folder so the pattern would be continuous.  Love that look.  I chose the boho chic embossing folder because it is nearly the same pattern as the coordinating scarf for my new top.  A reason for everything.  The banner tag was layered on the card front with dimensionals and I called it done.  I didn’t sponge anything or even stamp inside.  Don’t worry, I lived.

2-17 (3)

Have a creative day!

Moana

Dream Without Fear

Last weekend was a great workshop and more often than not, there a one or two people that don’t show.  This leaves behind extra kits that I get to play with.  Sometimes I file the materials back, often I will make them up and make gift sets, and there are times I make something different.  That would be today.

2-6

The card made with this kit was more about the embossing folder and the paper was background only around the edges.  I decided to make it a focal point and just show it off. Truly, this paper pack is so fantastic.  I think I will be getting an extra one just for myself.

The fine tip glue pen is new to me, and I haven’t quite mastered it yet.  I have watched others use it with sequins and decided to try it out.  Not so easy as it looks, but I did get better as it went on.  On the whole, I think it turned out.  With such pretty paper, you don’t notice all of my glue adventures.  I have two more of these kits, I wonder how I will use them up?

2-6 (3)

Have a creative day!

Moana

Hooray! for Perfect Pairings

I could probably keep making samples for these bridal shower invitation choices.  Where do you draw the line?  Is three enough?  How about five?  Perhaps four is just right…

1-27

Even though this is still floral, it is has a much stronger navy blue influence.  With the soft seam binding ribbon, the navy doesn’t seem too overpowering.  Not too complicated a card here.  There are 1/8″ simple borders layered with a decorated front.  I started with the navy flower background stamping and then included the pink centers.  How fun is it to have just the colors you want.  The beauty of stamping.

1-27 (2)

Have a creative day!

Moana

Courage Doesn’t Always Roar…

I wasn’t sure about posting this one, it is definitely not my usual type of project.  And if I am being totally honest, it is a bit of a mess.  It wasn’t my idea, but I needed to make a sample, so it happened.

1-15

I work with the youth in my church, specifically the young women ages 14-15, and this was our project last Wednesday night.  One of the girls had suggested this activity and we went at it.  I was to make the sample and I rushed through it a bit too quickly.  We only have a little over an hour to work with, so I was on a timer.  Also, this wouldn’t be my best crafting area.  It is so okay to know there are areas to improve in, and I don’t mind sharing my learning opportunities. (I don’t like to call them mistakes.)

I used two sheets of dsp for this project.  I love the paper. I did get a bit of teasing from the girls.  “Are those artichokes?”  Yes they are, and I love them.  The back side of the paper reminded me of a double wedding ring quilt pattern, so it was a win all the way around.  We were to modge podge pretty paper to a clip board, add some decoration, and finish it off with a favorite inspirational quote.  I have creases and bubbles, but I still love it. I also got into my retired stash of ribbon and found a bunch to use.  I will be happily using this clipboard.  I do need to sand the edges a bit, but otherwise, it is all done.

1-15 (1)

Have a creative day!

Moana

Perfectly Artistic Gift Box

Sometimes you just need a big box to fill with treats.  I have found that if I keep treats on hand to put in my blog projects, I just eat the treats.  So this guy is on display empty, but I imagines it with Lindt truffles, the white chocolate ones that come in a white and silver wrapping.  Wouldn’t that be lovely?  Thought so too.

Perfectly Artistic Gift Box

I did use a whole sheet of paper for this project.  But when it is a free paper pack, love that Sale-a-bration, it is easier to do that.   I had to fight the urge to tack down my banners so the sentiment was easier to read.  I will need to remove the ribbon to fill it up for gifting, so I  had to just let them dangle.  I do like how they look with the ribbon tails though, so I am good with it.

After I did my scoring and folding I ran the paper, folded in half and half again, through the big shot all at once with my oval framelit.  I know they are designed to be used with one layer of paper at a time.  I have found that when the design is simple, they do great with more than one layer.  I would be cautious with cardstock, but the dsp worked like a charm.  That way my oval windows were all exactly the same placement.  And that makes me very happy.

Perfectly Artistic Gift Box

Have a creative day!

Moana

Oh What Fun

Adorable, adorable, adorable.  There is only one more to share in the set after this one, but I do love this one especially.

Oh What Fun

Some time ago I came up with a little way to attach a tag in my twine and thought it would work well with this card.  Yes, it worked out great!  A bit of a threading thingy, but definitely not tricky.  Just looks neat.  I did have to use a dimensional to keep it straight across the card though.

The triple banner punch came in handy to make the tag super easy.  I am not one to have success with a square punch to make the banner end, so I think they made it for folks just like me.  Thanks for the frustration reliever.  Light sponging went into this one to finish it off.  Simple and sweet and easy to make.  Give it a try!

Oh What Fun

Have a creative day!

Moana

From Santa

Another wonderful day in Utah.  I sure could get used to this vacation thing.  My girls are fast asleep and looking adorable.  I took a photo of them, but they would not be happy if I shared, so it stays with me.  So cute. However, here is one of the adorable cards from my gift set.

11-26 (1)

This is definitely a clean and strong look with these wonderful stripes.  They are the focus of the card for sure.  So I kept the sentiment simple and stamped on a strip of velum.  I backed it with another piece of paper from the same dsp set, only one set of paper used in this series, and wrapped them together with silver metallic thread.  I just love that thread!  The ends were punched with the triple banner punch and it finished it off quite nicely I must say.

11-26

Have a creative day!

Moana

English Garden with Flower Patch

Can we just not jump right into the next holiday?  That is my theme for today.  I know everyone will be all into Christmas, blowing right by Thanksgiving, but I am going to take a break in between.  So, how about a lovely birthday card?

English Garden with Flower Patch

This paper is so absolutely wonderful.  I would love it in fabric so I could have it all around.  However, I wanted to partner a technique I recently learned with flowers, so I knew the pretty paper wouldn’t be the focus.  Is that even possible?

English Garden with Flower Patch

After stamping and punching out these pansies, I tried the technique out.  I used a very large stylus to just roll around the petals, slowly breaking down the fibers and creating curl.  Oh, you do this on a foam pad so you can squish a lot. It was so fun.  I did the same thing with the little leaves I made.  For those I punched a circle and then used the same punch to punch a section out of both sides giving the leaf shape.  It leaves kind of an apple core looking center behind.  Hope that makes sense.  One day I will get brave and try videos, not there yet though.  Lots of sponging for everything involved and tons of dimensionals.  This is one thick card, extra postage for sure.

English Garden with Flower Patch

Have a creative day!

Moana

Vintage Leaves

What happens to some mornings, I really don’t know.  Just when you think you might get a break here or there, it just doesn’t happen.  But I made it here, finally.

Vintage Leaves

I have taken my time in using this new set, Vintage Leaves, but am totally ready to go now.  I only used one leaf today.  I wanted to focus on color as much as detail and thought if I had too may patterns and colors it might get lost.  Rich Razzelberry was my focus, and this was totally what I wanted it to look like.

  Vintage Leaves

I stamped several of the same leaf in black Stazon and left space for just one rich razzelberry one.  So simple.  I used a second stamp set, For All Things, for the sentiment.  It was layered flat with a banner of coordinating cardstock.  I touched it up with a strand of cotton ribbon and called it good.  I really did love how this turned out.

Vintage LEaves

Have a creative day!

Moana

Tiny Thank You

Spending the morning with my husband took first place today.  So, blogging had to happen later on in the morning.  Works great for me, during the summer that is.

Tiny Thank You

I didn’t know where to start this morning, so I turned to my scrap pile.  You know, those extra bits of paper that are too big to toss and haven’t filed back into the paper files.  Well, there was this piece of bermuda bay measuring 5×6 that was calling to me.  I did the math and ended up using my scoreboard to make this cute little carton.  Simple division is a beautiful thing, did I just say that?  Yup!

Tiny Thank You

This carton is big enough to fill with plenty of treats or even a nail polish or two.  Sometimes it is fun to say thank you in a different way.  I do have a weakness for cute little boxes and bags.

Tiny Thank You

How about the washi tape though!  I did all of my scores first and then got the tape out.  I put it down on an angle leaving about 3/4″ between pieces.  I didn’t measure, just eyeballed it.  From a distance it looks like striped paper with blue stripes over the top.  Fun look.

Banner punches went to work on the adorable sentiment tag.  Using bakers twine was the only thing tiny enough to work well.  All in all, I do love this little guy. Now, who to share it with…

Have a creative day!

Moana

Remarkable You

I think going on that pioneer trek took a little more out of me than I thought.  I tried to sit down at my usual 5:30 this morning, but I could hardly focus.  Time to get into a good summer routine.

Remarkable You

I absolutely fell in love with this stamp set when I saw it in the catalog.  The floral images are so elegant.  They cover several of my favorites.  I had to use this one first, because it is my absolute favorite.

Remarkable You

I started by stamping the image in garden green.  I got out my aqua painter and drew in the color for the stems and some of the outer lining.  I brought in daffodil delight and hi-lighted with so saffron.  Just a touch of color there.

Remarkable You

I used the oval framelits to make my layers with the third largest for the flowers and the second largest for the frame.  I stamped and sponged and put everything I could up on dimensionals.  I tried out the triple banner punch and it works like a champ.  That is going to get a lot of use.  Finally, I hid my glue dot under the velum with a rhinestone.  I used a section to curve around the top left of the frame and called it done.  I didn’t even stamp inside!  Scandalous,  I know.

Have a creative day!

Moana