Floral Tone on Tone

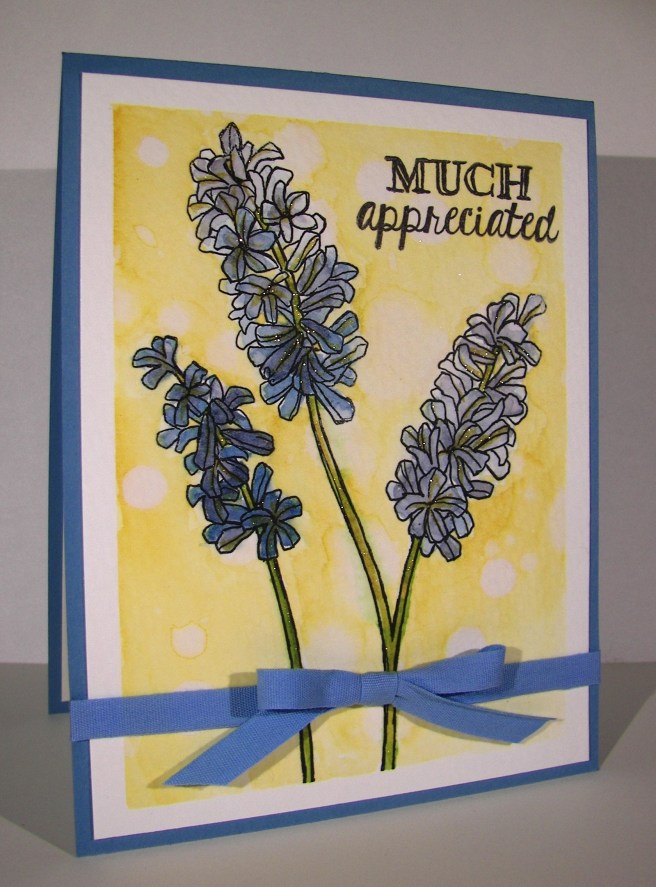
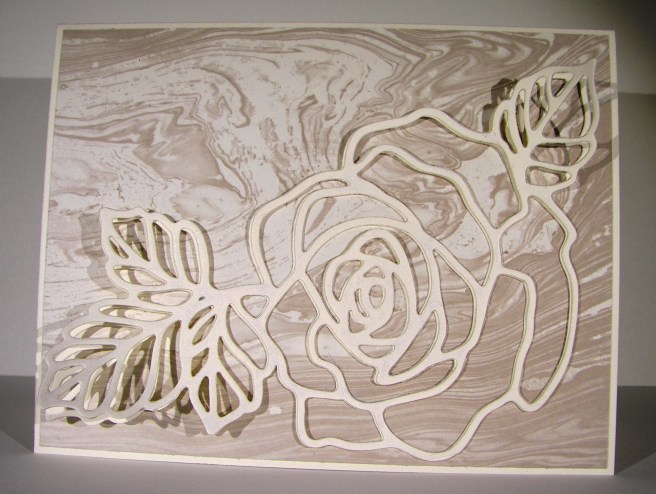
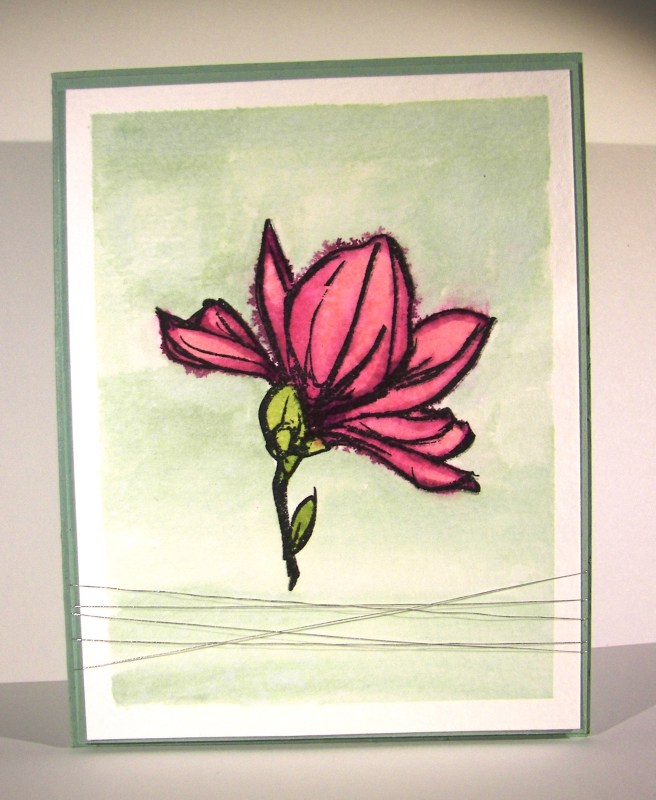
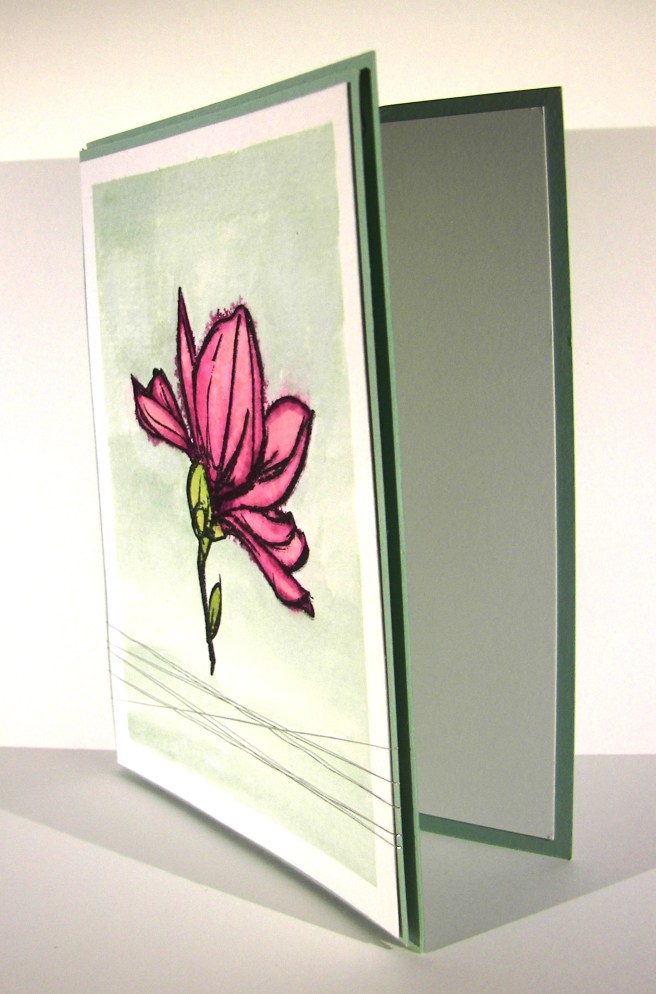
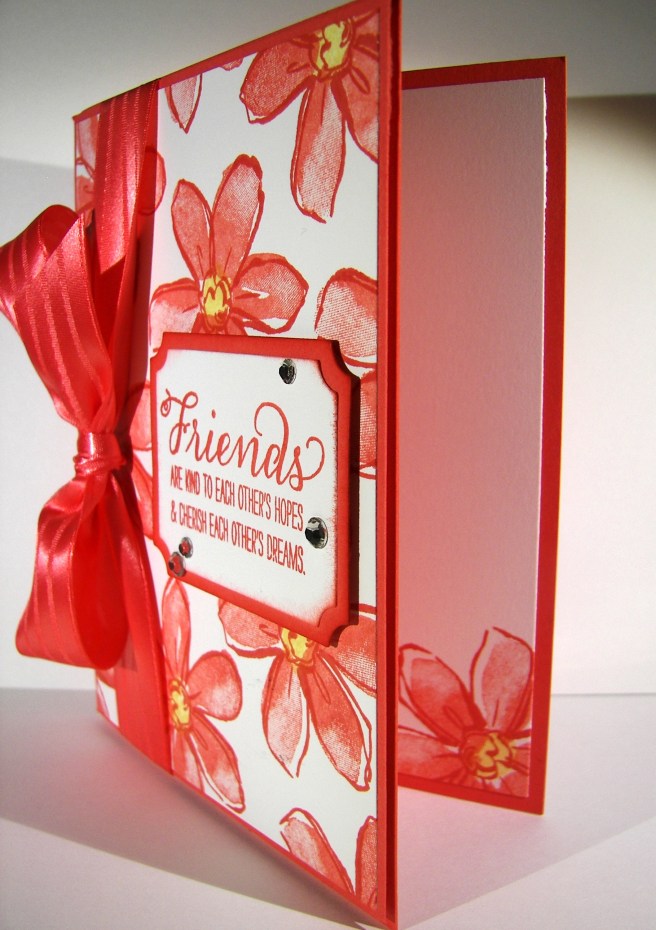
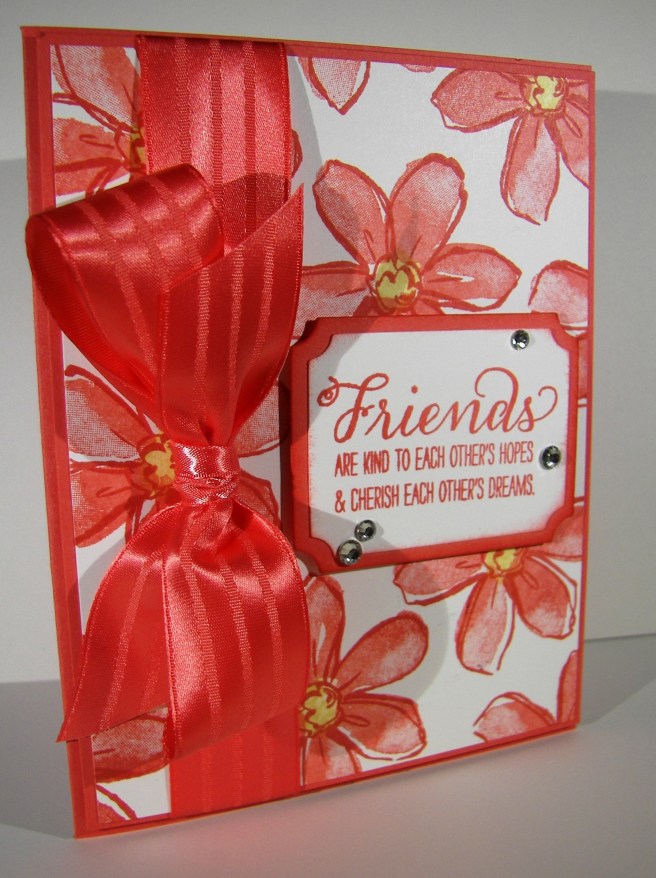
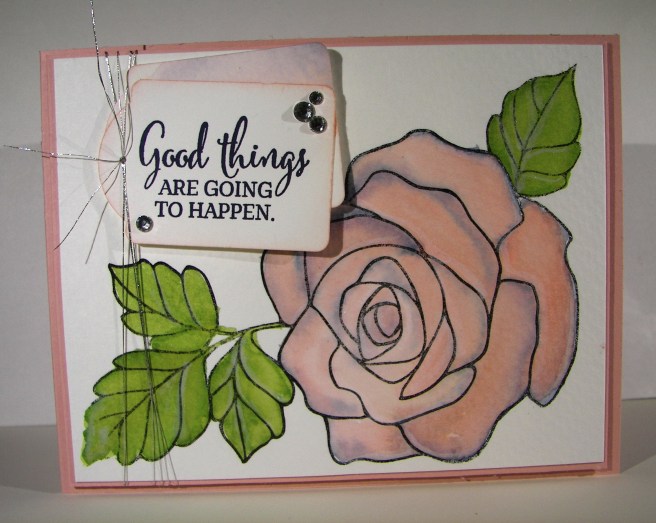
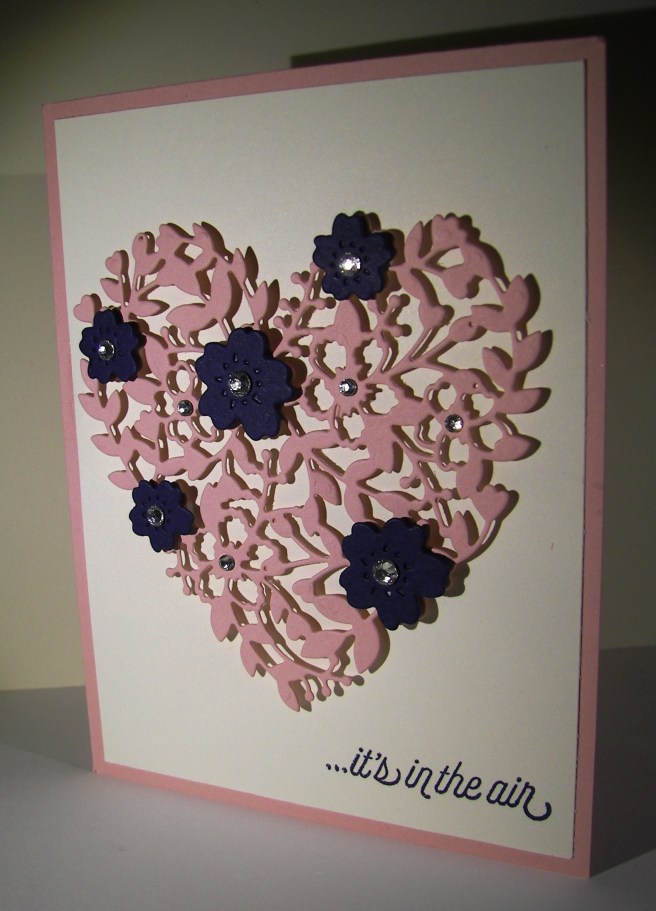
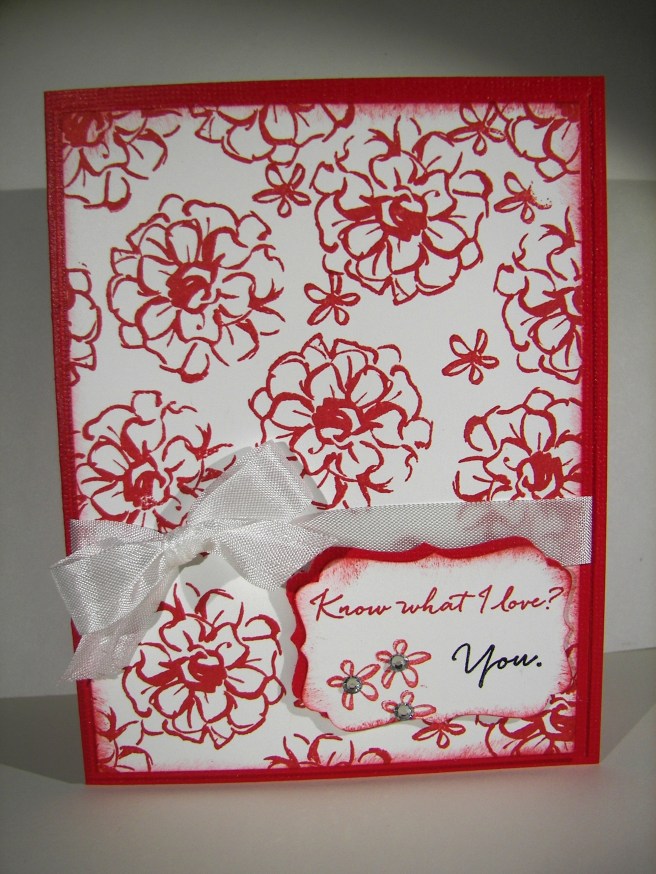
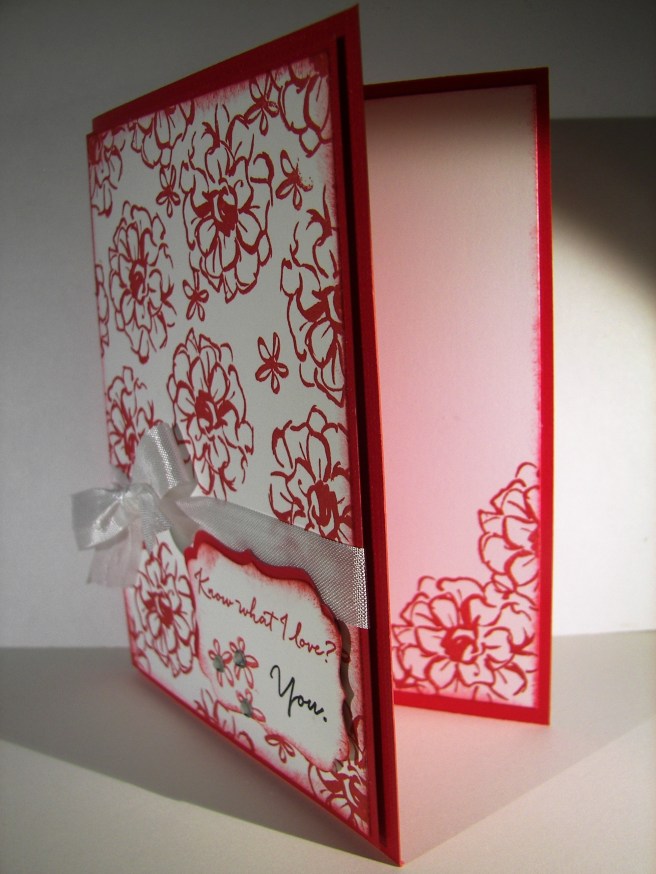
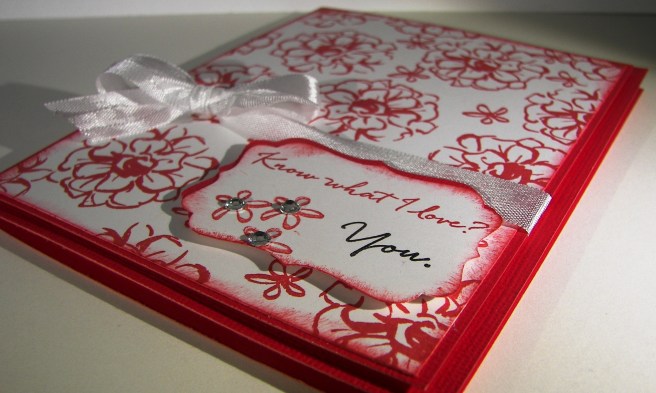
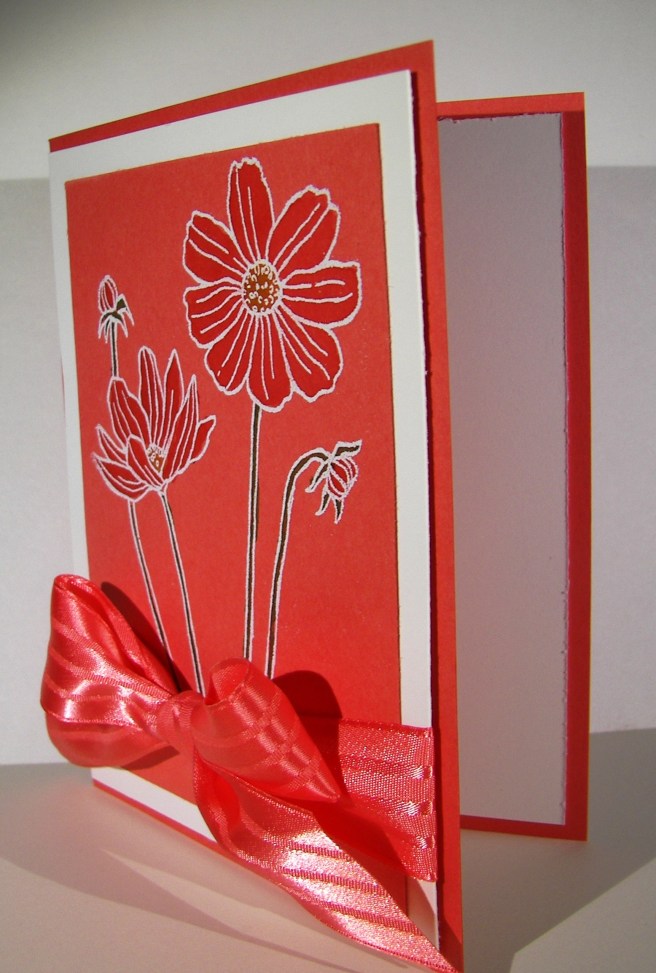
Pretty, pretty, and just so pretty.  That is what comes to mind here.  My husband thought it looked a little tropical with the white outline, I am really loving this card.  While driving back from an ice cream run last night the idea came to me.  There is no inspiration connection here, just a great idea.

4-14

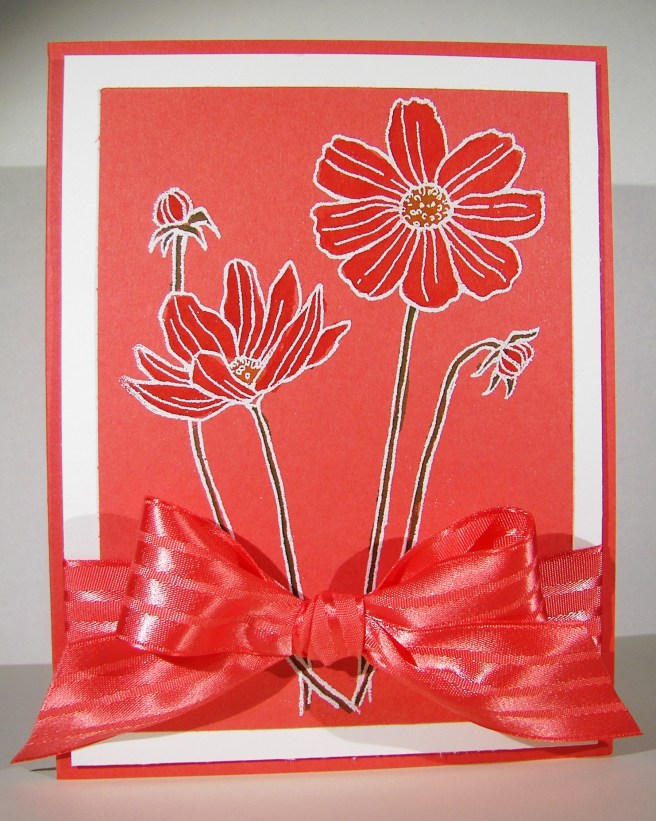
The image was stamped in versa mark ink on watermelon wonder cardstock instead of white or water color paper.  Different for me, but it worked out well.  I embossed with white embossing powder and water colored in the flowers.  Pretty easy and such a nice effect.  I layered it in white to bring out the outline and wrapped it in some of the most beautiful ribbon I have.  Yummy!

4-14 (1)

Have a creative day!

Moana

Helping Me Grow

I do love to water color, that much is more than obvious.  Since spring is everywhere I knew I had to do some flowers like the ones I see everywhere.  How about lupin?  Pretty sure I spelled that wrong, but they are the prettiest wildflower, next to the poppy of course, that are growing all around this time of year.  My husband even recognized the flower on the card, and that is saying something.

4-13 (2)

I stamped the large floral image on my masked piece of water color paper in black stazon. The flowers were initially painted in marina mist, letting the ink run lighter as I went up the flower.  After, I added in hi-lights of wisteria wonder in the centers and across some of the petals.  The stems were done in pear pizzazz.  I did a touch more with the gold wink of stella to give it a sparkle.  That was both on the petals and the stems.  I know, it is hard to see in the photo, but it is there.

I painted the background in so saffron, allowing it to be lighter and darker just here and there.  I didn’t have a specific rule in mind, I let it happen.  I then used my aqua painter to drop clean water across the card to make water spots.  I let the drops sit there for several minutes then came back and dabbed them up with paper towels.  That removed ink and left the fun spots behind.

A simple bow across the front finished it off.  I used a piece of very vanilla for the inside.  I decided not to leave it blank and opted for a repeated image of the front.  Instead of black, I used so saffron stamped off and placed it right in the middle just like the front.  The idea is that it is light enough to be written over, kind of like a water mark.  It looks great.

4-13 (1)

Have a creative day.

Moana

Love You Bloomin’ Love

Just when I thought I could sit down and make something new my time got snatched up. It seems to happen that way more often than I would like, but we do what we have to do.  So, I grabbed a leftover kit from last months workshop and turned a card base into a box.  Pretty cool if I do say so myself.

4-11

I stamped tone on tone with mint macaron using one of the larger flowers from the Bloomin’ Love set to create the background pattern.  My tag was a tiny piece of very vanilla which measured 1/2″ x 4″.  After I stamped the ‘love you’ sentiment from the same set I punched a banner at the end with the bitty banner punch and sponged around the edges with the same ink.  I curled the banner a bit before I set it in place.

The cardstock was cut at 4 1/4 x 11″.  All ready to be a tall folded card.  I scored along each of the long sides at 1″, turned it one quarter turn and scored at 5″ and 6″.  Those last two scored would become the hinge side of the box.  Scoring, snipping and a bit of gluing later and this little box came together.

4-11 (1)

I chose the large satin ribbon for my bow.  That is such a rich ribbon.  I just wrapped it around the short side and tied a pretty bow, leaving the tails a bit longer than normal.  I usually wrap my boxes up more, but wanted to be able to slide the ribbon off easy to fill with treats when the time came.  I also decided to add a tiny basic pearl on the banner, but just one.  How cute is that?

Have a creative day.

Moana

Thanks to You I Grew Up Loved

What a sweet, tender card.  I was thinking of my mother as I put this one together.  She is all about flowers and everything that go along with them.  As I shared this one with her, we shared a few tears.  Having a wonderful mother that helped you grow up loved is more than a blessing, it is an absolute treasure that we both share.

3-31 (2)

This lovely card showcases the dsp almost as much as the sentiment.  It is hard to decide which is the focal point, so I will call it a draw.  I stamped the sentiment on whisper white and punched it with the most narrow portion of the triple banner punch.  I then created a border of calypso coral and repeated the punching  to give a nice quarter inch boarder that tied the entire card front together.  After a lovely bow tied with seam binding ribbon I decided to put the tag on an angle.  It turned out so adorable and yet so simple.  One of my favorite ways to work.

3-31 (1)

Have a creative day!

Moana

Flowering Fields with Botanicals for You

I did start out with a St. Patrick’s Day card set in mind.  Hence the green and gold. However, it quickly changed into something more elegant and much more useful.  I do know several people that truly do love to celebrate this holiday and this would work wonderfully for them as well.  What fun, right?

101_1224

This Flowering Fields stamp set will be gone soon.  I do love the fun free products available during Sale-a-bration, but always are sad to see them go.  I do know that there are always new things on the horizon that I will love equally well, but I do have my favorites that stick around year after year.

101_1225

I ended up using a full sheet of very vanilla, part for the card front and inside, and used the rest to make a gift bag.  I prefer to have paper used up with as little waste as possible.  I even used the snipping left from cutting the front and inside to be my sentiment tag.  Very little waste today indeed.

This glitter tape is so much fun.  I admit I have stashed it a bit too long, I thought I had learned my lesson.  Guess not.  So, I broke it out and put it to work.  Just a little bit does so much.  And it is so tidy, no glitter messes to be found.  A win for everyone for sure. I do think I will use some tape to close the bag when it gets filled with a treat or two.  Yeah!

101_1226

Have a creative day!

Moana

Wink of Stella Rose Garden

I have wanted to use this thinlit for some time, but didn’t want to go traditional.  It is obvious that it is a rose, but what if I didn’t want it to look too realistic.  I do love the matching stamp set and have water colored that one plenty, but I wanted this to be different.

2-16

Different in a good way though.  I think I like it, but am not quite sure.  However, when I start something I just stick with it through the end.  The positives?  No additional postage required.  There is dimension without too much layering.  It is delicate and masculine at the same time.  And, it is definitely different than how I have seen it used.

What is my hangup then?  I honestly don’t know how I feel about the designer paper showing through without the flower being a solid color, or an obvious floral color.  Personal hangup I guess, but still, there it is.

2-16 (3)

I painted the surface of the flower and leaves with the white glitter wink of stella brush.  I love how easy it is to add a lovely glitter look.  And it is almost even goof proof.  I wasn’t too focused on the detail when I painted and it was already adhered when I did.  But it was easier to paint it on the card than trying to hold it at different spots while I got it done.

I normally have my card base heavier to support all of the goodies I layer on, but I really wanted a very vanilla card.  So I gave the inside a little extra layering to keep it strong enough to stand up.  All good here, it worked like a charm.

2-16 (1)

Have a creative day.

Moana

Remarkable You

It is so nice to have a day off from school and work, but it does put things off more than a bit.  I seem to be having more and more of that as of late, but I do keep trying to get it back in the right gear.  Now I have wedding reception plans to toss into the mix.  Exciting!

2-15

I pulled a few ink colors that I wondered about going together.  Blackberry bliss is such a strong color I hesitate sometimes to put it with others.  This pastel grouping compliments it nicely though.  I don’t think I have watercolored with it yet either.  That was fun for sure.  I used a basic card front made from cold pressed water color paper, masked a quarter inch border off and got to work.  This project was one of the times I just let it happen without too much planning or thought.  I find that less stressful because you don’t have an exact finish in mind, just simple imagery and colors.  Works well for me.

I layered my front on a backgroun of mint macaron with a narrow 1/8″ border, and then placed it again on the card base.  I didn’t do any inside stamping this time.  Just a simple and clean piece of whisper white waiting to be written on.  I think that was all it called for.

2-15 (2)

Have a creative day.

Moana

Everything Botanical

Well, this project started somewhere else, but the results are great.  Sometimes it is hard to see past your ‘opportunity mistakes’, I managed though.  Once I fussy cut designer series paper I am totally committed.

2-8 (3)

The free items you can earn from Sale-a-bration are all unique, but this one caught my eye right away.  A patterned velum paper that not only coordinates, but actually outlines designer series paper, well that is amazing.  I fussed a bit matching it up, but found the exact spot.  I almost did a 6 x 6 card just so I could see the whole pattern line up.  It would have been worth it, it looked so pretty all lined up.  I moved on though.

2-8

My opportunities came from the glue experience.  I thought I could put tiny tiny dots of glue on little flowers and it would look kind of neat, and hide the adhesive at the same time.  Well, my tiny dots were not as tiny as they needed to be.  Several fixes later, it worked out.  Basic rhinestones, a larger sentiment with tag layering, and using one of the many coordinating framelits.  Phew!

I added a touch of inside stamping with a leaf from the coordinating stamp set.  I don’t usually go for a whole suite of product.  This one is different, I loved all of it.  However, it is my favorite color pallet, floral, and it goes together so wonderfully.  I couldn’t resist it.  So I didn’t.

2-8 (1)

Have a creative day!

Moana


Garden In Bloom

Taking a few days off is kind of nice, but it was not intended.  Getting ready for a huge workshop can be really exciting, but also very time consuming.  Put that with still working full time and you get a bit of a circus.  Not to mention the adventures of everyday life.  Time to get back on track and have some fun!

2-1 (2)

There is a lot of attention right now with Sale-a-bration and the Spring Occasions catalogs, and they are very exciting to say the least.  However, the annual catalog is so full of beautiful product it is hard to ignore.

I have been waiting to use this stamp set for some now and it was worth the wait.  I took one of the left over kits from Saturday’s workshop and paired it with this lovely set.  There are a ton more stamps in the set, but I focused only on the large flowers.  I think I could get stuck on this set and not repeat myself for some time.  Exciting!

2-1 (1)

The card front is 4 x 5 1/4″ with an 1/8″ background piece of watermelon wonder and then placed on a standard card base.  Not too tricky.  I put the tags & labels framelit set to work for this lovely sentiment.  It is so pretty.  Then I broke out the fabulous ribbon that has been teasing me from the shelf.  I love, love, love big pretty ribbon.  It is just delicious to me.  The ribbon is the only item from the occasions catalog.  I would love it if Stampin’Up! would bring back some huge satin ribbon in next years annual catalog.  I will have to just wait and see.

2-1 (3)

Have a creative day!

Moana

Hooray! for Perfect Pairings

I could probably keep making samples for these bridal shower invitation choices.  Where do you draw the line?  Is three enough?  How about five?  Perhaps four is just right…

1-27

Even though this is still floral, it is has a much stronger navy blue influence.  With the soft seam binding ribbon, the navy doesn’t seem too overpowering.  Not too complicated a card here.  There are 1/8″ simple borders layered with a decorated front.  I started with the navy flower background stamping and then included the pink centers.  How fun is it to have just the colors you want.  The beauty of stamping.

1-27 (2)

Have a creative day!

Moana

Rose Wonder

This was a fun project for sure.  As you have heard me say so much recently, I do love to water color with my stamping.  I wasn’t sure if these two colors would come together in an attractive mix, but they did well.  Having the touches of navy with the blush as a primary is really enjoyable.

1-26

I think I might be making the decisions a bit tricky for these bridal shower invitation choices.  I am not sure which one I like better between the two, guess I will have to come up with another one just for good measure.  I can’t spend too much time playing though, I have workshop coming this weekend.  It is fun to play though.

I stamped this huge wonderful rose on water color paper with stazon ink.  I didn’t goof it up too much, so I went with my first attempt.  I did a trial run with the colors on a scrap of water color paper just to check it out and I liked it.  So, I wet down my stamped image and got to work.  I spent a bit of time trying to be cautious, then I just went for it.  That is why I love to water color, it is pretty darn forgiving.  I even used my trial scrap as a background punch, cool right?  I do try not to waste.

1-26 (1)

Have a creative day!

Moana

Bloomin’ Love

I do enjoy making something special by request.  It isn’t always easy to start, but once you do, the ideas just begin flowing.  This is my first go at a bridal shower invite.

1-25

The brides colors are a blush pink and navy blue.  My blue looks a bit royal purple here, but it is a deep navy.  How about this lovely framelit die cut?  I thought I might go a bit bonkers trying to get it all detailed out, but I managed.  I am not always the most patient one, but this die requires it.  I had to put it through the big shot back and forth several times to get all of the cuts done.  It was worth the fussing though.  The detail is amazing.

1-25 (1)

I might have gotten a bit carried away on the inside stamping.  I was chatting while I stamped and before I knew it, it had gotten pretty busy.  If this one ends up being the choice, we might have to print the details on velum to be an overlay.  That would be pretty though too.  Love is definitely in the air.

1-25 (2)

Have a creative day!

Moana

Forever Begins Today

This was for yesterday, however, yesterday was for my family and there wasn’t time to share this with you.  I am sure it was worth the wait though.  Aren’t these flowers just the best thing ever?

1-21

One framelit set gives you all of these pieces, plus a couple more.  And they coordinate with velum, designer series paper just to name a couple. I have been planning this one for a while now, with a very specific goal in mind.  I am fortunate enough to have my son getting engaged and this is how I am going to approach the second reception.  What else could I possibly use for my inspiration piece, right?

1-21 (1)

I do admit that once I cut into a piece of designer series paper for a card front, I look to the remainder of the sheet and immediately think of a bag or box I can make to coordinate.  I have a hard time stopping myself to be honest.  I also have a bit of a problem filing back my scraps of cardstock when I work.  All of these colors were available to me in my stack of put me away papers.  I put them to good use for sure.

1-21 (2)

Have a creative day!

Moana

Know What I Love?

My youngest is in the throws of re-decorating her room and the colors are so awesome.  I thought I would work with them for a few projects.  She has real red, basic gray, smokey slate, whisper white and basic black.  I used Stampin’Up! color names because that is just how my brain works anymore.  You get the idea.

101_1063

Either way, this card was so quick and fun.  I just used a bit of the stamps available in the Know What I Love stamp set.  We may still be in winter, but I couldn’t wait to start with some spring things.  Rain is so welcome, and flowers won’t be far behind.  How exciting!

101_1064

The card is pretty basic, just a few layers.  I do love it when a stamp sentiment fits inside a punch I already have.  It just makes life easier and definitely more fun.  If I hadn’t been distracted with other projects, this card would have come together in about twenty minutes, including design time.  That is what you get when you have great product to work with, and I definitely do.

101_1065

Have a creative day!

Moana

Flowering Fields Thank You

So I was looking through my blog site and discovered this as a draft and not a blog.   Oooops on my part.  I really loved this one too.  Enjoy!


While browsing a catalog I came across this book.  The title was awesome, but to be honest, I knew I had to make a card that looked like it.  It sat at my desk for several days until I had a little time to experiment.  I got my inks out and went to work.

Flowering Fields Thank You

I went back and forth on using just ink, or a versamark with gold embossing powder.  I went with just ink and then used my aqua painter with some ink to add details and make the flowers a bit more prominent.  Aren’t these pretty?  Yet another awesome free set during Sale-a-bration!  Wheeee!  The thank you came from Another Thank You.

Flowering Fields Thank You

I masked the water color paper and brushed it heavily with water before I added ink.  I added, dobbed, and added more until I was satisfied.  So much fun, honestly.  I could do that a lot.  Wouldn’t it be fun if we could just hide away in a creative bubble?  Either way, I absolutely loved making this card.  But not more than sending it to share a very special thank you.

Flowering Fields Thank You

Have a creative day!

Moana

Bouquet Bigz L Die Meets Thrift Store Skirt

My daughter gave me a challenge.  She took a photo of this wild skirt she saw at the thrift store she works at.  She wanted to see it made into a card.  Well, I took it a different direction.  And yes, the skirt looks this wildy.  How fun!

Bouquet Bigz L Die Meets Thrift Store Skirt

I made flowers using the Bouquet Bigz L Die with real red.  It was actually the maiden voyage of that die cut.  As I looked at it I decided I could spend way too much time playing with it.    I distressed the petals before I put them together.  Even though it adds time in the process, it was worth it.

Bouquet Bigz L Die Meets Thrift Store Skirt

I attached them to a rectangle of black cardstock so I could put the flowers on the ribbon and not the box.  Makes for easy opening and the opportunity to re-use both the box and the flowers.  This box though.  The pattern of this paper is more than fun, don’t you think?  And with a simple wrap of satin ribbon it was done and ready to be used.

Bouquet Bigz L Die Meets Thrift Store Skirt

Have a creative day!

Moana

Botanical Gardens Designer Vellum Stack

It is so nice to be able to sit and create something beautiful.  Some people have their best thinking moments in the shower, well, mine is at the craft table.  Now, if I could just figure out how to get more working space in my area, that would be wonderful.  I’ll have to get back to you on that one.

Botanical Gardens Designer Vellum Stack

This vellum paper though.  It comes in eight different patterns and you get three sheets of each in the stack.  And yes, it is only available during Sale-a-bration and is only a free item.  With a $50 purchase, you might choose this one as your gift.

Botanical Gardens Designer Vellum Stack

The card itself is quite simple.  I cut both my vellum and the card front sheet at 4 x 5 1/4″ and layered them together with glue dots.  I covered my glue with basic rhinestones, and then I went a little crazy and there you have it.  I then added a wrap of satin ribbon with a lovely bow on the front.  That front is layered on to the card base with lots of dimensionals and I called it done.

Botanical Gardens Designer Vellum Stack

Have a creative day!

Moana

Joy, Plain and Simple

As we have been showered with much needed rain here in Northern California, all I feel is joy and gratitude.  We have a long way to go, but every little bit helps.  I thought I would put my feelings into a card.

12-10

The Color Me Irresistible  Specialty DSP is so much fun to work with.  It was actually my inspiration.  I knew it had a raindrop pattern and the project just went from there.  I sponged with a dauber in silver encore ink all over in tiny swirls to give a cloudy gray look.  Turned out fantastic I must say.

12-10 (1)

The flowers were punched with the pansy punch hovering over the large dots in the silver fancy foil designer velum, using the dots as the flower center.  Nice idea, right?  I used a bone folder to curl the petals of the velum and decided I needed more flowers.  Basic gray became the flower background color and I punched another six of those.  I distressed those with a large stylus to give them dimension and lift.  Layered with dimensionals and glue dots, the side border came together.

A single stamp from the Your Presents set put the focus just right.  It was framed with a smokey slate oval and both were sponged with more silver ink.  The “i” was dotted with a metal rimmed pearl and a tiny ribbon was wrapped around.  Add one more awesome card to the mix.  A very rewarding project to make and enjoy.

12-10 (3)

Have a creative day!

Moana

Sheer Perfection Gift Set

Sitting down with a tool in mind instead of color, design, or even a sentiment can get a bit interesting.  I wanted to make a quick pillow box with a new punch board I just bought and needed some paper that was six inches wide.  Sounds like an easy start, right?

Sheer Perfection Gift Set

The only thing I had at the ready was a retired velum stack, not the easiest stuff to make boxes with.  But, I was trying to be quick, so I stuck with it.  The board wasn’t too tricky, but I was scared of tearing the paper, so I was a bit timid.  It managed to work out.

Sheer Perfection Gift Set

I thought it needed a matching card and this little number came together.  But I kept on getting held up on embellishments.  Little flowers on top, nope, coloring, nope, tags, nope.  So, I just left it as is and called it all occasion.  Good enough?  It was for me.  And it turned out that my daughter needed a little thank you gift and card this morning, so treats went in and smiles will happen.

Sheer Perfection Gift Set

Have a creative day!

Moana

Glittering Holidays

After nearly a two week run of a clean and simple holiday gift set I have been more than ready to make something fabulous.  That is exactly what I did, if that sounds a bit showy, well, just look at it!  I have been planning it all week.

Glittering Holidays

I really just had the flowers in mind and knew they should go on top of a box.  So, to get my brain going, I picked some paper, ink and a stamp and got to work.  The paper alone was just lovely.  I stamped in a way to further elongate the tall box I had in mind.  I really wanted it to be about the flowers.  I did have to use my hot glue gun to keep these guys in order.  After they were assembled I attached them to each other.  The ribbon is threaded between them to hold them on top, so they are not attached otherwise and can be used again.

Glittering Holidays

The box is just scored every two inches for the side measurements and the same for the top and bottom.  Simple there for sure.  I closed the bottom, but just folded the top in place.  I am so going to use this for a wonderful gift, so I needed to get back inside.  Not just for a blog post, nope.

Glittering Holidays

My husband actually designed the card for me.  We chatted while he drove to work and he did a great job with the stamp choices I must say.  I stamped in silver ink and heat embossed in clear to give it an extra shine.  So pretty.  I added flowers with metal rimmed pearls in the centers and added a thin ribbon to finish it off.  The ribbon also helped tie the gift box in as a set.

Glittering Holidays

Have a creative day!

Moana