Dear Heart, Sweet Boy

This project was all about giving myself a challenge.  I grabbed a piece of dsp, decided on three colors, picked a stamp set I hadn’t used a long time and went for it.  This was definitely not my usual style, but it felt good.

3-20

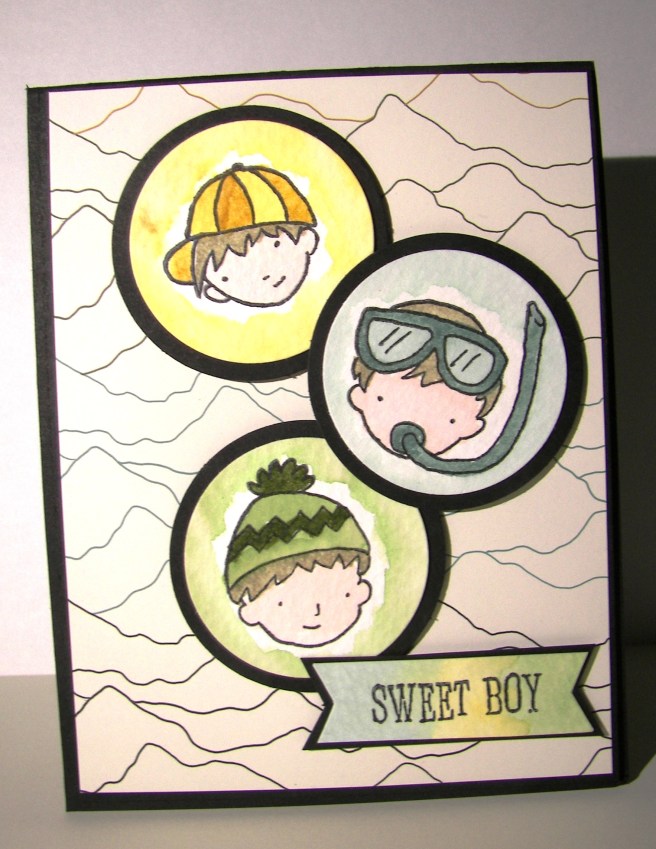
The card itself wasn’t too complicated, just one layer for the background.  I stamped my little boys on water color paper with black stazon and opened the ink pads.  Their faces were done with a very diluted wash of pink pirouette with the hair in tip top taupe.  I wanted them to look like the same boy just doing different things.

Each boy face was accented with one color only.  For the darker areas I kept the ink fairly strong.  When I accented I diluted it a bit more and even more for the outlined areas in the background.  I left it simple because I wasn’t really going for perfection, just soft coloring. I punched their faces out with the 1 3/4″ circle punch and a background of black with the 2″ circle punch.  They were arranged on the front and layered with a bit of dimensionals.

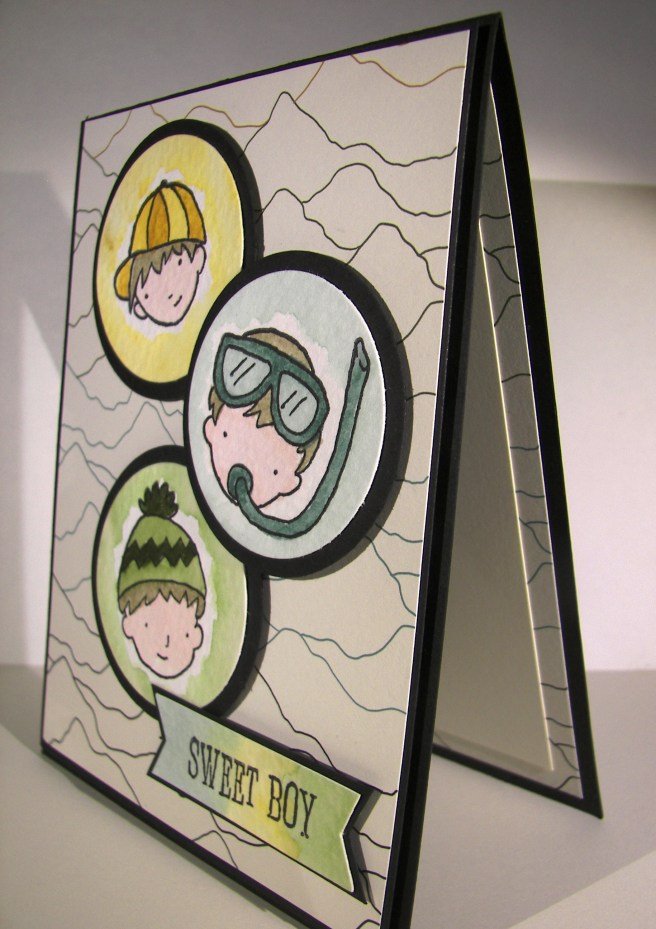
The banner was stamped from the same set and a light wash of each color was put on its own section.  Then each end was punched with the bitty banner punch.  I also put that up on dimensionals.  I repeated the pattern of paper inside with more dsp and a smaller piece of very vanilla to write my message on.  Such a sweet card, for a very sweet boy indeed.

3-20 (1)

Have a creative day!

Moana

Forever Begins Today

Inspiration came from an unusual place this time.  I was pretty tired after a full day and looked through the events and chatted with my daughter a bit.  She didn’t have much either.  However, we had just gotten our nails done that afternoon and I went with her nail choice.  They were done white with a few pretty jewels tucked around the base of her ring finger nails.  I thought it was lovely.  So, here it went into the card.  This turned into one stunning card fit for any wedding or very special occasion.

3-11 (1)

Of course weddings are on my mind like crazy.  Not only is my son getting married this summer, but my niece, my good friends daughter, and another few to boot.  It is a really busy wedding season for sure.  I will need wonderful cards like this for sure.

3-11 (4)

The layers are very simple.  Just quarter inch two times over with the front layer embossed with the elegant dots embossing folder.  I tucked small basic rhinestones in each of the small ovals and it was wonderful.  Yes, that is a lot of bling, but wedding cards always deserve special attention.  This is the kind of card I could see a bride keeping in her memory book.  So exciting!

I had intended on putting the sentiment on the front of the card, but hated to interrupt the beautiful symmetry going on.  So I tucked in inside because it made it wonderful.  Without that particular sentiment the card could become all occasion, but special occasions for sure.

The sentiment was stamped in silver encore ink.  I wanted a bit more shine so I sprinkled clear embossing powder over the top and set it with my heat tool.  It took it up a notch and made me very happy.  I can see more of these coming together to help celebrate the many wonderful events coming up this year.

3-11 (3)

Have a creative day.

Moana

Bloomin Hearts Everywhere!

Springtime sure does bring a lot of beauty, especially love.  It is so much fun to hear about new engagements and wedding plans.  There are three this spring and early summer that are pretty darn exciting, one in particular, my son’s.

2-11

I was getting a little misty eyed and created a couple of cards with their wedding colors so I could write them each a personal note of congratulations.  I really had fun just taking my time and enjoying the process.  I did have a brief thought that these could be a lovely wedding invitation front.  Then I thought about having to make 400 or so and quickly decided that would be a lot of time spent that could be better spent otherwise.

2-11 (4)

The detail on this framelit is just so wonderful.  It makes such a pretty piece of art you don’t need anything else on the front.  I did do a little more, but just embellishments. Two varieties of pearls, one with the added framelit flowers, each with a different embossed background, and both finished off with very vanilla satin ribbon.  What an elegant look.

They are very similar, but also uniquely different.  Just like the two people I was thinking about when I made them.  This weekend we are hosting an engagement party for them. It should be so much fun!  I am new to this part of life, but I am definitely up for it.

2-11 (2)

Have a creative day!

Moana

Bloomin’ Love

I do enjoy making something special by request.  It isn’t always easy to start, but once you do, the ideas just begin flowing.  This is my first go at a bridal shower invite.

1-25

The brides colors are a blush pink and navy blue.  My blue looks a bit royal purple here, but it is a deep navy.  How about this lovely framelit die cut?  I thought I might go a bit bonkers trying to get it all detailed out, but I managed.  I am not always the most patient one, but this die requires it.  I had to put it through the big shot back and forth several times to get all of the cuts done.  It was worth the fussing though.  The detail is amazing.

1-25 (1)

I might have gotten a bit carried away on the inside stamping.  I was chatting while I stamped and before I knew it, it had gotten pretty busy.  If this one ends up being the choice, we might have to print the details on velum to be an overlay.  That would be pretty though too.  Love is definitely in the air.

1-25 (2)

Have a creative day!

Moana

Know What I Love?

My youngest is in the throws of re-decorating her room and the colors are so awesome.  I thought I would work with them for a few projects.  She has real red, basic gray, smokey slate, whisper white and basic black.  I used Stampin’Up! color names because that is just how my brain works anymore.  You get the idea.

101_1063

Either way, this card was so quick and fun.  I just used a bit of the stamps available in the Know What I Love stamp set.  We may still be in winter, but I couldn’t wait to start with some spring things.  Rain is so welcome, and flowers won’t be far behind.  How exciting!

101_1064

The card is pretty basic, just a few layers.  I do love it when a stamp sentiment fits inside a punch I already have.  It just makes life easier and definitely more fun.  If I hadn’t been distracted with other projects, this card would have come together in about twenty minutes, including design time.  That is what you get when you have great product to work with, and I definitely do.

101_1065

Have a creative day!

Moana

First Sight

I keep getting drawn into playing with water colors.  Maybe that is just my thing for right now, and I love it.  The effect is just so soft and subtle.  And it isn’t even very tricky.

1-18

I do have a hard time putting embellishments on top of this kind of card front.  So I settled for a short strand of basic pearls and a hint of Wink of Stella.  I drew a few hearts and hi-lighted my stamped flourish to give it a little interest.  You have to turn the card to see it, so it is very subtle.  I didn’t want much to get in the way of the color blending.  When I tried different ribbon options it just was this huge separation that was pretty sad.  Clean and simple does the trick today for sure.

1-18 (1)

Have a creative day!

Moana

Inspired First Sight

I have a thing for unique mugs and my oldest daughter gets me.  She found this little treasure and couldn’t resist.  It reminded me of simple water coloring, so I thought I would create a card around it.

Inspired First Sight

Of course it had to be water color somehow to go with the simple brush strokes on the mug.  I matted a card base with painters tape to leave me a clean 1/4″ border and brushed the whole surface with plenty of water.  I then dabbed my aqua painter in the ink colors to coordinate with the mug and created a very soft background.  When I was satisfied I went looking for the perfect stamps.

Inspired First Sight

One of the new sets in the spring catalog caught my eye.  It is called First Sight and has more than one use.  It isn’t all about Valentine’s Day, or Mother’s Day but really has several uses.  For me, that is when a set gets purchased.  Having a stamp for just one use better be pretty darn amazing to get into my collection.  And as of today, the catalog is live so you can have the stamp set too.  How fun!

Inspired First Sight

Have a creative day!

Moana

Flameless Candle Favors

Two days off in a row?  What is up with that I would like to know.  Well, these little babies are to blame.  Well, these are the ones left over from the original 150 I made.  Yes, there were 150.

Flameless Candle Favors

Our church youth group decided to go Christmas caroling to a few nursing homes in our area and well, the final decisions came a bit late.  We normally would have collected fuzzy grippy bottom stockings, or made knitted hats or something along those lines.  I live in a small town and couldn’t gather up enough of those kinds of things this late in the holiday season.  So, it ended up being a paper crafting moment, or two, or more.

Flameless Candle Favors

My Saturday was spent making these little treasures.  If you weren’t making a ton it would be a super quick craft.  I cut 6″ squares, scallop trimmed the tops, punched two snowflakes on opposite sides and tucked in a candle at the bottom.  The candles got a little extra grip from glue dots to make sure they stayed put.  It is a tight fit, but just in case.  They are tubes so you can turn the candle on and off without taking it out.  Pretty simple, but very nice.

As we sang the kids passed out lit favors to the nursing home guests.  It really was a lovely experience for everyone.  Christmas is about giving after all.

Flameless Candle Favors

Have a creative day!

Moana

@love

Not everyone shares the same view of love, but that doesn’t mean it isn’t beautiful to them.  Easy words to say, but not always easy to follow.  Sometimes we just need to look at it from a different perspective.

@love

This card is much larger than my normal projects.  It measures 7 1/4″ x 4 1/4″.  That will definitely require a custom envelope.  Won’t this one be fun to get in the mail though.

@love

I lined my wonderful huge alphabet stamps up on a long block and got to work.  I had planned on a clean background, but liked how my practice stamping looked as I stamped off ink.  There you go.  I added the @ symbol afterwards using silver Encore ink.  Thought it gave it the perfect touch and made it have a bit more meaning, to me at least.  Several strands wrapped around the bottom with my ever favorite metallic thread and this lovely card was all done.

@love

I almost forgot to mention, but I am sure you can see it, I echo stamped the entire phrase inside super light.  You can see it, but there will be no problem writing over it without confusing your message or the image.  Just right.

Have a creative day!

Moana


Banner Blessings Gift Set -Shine

This is card four, the last of the set.  The gift box is so lovely.  I can’t wait to show you.  But this card was saved for last because it is my favorite one.  So pretty and such a beautiful sentiment.

Banner Blessings Gift Set -Shine

I used the falling snow embossing folder to give me a starry background.  Since it was more sparse on the top, because it was to show snow not stars, I put it through again turned around and ran it through half way and ran it back out.  That gave a lovely balance I think.

Banner Blessings Gift Set -Shine

The star border punch doesn’t get to come off my shelf much, but this was the perfect job for it.  Stars stars and more stars.  The heavens are full of them and I wanted the card to do so as well.  Mission accomplished.  The card base is made from the heavy weight whisper white.  Sometimes I cannot get enough of this stuff.  I accented the sentiment with a hefty twisting of metallic gold thread. I decided it made my sentiment look kind of like a shooting star or a comet.  I love feeling creative.

Banner Blessings Gift Set - Shine

Have a creative day!

Moana

Banner Blessings Gift Set – Friend

The morning took off without me, and there was nothing I could do about it.  This has sat at my computer waiting for me to take a lunch.  Well, never happened.  How about a tiny break?  Works for me.

Banner Blessings Gift Set - Friend

This is the first card of a set of four with a coordinating gift box.  It was so fun to make.  I actually made it for a special someone and I can’t wait to deliver it.  Should be tomorrow!

Banner Blessings Gift Set - Friend

I attached the island indigo torn card stock to the thin whisper white before I ran it through the fluttering embossing folder.  Everything got done at once.  The sentiment was stamped in black stazon and sponged a bit with coordinating ink.  I love the cotton ribbon, it makes such cute bows.  The inside stamping is actually negative punching.  I punched a butterfly or two from the white insert and revealed the card base.  Simple and very effective!  So fun.  Those pretty pearl accents.  I could really get used to those.  I had it dot the “i”, even though it wasn’t needed, I wanted to use one and it fit the image.  A bit of dimensionals and this card was done!

Banner Blessings Gift Set - Friend

Have a creative day!

Moana


Chalk It Up To Love

This is only one of the three projects available in this months Paper Pumpkin kit.  Two different kinds of cards, three of each, and three pretty boxes.  What a fun kit!

Chalk It Up To Love

I sat down to make this card and it literally took me three minutes.  That includes stamping on one side, not liking how it turned out, turning it over and stamping the other side.  Yup, three minutes including a goof.  How cool is that!

Chalk It Up To Love

And that my friends is the beauty of Paper Pumpkin.  All of the creativity bundled together in quick easy to make and even easier to love kits.  Just my speed sometimes.

Chalk It Up To Love

All of the preparation I do for others, including my classes, it is just so nice to have something made just for me.  I know it isn’t just for me, but sometimes it feels like it.  Thanks Stampin’Up!

Have a creative day!

One Big Meaning and Remarkable You

To get my mind off the heat last night I sat down at my desk and got a little more creative.  It has been a bit since I spent this much time for one project, but to be fair, I didn’t have any idea what I was going to do when I sat down.

One Big Meaning and Remarkable You

I used a whole sheet of tip top taupe to make the bag.  Just simple scoring there, nothing fancy.  I did forget to stamp before I scored, ooops.  So, my stamping does have little crease marks on the edges.  Can’t be perfect.

One Big Meaning and Remarkable You

The base has two layers, tip top taupe and a stamped layer of very vanilla.  I brought out the aqua painter again, oh how I love that tool.  Just using the ink from the stamp gives such a soft look.

One Big Meaning and Remarkable You


The oval framelits were put to work again for the focal point.  What a lovely flower.  I brought in tip top taupe into the flower and water colored it into the old olive.  I can tell the color difference, but I can also see a hint of lavender forming.  Interesting.  Crystal effects really made a difference in the look of the flower.  I could really use that stuff way too much.  A final stamped sentiment layered with some circle punches finished the front.

A touch of dotted lace trim was put to the side and also used to make a simple handle for the bag.  It really turned out beautiful.

Have a creative day!

Moana

Ray of Sunshine and Pretty Petals

How about another one of those crazy mornings, that absolutely ran away from me.  To be honest, I was helping out everyone else and didn’t get my own goodies done.  Everything came together and worked out so, no worries!

Ray of Sunshine and Pretty Petals

Is this designer paper adorable or what!  This particular print reminded me of a recently retired stamp that has the most beautiful poppies in it.  I do love it when everything goes together so nicely.

Ray of Sunshine and Pretty Petals

A simple layering of designer paper, with coordinating paper and a length of ribbon to bring it all together.  I did a double layer of tags and squeezed in this sunshine sentiment keeping everything in calypso coral.  Love that color.  Six pretty little flowers all sponged and centered with basic rhinestones and I am in love with this card.

Ray of Sunshine and Pretty Petals


Have a creative day!

Moana

For the New Two

Does this conjure images of a wedding couple or what?  I do have another idea though.  Honestly, I went with brighter colors for that other idea.

For the New Two

We often associate two as a couple, as in a relationship couple.  Friends of mine are currently working as nannies for a set of twins.  So, how about congratulating a couple on the birth of their twins?  Get it?  For the new two?

For the New Two

Well,  I thought it was very clever indeed.  There are plenty of gift ideas for baby boys and girls, but how about those twins?  It will take longer for triplets and such, but I am sure there is a way.

 For the New Two


This is made from a whole sheet of english garden dsp and isn’t it glorious?  I paired it with the thick backers twine and went cherry cobbler all the way.  A handful of punched and sponged hearts were the perfect embellishment.  A small doily helped to close it off.  The stamp is of course from the wedding set, For the New Two.  I layered the tags using the scalloped tag topper punch, happens to be on sale this week oddly enough, and the hearts border punch as well.  Quite the gift bag if I do say so myself, and I do.

Have a creative day!

Moana

Love

How would you suggest I celebrate my 200th blog post?  Some would perhaps do a give away, a special sale, or something else full of excitement.  I just might be a little different.  How about showing something simple, something that I love.

Love

How about just saying that I have loved my journey so far, and am looking forward to continuing.  I do love being creative, love sharing it with others, and love the joy that comes from helping others find they are creative and talented too.  There, love.

 Love

This cute little bag?  How about using a 6×6 piece of paper, like this Go Wild DSP stack, scoring it at 2″ on all four sides, quick snip on both score lines on opposite sides, and watch it come together.  A little hole punching for the ribbon, which I do love the dotted lace trim too much, and a sweet bow.

Love

One tiny stamp with one tiny tag layered on another tiny tag.  Two little basic rhinestones and it is all finished.  I do love a simple project that shares more than just pretty product that is fun to work with, it shows you care about someone enough to do something special.  That is what I love.

Have a creative day!

Moana

You’ve Got Me

I love it when everything coordinates so perfectly, but today is all about the sentiment.  I love these paired phrases, simple but strong.

You've Got Me

The card layering is fairly basic and puts a few favorite punches to work.  A dash of basic rhinestones to draw further attention to the sentiment and the front was done.

You've Got Me

I don’t normally stamp inside a card, but this one needed it.  I zoomed in on the detail, but it actually measures barely over a square inch.  When that card gets opened, that is what you see. “You’ve Got Me.”  How perfect is that.

You've Got Me

This new paper pack is loaded with beautiful paper.  I just used one sheet for this card.  The green floral is the other side to the main floral front.  My little flowers are from scrap of the same sheet.  I love putting all everything to work.

Have a creative day!

Moana

Love You My Friend

In the middle of cleaning out book shelves I had an idea for a card.  So I went to my desk, pulled out the stamps, dies and ribbon, and went back to my shelving.  This morning I just looked at them and thought, “What did I have in mind?”  Not sure, but this is what I ended up with.

Love You My Friend

I think it is funny because if you don’t read the little word love that is inside the heart cut out, the tags just say “you my friend”.  A bit basic, but really made me laugh.

Love You My Friend

All of the detail work went pretty quickly.  I started out by using the heart die cut on the whisper white paper and then ran it through the big shot to emboss it.  I thought the stamping inside the heart would be tricky to place.  Not at all.  I just eyeballed it and it was perfect!  Go figure!  The tags were simple stamping on scrap.  I do save scrap a bit too much sometimes.  But, the half inch that gets cut off when I trim down my paper works perfectly for sentiments and the banner punch.  Some might call it clutter, but I have used them so many times.

Love You My Friend

Have a creative day!

Moana

One Big Meaning

Today is workshop day!  As much as I dislike all the rush to finish up last minute to-do’s, workshop is always fun.  I get to work with a bunch of really great ladies that love to create and do beautiful work.

One Big Meaning

I set out for a super quick project this morning and found it.  I do love how a few good punches can make magic so quickly.  It really was a grab and go kind of card.

One Big Meaning

This was made with a card front in my ever so favorite newsprint designer series paper.  It is so light and clean.  The look of newspaper without all the mess.  Partnered with a card base in sahara sand, all it needed was a simple sentiment and a bit of fluff.

One Big Meaning

I love the new thank you set, One Big Meaning.  I like having choices of how I say thank you.  A heavy dose of itty bitty flowers and basic pearls and it was nearly done.  A full bow was too much, so I opted for a simple knot instead.  When you are working with the beautiful dotted lace trim you can’t go wrong.  Great stuff!

Have a creative day!

Moana

Just Kidding…

Emma thought I should do a card that went with our current nail polish colors.  She has the blue and yes, I do have a very bright pink.  I wasn’t sure about the combination, but went for it anyway.  Why not?

Just Kidding...

Looking at the colors, I knew I had to put something silly together.  The Just Kidding stamp set is very silly, so that was the obvious choice.

Just Kidding...

A standard card base with a narrow white card front, which I embossed in the decorative dots folder.  Then I added a layer of pool party, also with a narrow border, and the final stamped card front.  The aqua painter came to the rescue again and helped me color this funny lady in.

Just Kidding...

I used a coordinating sentiment for the inside that says, “You’ll be missed.”  So, it ends up nice after all.  Just Kidding, get it?  Like I said, a silly set.  There are lots of fun phrases in it, lots.  A not so quick bow tied at the front and I called this one complete.

Have a creative day!

Moana