Happy Christmas

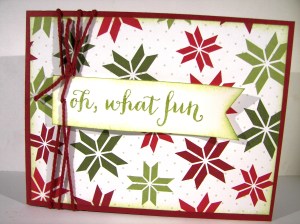
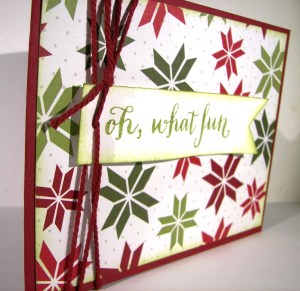
And this would be my absolute favorite stamp from the set Oh, What Fun.  The sentiments are fantastic, but this one is the true reason I bought the set.  Just look at how lovely the card is with just the sentiment.  Giggles and grins here.

Happy Christmas

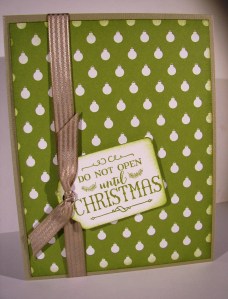
I used a single layer of Merry Moments DSP for the card front, love those adorable ornaments.  I  stamped on a doily and centered it nicely and then finished it off with a gold cord ribbon wrapped all the way around.  It is a tall fold card so my cording goes around the whole card front.

The reason I like that so much is that it allows a space for gift cards to be put inside and still allow for plenty of space to write a message.  You have to have both for sure.

Happy Christmas

Have a creative day!

Moana

Oh What Fun

Adorable, adorable, adorable.  There is only one more to share in the set after this one, but I do love this one especially.

Oh What Fun

Some time ago I came up with a little way to attach a tag in my twine and thought it would work well with this card.  Yes, it worked out great!  A bit of a threading thingy, but definitely not tricky.  Just looks neat.  I did have to use a dimensional to keep it straight across the card though.

The triple banner punch came in handy to make the tag super easy.  I am not one to have success with a square punch to make the banner end, so I think they made it for folks just like me.  Thanks for the frustration reliever.  Light sponging went into this one to finish it off.  Simple and sweet and easy to make.  Give it a try!

Oh What Fun

Have a creative day!

Moana

Do Not Open Until Christmas

How cute is this ornament print designer paper?  Almost like sweet polka dots, but done holiday style.  Here is yet another card from the gift set.  Several of them would be great to use as gift card holders.

Do Not Open Until Christmas

One simple layer of paper, one single stamp and one punch.  Nothing complicated here.  I punched a hole in the tag for my ribbon to come through.  I tied the ribbon in a knot first and threaded the ends through the tag.  I did use a heavy card stock, but was still careful not to tear it.  The know popped through and finished it off just right.  I did really want to add ornament die cuts for extra fun, but made myself keep to the simple tool list.  Phew!  Hard work to keep things simple sometimes.

Do Not Open Until Christmas

Have a creative day!

Moana

Joyful

Just like yesterday, thought I would plan ahead.  I haven’t even left for home yet, but I know I will be tired and fussy going back to work Monday morning after a lovely week off.  So, one more helper for me.  I could get used to this.

Joyful

Another card got the wrapped present sentiment look.  So perfect for Christmas cards I think.  I guess it would be great for birthdays too, and other gift giving occasions.  Well, I have some work to do!

More of the lovely Merry Moments dsp, soon to be retired.  These trees are so awesome.  At first they were not my friends, but I have grown to love them.  And even that silly coordinating punch.  One stamp for the sentiment, just a single word.  But it is perfect for the holiday season.  I love how this stamp, and the rest of the set too, have a water color style to it.  I have been practicing my water color writing, but will stick to stamps for a while yet.  Plenty of sponging going on here too.

Joyful

Have a creative day!

Moana

No Peeking

Planning ahead and definitely working ahead is what works best for today.  As this posts, I will be heading back home from my wintery holiday with family back to sunny California.  Not really good timing to let myself enjoy early morning blogging like I do.

No Peeking

For a simple card, there is a lot of dimension going on.  The ribbon and thread work great together with the tag duo and still manage to lay flat.  Three strands of ribbon were poked through the tags and then bound in linen thread.  I left the lengths of linen thread rather long and just curled them a bit with my bone folder.  Love it!  The ribbons were cut at different lengths to add interest and that finished the tag.  I thought it would be an adorable gift tag too.  Might have to make more of those.

Well, of course I sponged this lovely plaid paper before adding it to the card base.  A few wraps with even more thread were just what I needed.  I certainly have enjoyed this holiday card series, but we aren’t done yet!  Still five more cards to share.  So much fun!

No Peeking

Have a creative day!

Moana

Happiness and Cheer

A simple card like this can be so lovely too.  I really like the look of a ‘wrapped’ sentiment for a Christmas card.  Some of my favorite holiday elements are in this card.  I will be sad to see them go.

Happiness and Cheer

It is really just the paper and embellishments that will go, the metallic thread is a keeper!  I use that all of the time.  Maybe too much sometimes.  It was perfect for today though because it didn’t take over, but definitely made itself known.  I wrapped it a bunch to give more shine and couldn’t be happier.

This card series started out as a gift set but has turned into a reminder that simple can be so satisfying.  I do love having lots of tools and product to work with, but I really enjoy simple beauty.


Happiness and Cheer

Have a creative day!

Moana

Christmas Card Gift Set

I have the pleasure of visiting my children and family during this Thanksgiving holiday.  Well, when I see my daughter I like to give her card sets.  So, I thought I would share them with you.

Christmas Card Gift Set

It couldn’t just be simple for me though.  I gave myself a challenge.  I let myself have one set of dsp and access to coordinating cardstock and only two stamp sets.  The challenge was to use these things, keep them simple but elegant, and make ten cards.

Christmas Card Gift Set

She is a young stamper and has loved having access to my supplies over the years.  But being at college she doesn’t have all of that, but does pretty well of course.  I thought I would make a set that she could see as doable for herself.


All of the cards are basic in shape, so they would fit in the card holder, with only one layer of dsp as the front.  A series of single stamping, sometimes an accent, and tag punches.  I am going to share her gift with you over the next week, so enjoy!

Christmas Card Gift Set

Have a creative day!

Moana

Merry Moments Gift Card Set

A card that looks like a gift, but is a card, or is it?  I guess you could use this when you want to give a gift card and don’t just want to use the tiny envelope provided.  Either way, I like the look of a present shown here.

Merry Moments Gift Card Set

It has a hint of masculine with the color choices, but with that much ribbon I hesitated to give it the full masculine stamp.  You could probably get away with it though.  And I have to be honest, this is the first time I have used this adorable Christmas tree punch.  I guess I needed this awesome paper to inspire me to get it out.  It fit nicely as the gift tag.  So, I guess I will get to use it on other gifts this holiday season as well.

Merry Moments Gift Card Set

The DSP is layered on a piece of sahara sand cardstock with a narrow border showing.  I wanted to have a little more strength as I tied my ribbon on.  I do very much like a snug fit and probably winch it in a bit much sometimes.  I got the look I wanted though.  Why not give it a try your self?

Merry Moments Gift Card Set

Have a creative day!

Moana

Hearth & Home Thinlits Fun

After a full day of workshop excitement, I finally have a few minutes to share the third project we did.  This one just about did my ladies in, but they managed though most of it.  I didn’t have to help too much really.

Hearth & Home Thinlits Fun

The base of this candle holder is made with old olive from one sheet of cardstock.  Two card bases with 1/2″ cut off from one side and 1/2″ score on the other with a score in the middle.  With two of these joined together, the box frame was made.  Four panels of heavy whisper white cardstock were put through the Bigshot in the Brick Wall embossing folder that had been brayered with old olive ink.  It gave the perfect mix of a soft brick wall that coordinates nicely with the base.

Hearth & Home Thinlits Fun

Cherry cobbler was used to create the window frames.  The Hearth & Home Thinlits set is simple, but what a great look right?  The window frame is a great focal point that I chose to back with velum to allow an opaque look in.  I had provided fun battery operated candles that fit nicely inside.  When they flickered it made it look like there was a very colorful set of Christmas lights going on inside.  So pretty.  A couple of buttons, some twine with a simple saying set the front panel apart from the others.  Along with a few little shrubs made from mossy meadow paper punched with a scalloped circle punch.  Really, a cute project all in all, even if it was a bit of work.

Hearth & Home Thinlits Fun

Hope your day was creative, mine sure was!

Moana

Sparkly Seasons Pumpkin Patch

It may not look very busy, but these little pumpkins almost did me in.  I nearly got to the point of just showing you how frustrated I was and that there was not much to show for it.  Then I thought about iridescent ice, and the world came together.

Sparkly Seasons Pumpkin Patch

I love that stuff.  It can make the most simple things look almost magical.  I used three different framelits for my pumpkins and got to work.  I used a large stylus to create grooves and texture to the surface, but from the back side.  It really broke down the fibers a lot.  Then I began to water color streaks to give dimension.  That didn’t do a whole lot.  Then I spritzed water and swiped ink on with my finger.  It got better.  Then I sponged with pumpkin pie and added early espresso too.  At that point they looked okay, but still kind of sad.

Sparkly Seasons Pumpkin Patch

That is when I tried the iridescent ice.  I daubed the whole surface with versamark and sprinkled on the powder.  I only used one coating and thought that would be enough.  It was just right.  I did sponge a bit more with early espresso afterwards.  I layered the pumpkins together using dimensionals, with the stems too, and wrapped them all in linen thread.  I wanted to leave it then, but decided on a simple word phrase.  And there you go!

Sparkly Seasons Pumpkin Patch

Have a creative day!

Moana

Vintage Leaves, All Through My Yard

The weather has finally changed and I love the color change that follows.  Looking out my window I can see trees with leaves in all of these colors.  Just so lovely this time of year.

Vintage Leaves, All Through My Yard

This stamp set lets you create leaf images that have so much texture and the play of light across them.  How fun and validating is that.  Becoming the artist without knowing how to be.

Vintage Leaves, All Through My Yard

I stamped the leaves in different colors starting from light colors to darkest.  I had started with a different intention, but it didn’t work out.  I stuck with my background as the focal point and just enjoyed water coloring it.  It went together rather quickly.  A few simple layers, very light sponging, and a gentle wrap of gold metallic thread for an accent.  I love this kind of creative fun.

Vintage Leaves, All Through My Yard

Have a creative day!

Moana

Workshop Fun

Workshop was yesterday and this is the first chance I have had to share it with you.  Two of the projects you have already seen, but this cute little pumpkin is new.

Workshop Fun

I had the opportunity to attend one day of a scrapbooking convention with all kinds of lovely things to see, touch, and of course buy.  One of the many make and takes available was this cute little pumpkin.  When my friend and I would go by this particular area, there was always someone using the stations, but I knew I wanted to try one out.  I took a few photos of the samples and did my best.

Workshop Fun

There are a few other pumpkins on my counter, but this is the one I ended up making for my workshop ladies to play with.  I used  a piece of dsp cut at 6 x 12 and cut strips measuring 3/4″.  You get 15 strips from the sheet exactly, no waste at all.  They were stacked, clipped together, and punched with the ever handy crop-o-dile at both ends.  A hearty brad was used to keep the strips together, then you just fan them out.  Promise, they fan out nicely and curl into this pumpkin.  Then stamping and die cutting the fun leaves and place them where you like.  Some of the samples had ribbon, you could top it how you like.

Workshop Fun

Have a creative evening, since the day is pretty much done.

Moana

More Thankful Swaps

Isn’t this a lovely pairing?  The colors of fall are so beautiful to me, truly my favorites.  It should be turning fall here, but is still hot like summer.  A girl can dream, and enjoy pretty cards about fall, right?

More Thankful Swaps

These are other swaps that were completed samples for me, but I can’t wait to make them myself.  I have a lot of the tools, but didn’t get that cute little bear.  It comes from the Thankful Forest Friends set and I saw it as a bit too whimsy for me.  I think he, and his friends, are adorable and have put it on my wish list.

More Thankful Swaps

This window frame framelit set is a must have.  Paired with the brick wall embossing folder, there are endless options to enjoy.  I can honestly see myself making way too many projects with those in hand.  How fun!

More Thankful Swaps

The Into the Woods designer paper is so wonderful.  As I said, fall colors are my favorite, and these showcase them beautifully.  Hard to resist for sure.

I think my little stamping group would love the swap idea.  We haven’t yet, but I am going to have us try this out for sure.  Everyone has a different style and a unique set of artistic skills.  It is so fun to experience so many all at once.

Have a creative day!

Moana

Thankful Swaps

I have been out of town this last weekend and it is nice to be home for lots of reasons.  I did love my trip, seeing my daughter and son at university is just fantastic!  Something about your own space though, just feels cozy.

Thankfuln Swaps

I also discovered that I am not the best blogger on my iPad.  They were pretty basic, but I managed.  I was honestly just too tired yesterday and had tons more standing in line waiting to be tended.  Day survived.

Thankfuln Swaps

There were several fall themed swaps I wanted to share as well.  I had recently ordered this stamp and framelit set but haven’t gotten to play with it just yet.  So it was nice to play at the demonstrator workshop event.  Working through someone else’s vision is different, but entertaining.

Thankfuln Swaps

While it is fun to share these swaps, I am getting anxious to dig back into my supplies and create.  Especially with some of the new treasures.

Have a creative day!

Moana

One Big Meaning and Remarkable You

To get my mind off the heat last night I sat down at my desk and got a little more creative.  It has been a bit since I spent this much time for one project, but to be fair, I didn’t have any idea what I was going to do when I sat down.

One Big Meaning and Remarkable You

I used a whole sheet of tip top taupe to make the bag.  Just simple scoring there, nothing fancy.  I did forget to stamp before I scored, ooops.  So, my stamping does have little crease marks on the edges.  Can’t be perfect.

One Big Meaning and Remarkable You

The base has two layers, tip top taupe and a stamped layer of very vanilla.  I brought out the aqua painter again, oh how I love that tool.  Just using the ink from the stamp gives such a soft look.

One Big Meaning and Remarkable You


The oval framelits were put to work again for the focal point.  What a lovely flower.  I brought in tip top taupe into the flower and water colored it into the old olive.  I can tell the color difference, but I can also see a hint of lavender forming.  Interesting.  Crystal effects really made a difference in the look of the flower.  I could really use that stuff way too much.  A final stamped sentiment layered with some circle punches finished the front.

A touch of dotted lace trim was put to the side and also used to make a simple handle for the bag.  It really turned out beautiful.

Have a creative day!

Moana

You’ve Got Me

I love it when everything coordinates so perfectly, but today is all about the sentiment.  I love these paired phrases, simple but strong.

You've Got Me

The card layering is fairly basic and puts a few favorite punches to work.  A dash of basic rhinestones to draw further attention to the sentiment and the front was done.

You've Got Me

I don’t normally stamp inside a card, but this one needed it.  I zoomed in on the detail, but it actually measures barely over a square inch.  When that card gets opened, that is what you see. “You’ve Got Me.”  How perfect is that.

You've Got Me

This new paper pack is loaded with beautiful paper.  I just used one sheet for this card.  The green floral is the other side to the main floral front.  My little flowers are from scrap of the same sheet.  I love putting all everything to work.

Have a creative day!

Moana

My Dear Friend

I focused on one image for today’s project.  It initially reminded me of a Japanese maple tree as it starts to change colors.  They are so vibrant.  As I started to paint them I noticed the flowers and the leaves looking different.  I thought it was more of a shrub.  Put your glasses on, right?

My Dear Friend

I put the aqua painter to work here.  I stamped the image in cherry cobbler and brought the color in with just water.  Then I added in old olive and mixed the colors, just as the leaves would be looking.  I decided I wanted the flowers to stand out more, so I darkened the centers to bring out the detail.  I can’t believe I didn’t notice the flowers the first time.

My Dear Friend

Talk about being generous with the basic rhinestones, but I wanted all of the centers to sparkle.  Such a pretty look.  Is it over the top?  Well, if it is for a dear friend, you want it special.  The friend stamp seemed a bit lonely, so I wrote in above it using an old olive stampin’ write marker.  First try even, not bad.

My Dear Friend

There are so many new products used today.  The framelits, the embossing folder, the stamp, and they work together great!  I even got all nostalgic thinking about an old friend that I just don’t get to see anymore.  Guess I know where this one is going!

Have a creative day!

Moana

Trek Inspired Bordering Blooms

Trek Inspired?  Well, of course!  Coming up next week around two hundred youth and adult leaders will be heading out for a three day handcart pioneer trek covering about 15 miles.  My husband and I get to participate as “Ma and Pa” for a group of eight youth who will be our “children” during the trek.  I don’t know if I am more excited or scared.  Good to be both though.

Trek Inspired Bordering Blooms

I have been sewing my pioneer outfit and have it ready to go.  I am actually typing while wearing it.  What a great pioneer thing to do, right?  I even have my hair in french braids and my straw hat on.  I thought it might be a good idea to try and walk around in these skirts a bit.  My lace will be getting dirty I think.

Trek Inspired Bordering Blooms

While I saw sewing I saw a card coming together.  Mix my two favorites, right?  I stamped with one of the border stamps in old olive on very vanilla.  I used my aqua painter and the other ink colors to color in the flower and leaf patterns.  Yet another background creation.  And now I have two all occasion cards ready to go.

Trek Inspired Bordering Blooms

Here is a sneak peek at part of my apron.  Can you see the colors coordinating?  I know the marina mist is a bit brighter, but it was close enough to get my brain creating.  Ruffles and lace and ruffles and lace.  My mother will be so proud.

Trek Inspired Bordering Blooms

I think I will do some more trek inspired projects to share while I am gone.  Yee-Haw!

Have a creative day!

Moana

Corner Garden Gift Bag

Sometimes I design a bag around a gift or to match some cards I have made.  This time I wanted to work around a specific stamp.  I wanted to do a tone on tone with the Corner Garden stamp set.  The detail is fine and subtle, just the look I was going for.

Corner Garden Gift Bag

The bag is large enough to hold plenty.  It could hold a large set of cards and envelopes, or any number of things.  It is sturdy too.  A nice heavy cardstock bag with my favorite chevron ribbon.  Bring on the heavy gift, I am totally ready.

Corner Garden Gift Bag

At workshop Saturday my ladies teased me about my need to sponge the edges of everything.  I was able to say that I had controlled myself and we only sponged one of our three projects.  So I was feeling the need and definitely got busy on this bag. I just love the look it gives.

Have a creative day!

Moana

Park Lane Duo

I started this set yesterday morning, got stumped, fussed last night, and finally fixed it this morning.  I kept trying to put the yellow butterfly on the card front.  Yes, the one I inlaid back into the gift bag I cut it from.  Strange how things come together better when you give your creativity a break to refocus.

Park Lane Duo

I colored the paper with my ink sponges.  I didn’t want a lot of exact color, just subtle hints.  So I just used the sponges with leftover ink already on them.  It did the job just right.  Of course my photos make it hard to see, but I love the effect.

Park Lane Duo

When you use delicate die cuts it helps tremendously to sandwich wax paper in between the layers.  The paper just pops out then.  I decided to use the wax paper ones as well.  I didn’t want to cover up the coloring and the yellow butterfly just took over.

Park Lane Duo

After I swapped things around I fell in love.  I attached my wax paper butterflies with some folded glue dots and then ran a string of basic pearls down the body.  It gave such a delicate finish.

Park Lane Duo

One quick stamp from the Sheltering Tree set and the card was done.  No ribbon, no other extras, just some light color and transparent butterflies.  Since they are so thin, the move when the card does.  Beautiful.

Get out there and have a creative day!

Moana