Hey, Chick, I’m Back!

Well, I guess that kind of sums it up!  With two children’s weddings within six months, and a heavy dose of regular life, I just found myself taking a few things out of my day to help get through it all.  I have so missed this, it really does help keep me sane and happy.  I have still created, but not at the same volume and just haven’t taken the time to share.  Enough of that, so I am back to stay.

1-12-17-2

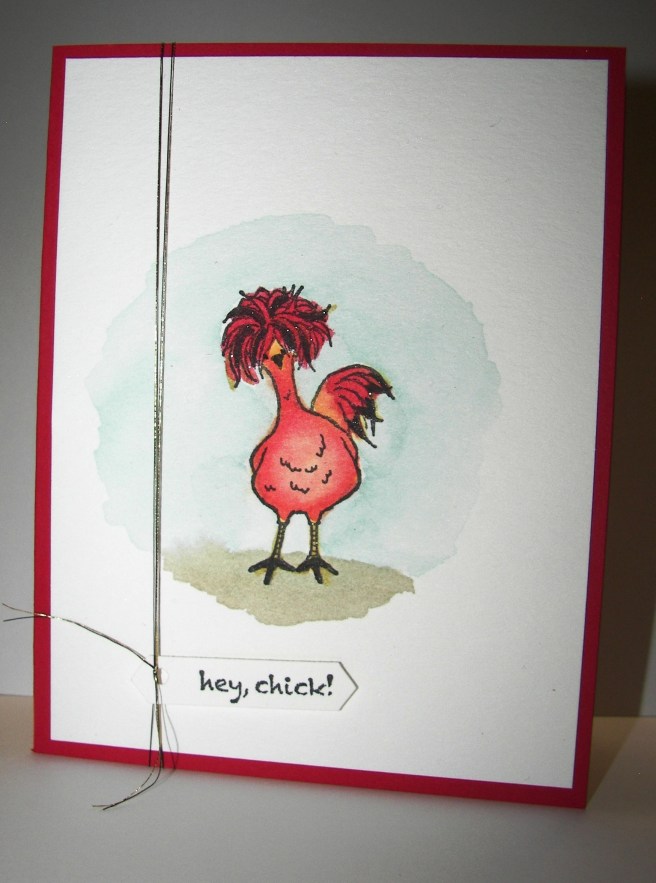
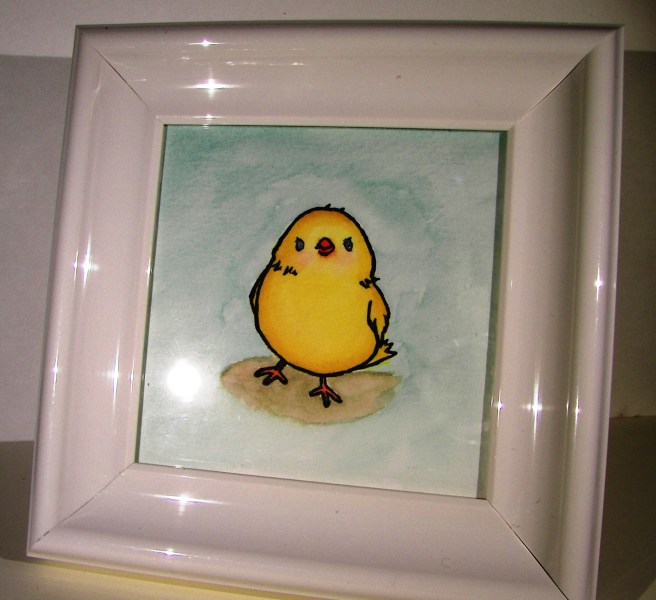
What better way than to be greeted by this adorable chicken, right?  Last year during sale-a-bration there was a different chick stamp set.  Here is the new one, and it has taken my number one favorite spot once again.  There are others in the set, but this guy is the best! What makes it better than that?  The set is free with a $50 product order.  Free is cool, but I would have bought this one in a heartbeat.

1-12-17-1

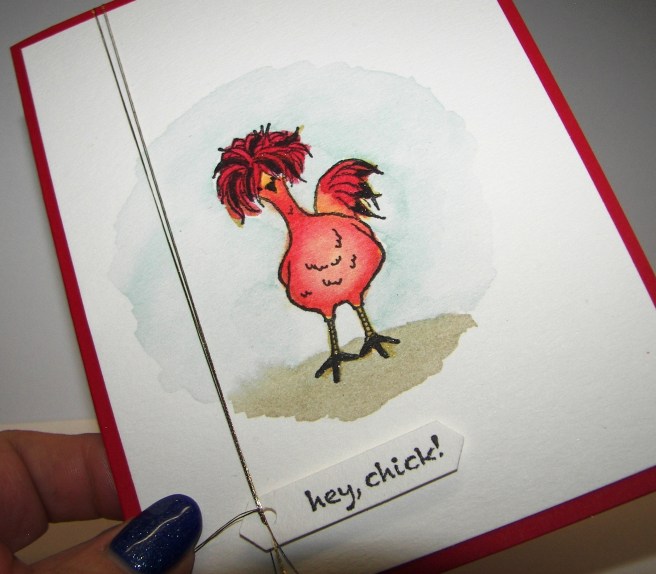
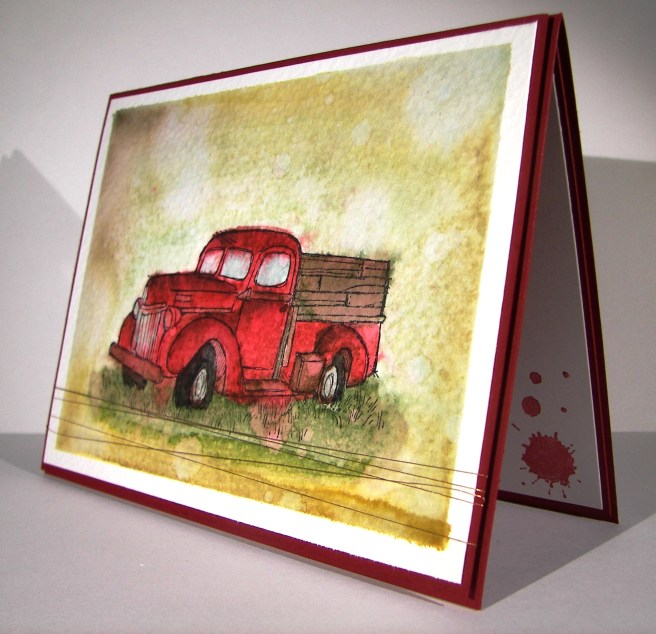
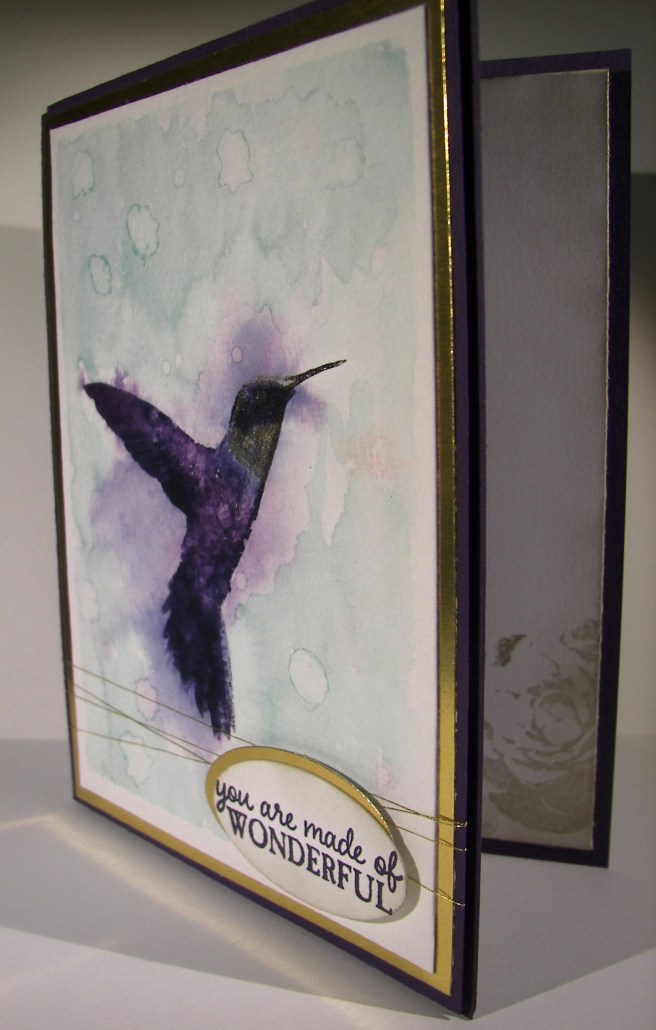
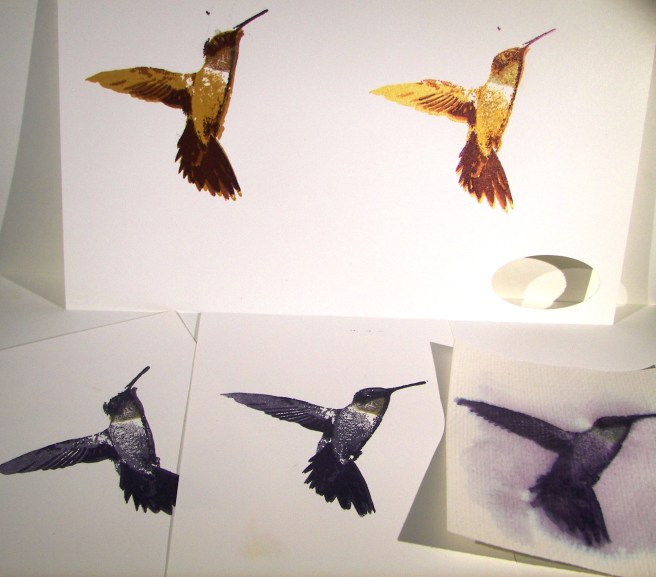
I stamped the chicken in black stazon ink on water color paper.  I knew I wanted the feathers on top red and decided to make the tail feathers match.  It really was a painting process here.  That is usually how my water coloring goes, layer upon layer.  I put out my colors, real red, pumpkin pie, and daffodil delight, and painted until I was happy.  I used a black marker to add some wild feathers and then hi-lighted with gold wink of stella.  His little eyes were a bit tiny, so I used my marker to make them a bit larger.

The tag was stamped on a scrap of water color and punched with the classic label punch. The stamped area was smaller than the punch, so I punched it again on one side to shorted it up a bit.  One quick hole punch and a double wrap of gold and black metallic thread and I called it done.  The water color is adhered down with a heavy dose of fast fuse while the tag got layered up a bit with dimensionals.  I forgot to include a photo of the inside.  I tipped the chicken a bit sideways and stamped him as if he was peeking around a corner.  I lightly water colored him to match the front and just giggled.

It feels good to be back.  Now, to make sure I give myself time to enjoy this lovely process every day once again.  It will be tricky, but worth it.

Have a creative day!

Moana

Country Livin’ Rocks!

Living in the country has its perks, and wouldn’t this be just one of them?  I unfortunately do not have an adorable old truck like this, but it sure would be wonderful!  I will have to settle for the stamp and my imagination.

7-2

This image was stamped with black stazon ink on water color paper and then adorned with a whole bunch of ink colors.  I started with a pallet of six colors, but it didn’t stay there.  I ended up with ten, but it called for it.  That doesn’t include the colors that emerged from simple blending and colors flowing together.  This kind of work is my favorite.  No real rules, just lots of distressing.

The perfect companion to the card is the new copper metallic thread.  It almost reminded me of barbed wire or old fence wire.  I like a little of embellishment, but don’t want any distractions when I water color.  The thread works for me.  There was a touch of stamping on the inside panel.  The splat image from the perpetual calendar set with cherry cobbler stamped off once.  Yummy!   I do think it would be interesting to try and paint this stamp with flames and metallic chrome.  I will have to see on that.

7-2 (1)

Have a creative day!

Moana

Flourishing Phrases

This particular project went through a few different phases.  This is how it started out, all about blue.  I had the ocean on my mind and gave it a try.  I had intended on using a new embossing folder after I water colored, but to be honest, I forgot once I got all this going.

6-25

After I painted with all of the blue inks I have I did some detail work using my gold wink of stella.  I focused on some of the watermarks and edges of color.  The look it creates is really awesome.  It is tricky to know when to stop because it is so much fun.  Mission accomplished here for sure.

6-25 (1)

The next step was to add a special tag.  This one got a bit out of control and went to a busy style that really isn’t my own.  However, I decided to leave it and see how it balanced out with the huge butterfly addition I had in mind.  I water colored large areas of paper to provide both my tag area as well as the butterflies.  It is much easier to paint whole sheets instead of small specific die cuts.

6-25 (2)

When this butterfly combo came along I really began to wonder just what I was up to.  I think that is because I love decorative painted backgrounds so much I rarely cover them up. They are such great all occasion cards, but I pushed forward.  I did edge the butterflies with the wink of stella, which of course you cannot see in these photos.  It is there though, and it looks so pretty.  You can see it better in the lead featured image which is much more close up.  Basic pearls, gold metallic thread with a little more patience and this project was finally finished.  It measures 5 1/2 x 5 1/2 plus the butterfly hanging off the edge.  A custom envelope will definitely be in order here.

Have a creative day!

Moana

Thank You, Friend

Did I take a few days off?  Well, not really.  My son recently got married and just last weekend we had a reception in our backyard to celebrate.  I thought I could keep things going, but I just had to get a bit more focused. Family always comes first.  Then you have the lovely friends that support and make everything come together.  I have several such friends and I couldn’t be more grateful.

6-14

Could these two adorable friends be any more wonderful?  They come on one stamp and make the perfect pair.  I decided to put several of the new in-colors to work to show them off.  The elephant is painted in sweet sugarplum, the mouse in peekaboo peach and the ground painted in emerald envy.  The sky background needed something different, so I went with soft sky.  Yup, just what the card needed.  Nothing else was needed, no ribbon, no distressing or anything else.

I mounted the water color on a separate piece of sweet sugarplum cut to provide a narrow 1/8th inch border and then raised up on dimensionals.  This is just the type of card I would love to get, but even more, love to give.

6-14 (1)

Have a creative day!

Moana

Corner Garden Bliss

As another catalog year comes to a close I have to be brave and say goodbye to the things that I have loved so much.  This card has so much of that in it.  The stamp, and three of the colors.  A very sad farewell indeed.

5-5

I masked a piece of water color paper and stamped the floral image in black stazon ink.  I have loved this stamp so much.  I do think it will stay with me even when it isn’t available to purchase.  The only color I wanted for the flower petals was blackberry bliss.  So, that meant some had more color than others and they all got special treatment to make them look unique but coordinated.

Before I painted the leafs and stems I applied the soft sky background.  I knew that mossy meadow would cover easily and I still wanted to allow it to blend out a bit.  It worked like a charm.  The flower centers were painted in hello honey and allowed to blend out a bit into the flower.  After the painting was done I  just stared at it wondering how I wanted to distress it.  I didn’t want splatters or spots, but didn’t want to leave it either.

I decided to use a spritzer and water.  Several sprays later I started to like what I was seeing. I did some sponging with a paper towel to lift off some color, then a neat thing happened. I took my damp, inky paper towel and sponged from the bottom to the top which brought a very light amount of blackberry bliss with it.  It looked pretty great so I went with it.  I bet I couldn’t recreate it though, but I will most certainly try.

5-5 (1)

Have a creative day!

Moana

Sandlot Inspired Card

What sandlot do you think I am referring to?  Well, the awesome kids movie about baseball and friendship of course.  This movie was just watched in the P.E. classes at the school I work at and I thought of a card to go with it.  New for me, a movie inspired card.  It was sure a lot of fun to create.

4-28 (1)

The card base and the fence is made from soft suede.  I stamped the hardwood image in early espresso and sponged the planks as well.  I also punched out a knot in the wood with the 1/4″ hand held punch to make a spot for a peephole.  So cute!  The grass is from a strip of garden green, snipped with the fringe scissors and sponged with early espresso as well.

The light paper is water color as well as the tiny little baseball in the grass.  It was a bit tricky to get the fence in the right place to let the boys peek over, but I did okay.  The interesting part was stamping an image to let a boy peek through the hold in the fence.  I think it would have been easier to just draw with a pen instead of trying to adjust my stamp, but I ended up having to do both anyway.

I glued the grass in place with tombo and placed the baseball in the grass with half a dimensional.  I did water color the ball a bit and sponge it too.  I had to hold it with tweezers during the sponging, such a small piece.  I totally had to fussy cut that one out. The 1/2″ circle punch was just too big, bummer.  I did some water coloring with soft sky on the background, pink pirouette on their faces and used markers to color in the rest.  It was a bit of work, but it turned out great.  I think it would be a great card to give along with the movie, don’t you think?

4-28 (2)

Have a creative day!

Moana

Beautiful Ride for Newlyweds

It may be hard to tell, but there are an absolute ton of colors going on here.  I had a blast working on this set.  When I finally finished I was a bit surprised to see how late it got, but it was worth it for sure.  I love making wedding cards just for special people in your life. This one is no different.

4-21

I worked the colors to create a sunrise look and I think it turned out really nice.  I was having a chocolate craving last night, so I settled for chocolate chip paper.  Not quite delicious, but it still worked out.  That led me to marina mist for the car color. From there everything else just came together.

4-21 (2)

I wanted a gift bag to go along with the card to give the gift card something to go in.  I think I will put a tiny selection of rich chocolates around it, wouldn’t you like to get a treat too? Opening gifts can be exhausting for a newlywed couple, so they deserve a sugar boost along the way.

The details in this set are really busy and probably hard to notice.  I think a project like this should look simple even if you know better.  Not everyone knows how much work goes into a tiny work of art like this, but that doesn’t stop me from sharing them.  Just a few more weeks and this card will find its way to the deserving adorable couple.

4-21 (1)

Have a creative day!

Moana

Mother’s Day Take Two

Earlier in the year I made a couple of cards with this darling little chick from a sale-a-bration stamp set.  I instantly fell in love.  So did my mother.  I decided she needed to have one of her own and not just a card.

4-12 (1)

A prior paper pumpkin kit had this frame along with pretty little things to make a wonderful decorative gift.  I couldn’t make it for my own mother since she gets the same kits each month and I didn’t want to give her something she already had.  It sat upon the shelf for some time.  Until last night when I needed it, the frame that is.  I also used the wrapping cardstock and ribbon to go around it.  Now I will send it away for an early mother’s day gift.  She will be super excited.

The little chick was stamped in black stazon on a 4 x 4″ sheet of water color paper.  I started pulling ink pads until I had everything painted just like I wanted.  I did use my heat tool a few times along the way to set color when I wanted to layer another.  The yellows I let all blend together without worry.  But I wanted the cheeks to stay pink and tried to keep the beak a little more under control.  The shadow needed to be dried before the background was applied, but that is about it.  After I put a touch of marina mist for blue eyes I used wink of stella to give them some sparkle.  Just a fun little project to make my mom smile.  So fun.

4-12

Have a creative day.

Moana

Watercolor Wings Just for You

Saturday mornings are usually busy with everything under the sun and then some.  I had the opportunity to chat with my oldest daughter while she got ready for work.  We put each other on speaker phone so we could keep moving along.  This is what I did during our chat.

3-12

With all of the excitement of Sale-a-bration products and the wonderful spring catalog, it is easy to put aside all of the great product in the annual catalog.  This set, Watercolor Wings, has been a favorite since it came out.  I hadn’t had it put to use lately and thought that was long overdue.

I stamped my ink layers onto watercolor paper this time not quite sure how it would all turn out.  The initial stamping was a bit too detailed for the effect I was going for, but I remained patient and kept going.  I moved in with the aqua painter and began blending, but still wasn’t satisfied.  Perhaps because I had stamped off to get the tones I wanted the ink didn’t want to move around too much.

I thought things were a bit stark still so I came in with pear pizzazz for my background. That really helped out a lot.  But the butterflies still weren’t what I wanted.  I got a spritzer out and put more water on.  Which led to dabbing water off, spraying again, and moving along to the heat tool and doing it all over again.  I did finally get a result I liked, but decided to bring out the wink of stella pens, both the clear and gold glitter ones, and put in finishing details.  I think it all worked out, but I wasn’t sure for a while.  Sometimes watercolors can be that way.

3-12 (1)

Have a creative day!

Moana

Lovely Amazing You Gift Set

I got myself back to that little set of cards to make a gift box for them.  I do like how it turned out, but I didn’t choose my paper very wisely.  One of those times where I just went for it, didn’t plan like I should have, but it worked out anyway moments.  Lucky for me…

3-4

The adventure began with a full sheet of this wonderful foil velum.  I was more preoccupied with the score lines for thickness and width for the box.  When I wrapped them around to close the box it ended up just over an inch too short.  Ooooops.  So I decided a belly band was in order.  I needed a bit more stability anyway, so I was good with that.  What to use?  I couldn’t use the rest of the sheet because the hearts would be facing in a different direction and that would bug me.

I got into the foil paper and pulled out one of the remaining scraps.  I am very sparing with the foil paper you know.  There was just enough to get a strip to almost go around.  I then created a layered base to connect the two sides of the band and covered it up with another scrap of foil.  Now, to make the perfect front.

Lovely Amazing You is a stamp set is one of my favorites.  The sentiments are so kind and fun.  The handwriting is also adorable.  I used the little envelope to create the background. The four colors coordinate with the different cards inside.  Nice little connection I thought. Then I chose the sentiment that tied in with the hearts on the foil.  Pretty cool.  I don’t know if I would try to do it again, the velum isn’t the most sturdy gift box choice.

3-4 (1)

Have a creative day.

Moana

Botanical Gardens Card Set

How sweet are the colors in this set?  I wanted to make a small set of cards using this wonderful velum as an overlay.  I asked my daughter for a color and she came up with soft sky.  So, I just selected three others from the subtles collection and got to work.

3-2 (3)

The tricky part is attaching the velum without adhesive showing, as always.  However, it didn’t turn out too rough.  The ribbon held most of it together, but I did use a touch of glue in the outer corners.  It was easiest to see on the wisteria wonder card, but even then it was acceptable.  I usually mask my adhesive, but this particular setup didn’t offer good hiding places where I needed them.

I do think I will create a small box to house these in and give it as a gift.  This tiny little stamp that just says “Hi”.  How adorable is that? It comes from the newly available sale-a-bration stamp set Party Pants.  There are so many cute sayings in that one.

3-2

Have a creative day!

Moana

Picture Perfect Hummingbird

Is it possible to be defeated by a stamp set?  It was surely happening with this project.  I decided to tackle a four step stamp, yes, this innocent looking hummingbird.  I took a photo of my study series, or my path of frustration to say the least.

2-27 (1)

I am much more used to sitting down, getting out whatever I want, and having it turn out pretty darn amazing.  This was not to be the case.  However, if I was to come across 3-D glasses, I might have had more fun.  My first two attempts obviously were poor color choices.  The hummingbird I had in mind was not going to come together.

I changed to monochromatic thinking that might help.  It did some, and I improved, but was still unhappy.  Keeping this guy all lined up, even being able to see through the stamp, was proving harder than anticipated.  I switched to water color paper and played some more.  I gave it one more try, with elegant eggplant, night of navy, gold, and black stazon.

Stamp one was in elegant eggplant, stamp two in gold (the little neck), stamp three was done in night of navy, and the final stamp (which included the beak) was done in black stazon.  I got to work with my aqua painter for the background wash, in soft sky, and then added coloring to the bird.  It got out of control fairly quick and I thought I was done for sure.  I was being so careful, so I thought.  I ended up putting a thick layer of paper towels over the image to seep up the crazy color mess.  When I peeled it away I got a little hope, it didn’t look so impossible.

When I had finished I fell in love with it.  I am not sure if I could duplicate it, because of all of the water color layering effects, but I won’t be scared to try.  It is such a pretty image and I love it in water color.  Especially with the gold ink and the wink of stella added in.

2-27 (2)

Have a creative day!

Moana

Forever Begins Today

This was for yesterday, however, yesterday was for my family and there wasn’t time to share this with you.  I am sure it was worth the wait though.  Aren’t these flowers just the best thing ever?

1-21

One framelit set gives you all of these pieces, plus a couple more.  And they coordinate with velum, designer series paper just to name a couple. I have been planning this one for a while now, with a very specific goal in mind.  I am fortunate enough to have my son getting engaged and this is how I am going to approach the second reception.  What else could I possibly use for my inspiration piece, right?

1-21 (1)

I do admit that once I cut into a piece of designer series paper for a card front, I look to the remainder of the sheet and immediately think of a bag or box I can make to coordinate.  I have a hard time stopping myself to be honest.  I also have a bit of a problem filing back my scraps of cardstock when I work.  All of these colors were available to me in my stack of put me away papers.  I put them to good use for sure.

1-21 (2)

Have a creative day!

Moana

Thoughts & Prayers Raining Down

This is the lovely view I have had all this past week.  It has been so wonderful to enjoy the cool cloudy days filled with light rain.  It makes everything look bright and clean, and the smell is wonderful.

Thoughts & Prayers Raining Down

I stamped my image first and washed the paper with plain water.  I then proceeded to layer on my ink until it was dark on the top and the right layer of light on the bottom.  I continued dabbing my brush along the top pointing down for ink to kind of fall down.  It started to look more and more like rain.  I finished it off with spritzing water, allowing it to dry some and doing it again. The last time I spritzed heavier allowing for some drops to form, and then controlled them down the piece.  It worked wonderfully.  How simple is that?

Thoughts & Prayers Raining Down

Have a creative day.

Moana

Sparkly Seasons Ballerina

Doesn’t everyone get enchanted with a pretty snow globe?  This particular stamp set has a few options to make one happen, but this pretty ballerina might be my favorite.  She is so delicate and lovely.

Sparkly Seasons Ballerina

The base is stamped in sahara sand and the globe is in soft sky.  That is also the card base and background color. I stamped her in sahara sand as well to give a hint of skin color without having to make it happen.  I did water color her tutu and slippers though, couldn’t resist that.  Her hair just had a touch of marker coloring.

Sparkly Seasons Ballerina

I stamped the ‘sparkle’ inside the globe with versa mark ink and then covered it with dazzling diamonds.  Loved it.  But I needed more.  So I used the 2-way glue pen to color a layer around the bottom of the globe and used more dazzling diamonds.  I liked that a lot better.  Of course I had to put a bunch of rhinestones around as well.  Sparkle means sparkle.  I even put a few inside.

Sparkly Seasons Ballerina

Have a creative day!

Moana

Elegant Butterfly

Butterflies, butterflies, and more butterflies.  There are a bunch going on here, but one in particular started it all.  You might not realize it, but I played quite a bit with this little butterfly.  Lots of detailing and working it with a stylus.

Elegant Butterflies

Sometimes the attention to detail makes all the difference.  My daughter made a good observation.  She said it would be really pretty if it were glass or something so it could be a necklace charm.  I have to agree, it would be lovely.

Elegant Butterflies

I do rather enjoy working with colors that are so not of the current holiday.  Nothing more entertaining than making a spring card in late fall, or a fun Christmas project in the middle of July.  Something different to expect.

Elegant Butterflies

Have a creative day!

Moana

Nautical Themed Invitation

Take a look at this fun invitation and imagine another twenty-four of them.  Quite the fleet of cards, and I just love them.  They are themed invitations for an event a few weeks out for a church event.  The cream banner at the bottom ended up having “Embark…” written on it.  Great invites for a great night to come.

Nautical Themed Invitation

I am not prone to square cards, but I don’t know why.  They look so fun and offer a different design pallet.  Good reminder.  Crumb cake, very vanilla and soft sky come together for this lovely scene.  Only one stamp and a lot of die cuts.  I did have help on this assembly line for sure.  I did all the stamping, sponging and assembly while my husband ran the die cuts.  Yes, he did all six sets of twenty-five.  He is so fun to work with.  How lucky can a girl get!

Nautical Themed Invitation

The dies are from a collection my husband found for me at a thrift store, so I couldn’t send you in a direction for them.  Aren’t they great though?  But honestly, the stamp makes it all happen, and that comes from the Traveler set.  Lots of layers and an eye for design.  With those in mind, there are no limits to what you can create.  Just be patient and try a few options out until you are satisfied.  Now, to create centerpieces that go with these.  Another day…

Nautical Themed Invitation

Have a creative day!

Moana

A Whole Lot of Lovely

Today is quite the contrast to yesterdays color scheme.  But I certainly am all over the place in regular life, so why should my crafting be any different.  Makes sense enough to me.

A Whole Lot of Lovely

I have wanted to try this technique for ages but have never sat down to actually do it. I saw a card that did this as a lattice background for a lovely floral collection and saved the image for later.  That was two phones ago, and I have long since lost that image, but not in my mine.  

A Whole Lot of Lovely

I used my simply scored set and diagonal plate to make these lines.  If you look closely you will see all of my errors, but it was my first time trying.  I tried to keep my score lines 1/2″ apart, but didn’t get them exact every time.  The look turned out though, and you get the idea.

A Whole Lot of Lovely

Some simple stampin, layering everything up on dimensionals, a couple of strings of basic rhinestones, and a healthy dose of sponging helped to finish it off. I of course had to stamp and sponge the inside to make it almost as lovely as the front, they need to coordinate.

Have a creative day!

Moana

Planning Ahead for Christmas

These cards feel like such a cozy Christmas, don’t you think?  We are making plans for a sunny holiday this year, but peeking out a window to a snowy scene is more than inviting.

Planning Ahead for Christmas

This window framelit set is sure to be one of my favorites.  Peeking through the window, could this snowman be any cuter?  I don’t think so.

Planning Ahead for Christmas

I love inside stamping.  It makes the card feel so much more complete.  Sometimes we need a place to write a nice long note, but other times it is just wishing someone a happy day, or a happy holiday.

Planning Ahead for Christmas

Most people enjoy displaying their holiday cards as part of their seasonal decorations.  These two swaps would definitely be a welcome addition to anyone’s Christmas decorations.

Have a creative day!

Moana

Let It Snow

I know it is only the beginning of  September, but I do love seasonal cards, especially winter scenes and Christmas.  Not to mention that the Stampin’Up! holiday catalog goes live today.  So much fun!

Let It Snow

I have used several new products in today’s project.  New stamp set, new framelit set, new embossing folder and then comes a new card.  How cute is this little snowman?

Let It Snow

I stamped the image where I wanted it along with the sentiment.  Then I embossed the card front.  At first I wanted to have all the snowflakes sky blue and thought to use the brayer.  But I decided to be more selective and yes, I did water color select flakes.  It didn’t take that long, really.  The effect is nice.

Let It Snow

I had an extra ‘snow’ die cut from Saturday’s event project and knew just where to use it.  Actually, that is what started the card out.  I added in a little silver metallic threat and layered it all up on dimensionals.  Just my speed.

Have a creative day!

Moana