Window Box

Each time I sat down to work on something I got frustrated, hated it and walked away.  I made myself go back and fix those projects, but not until this one made me happy first. It was a bit of a chore putting it together, but isn’t it lovely?

2-27

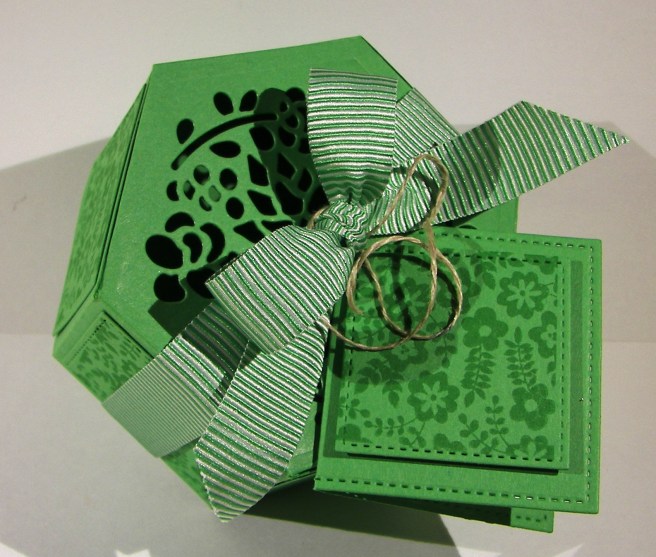
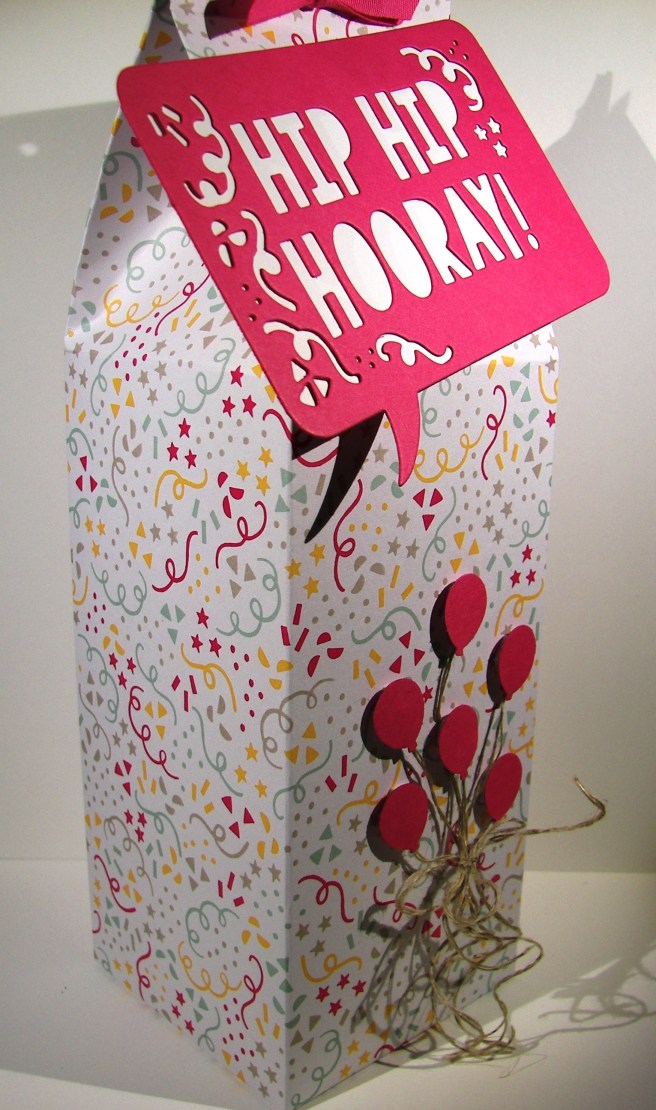
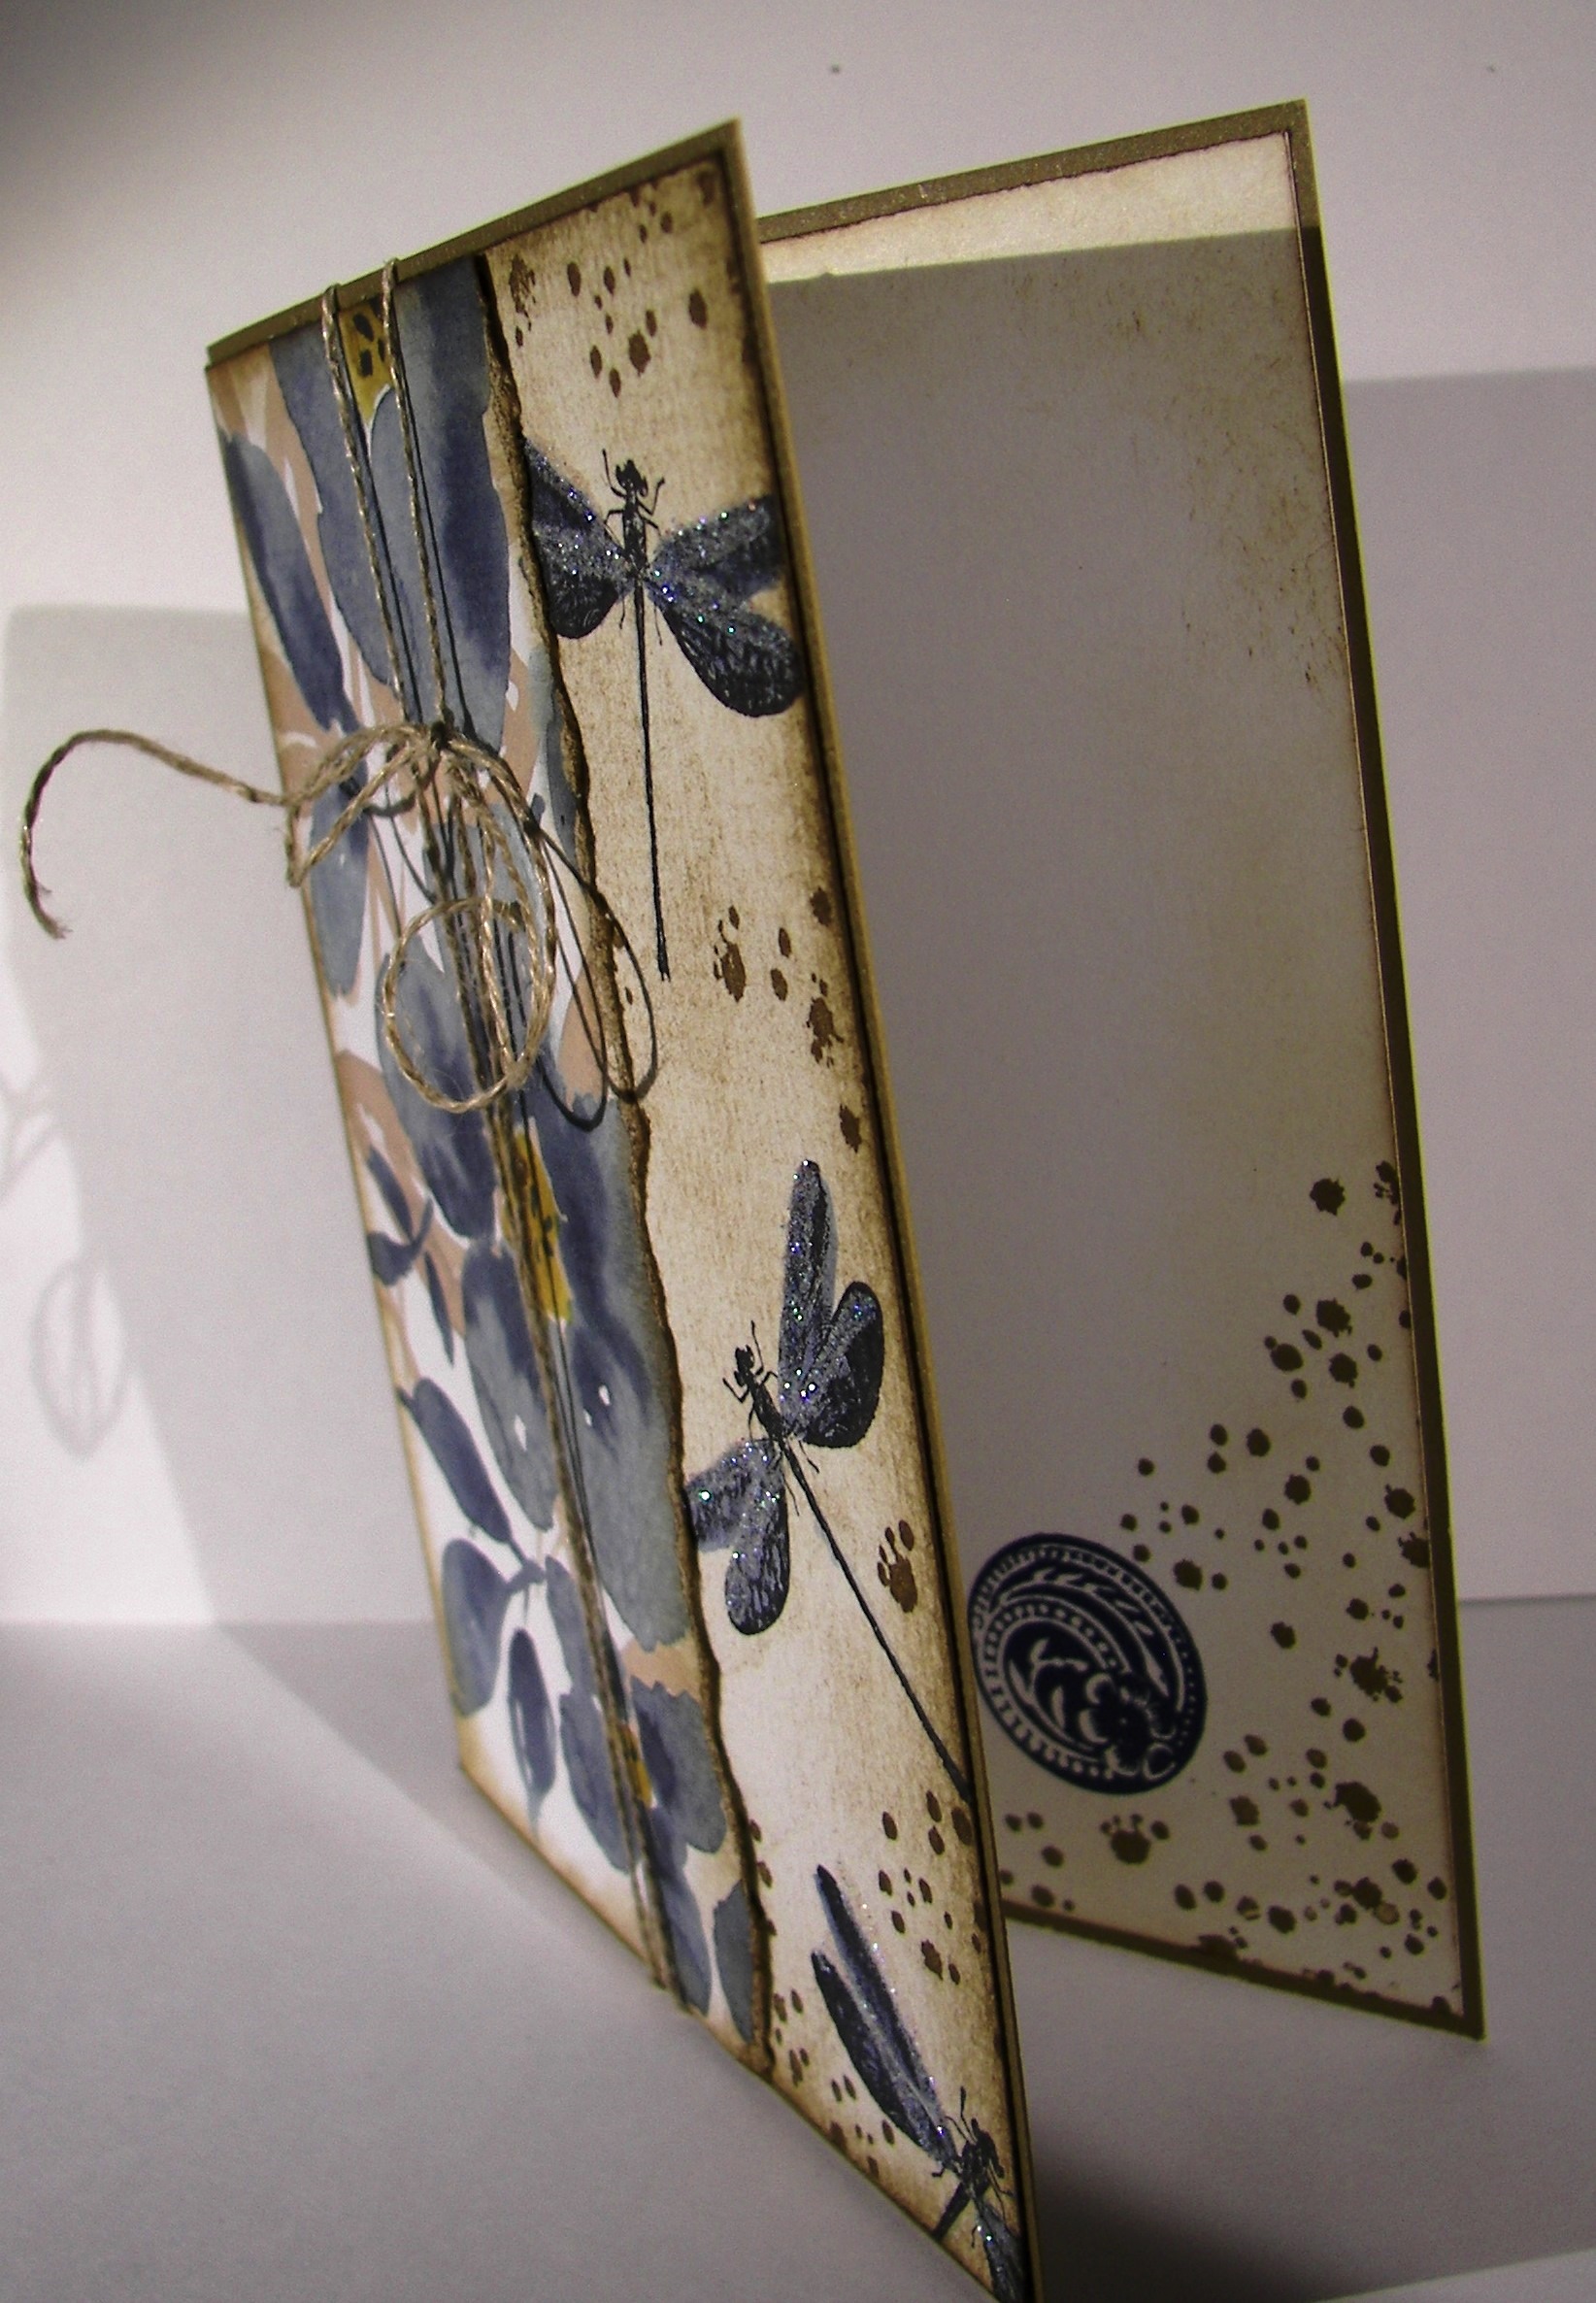
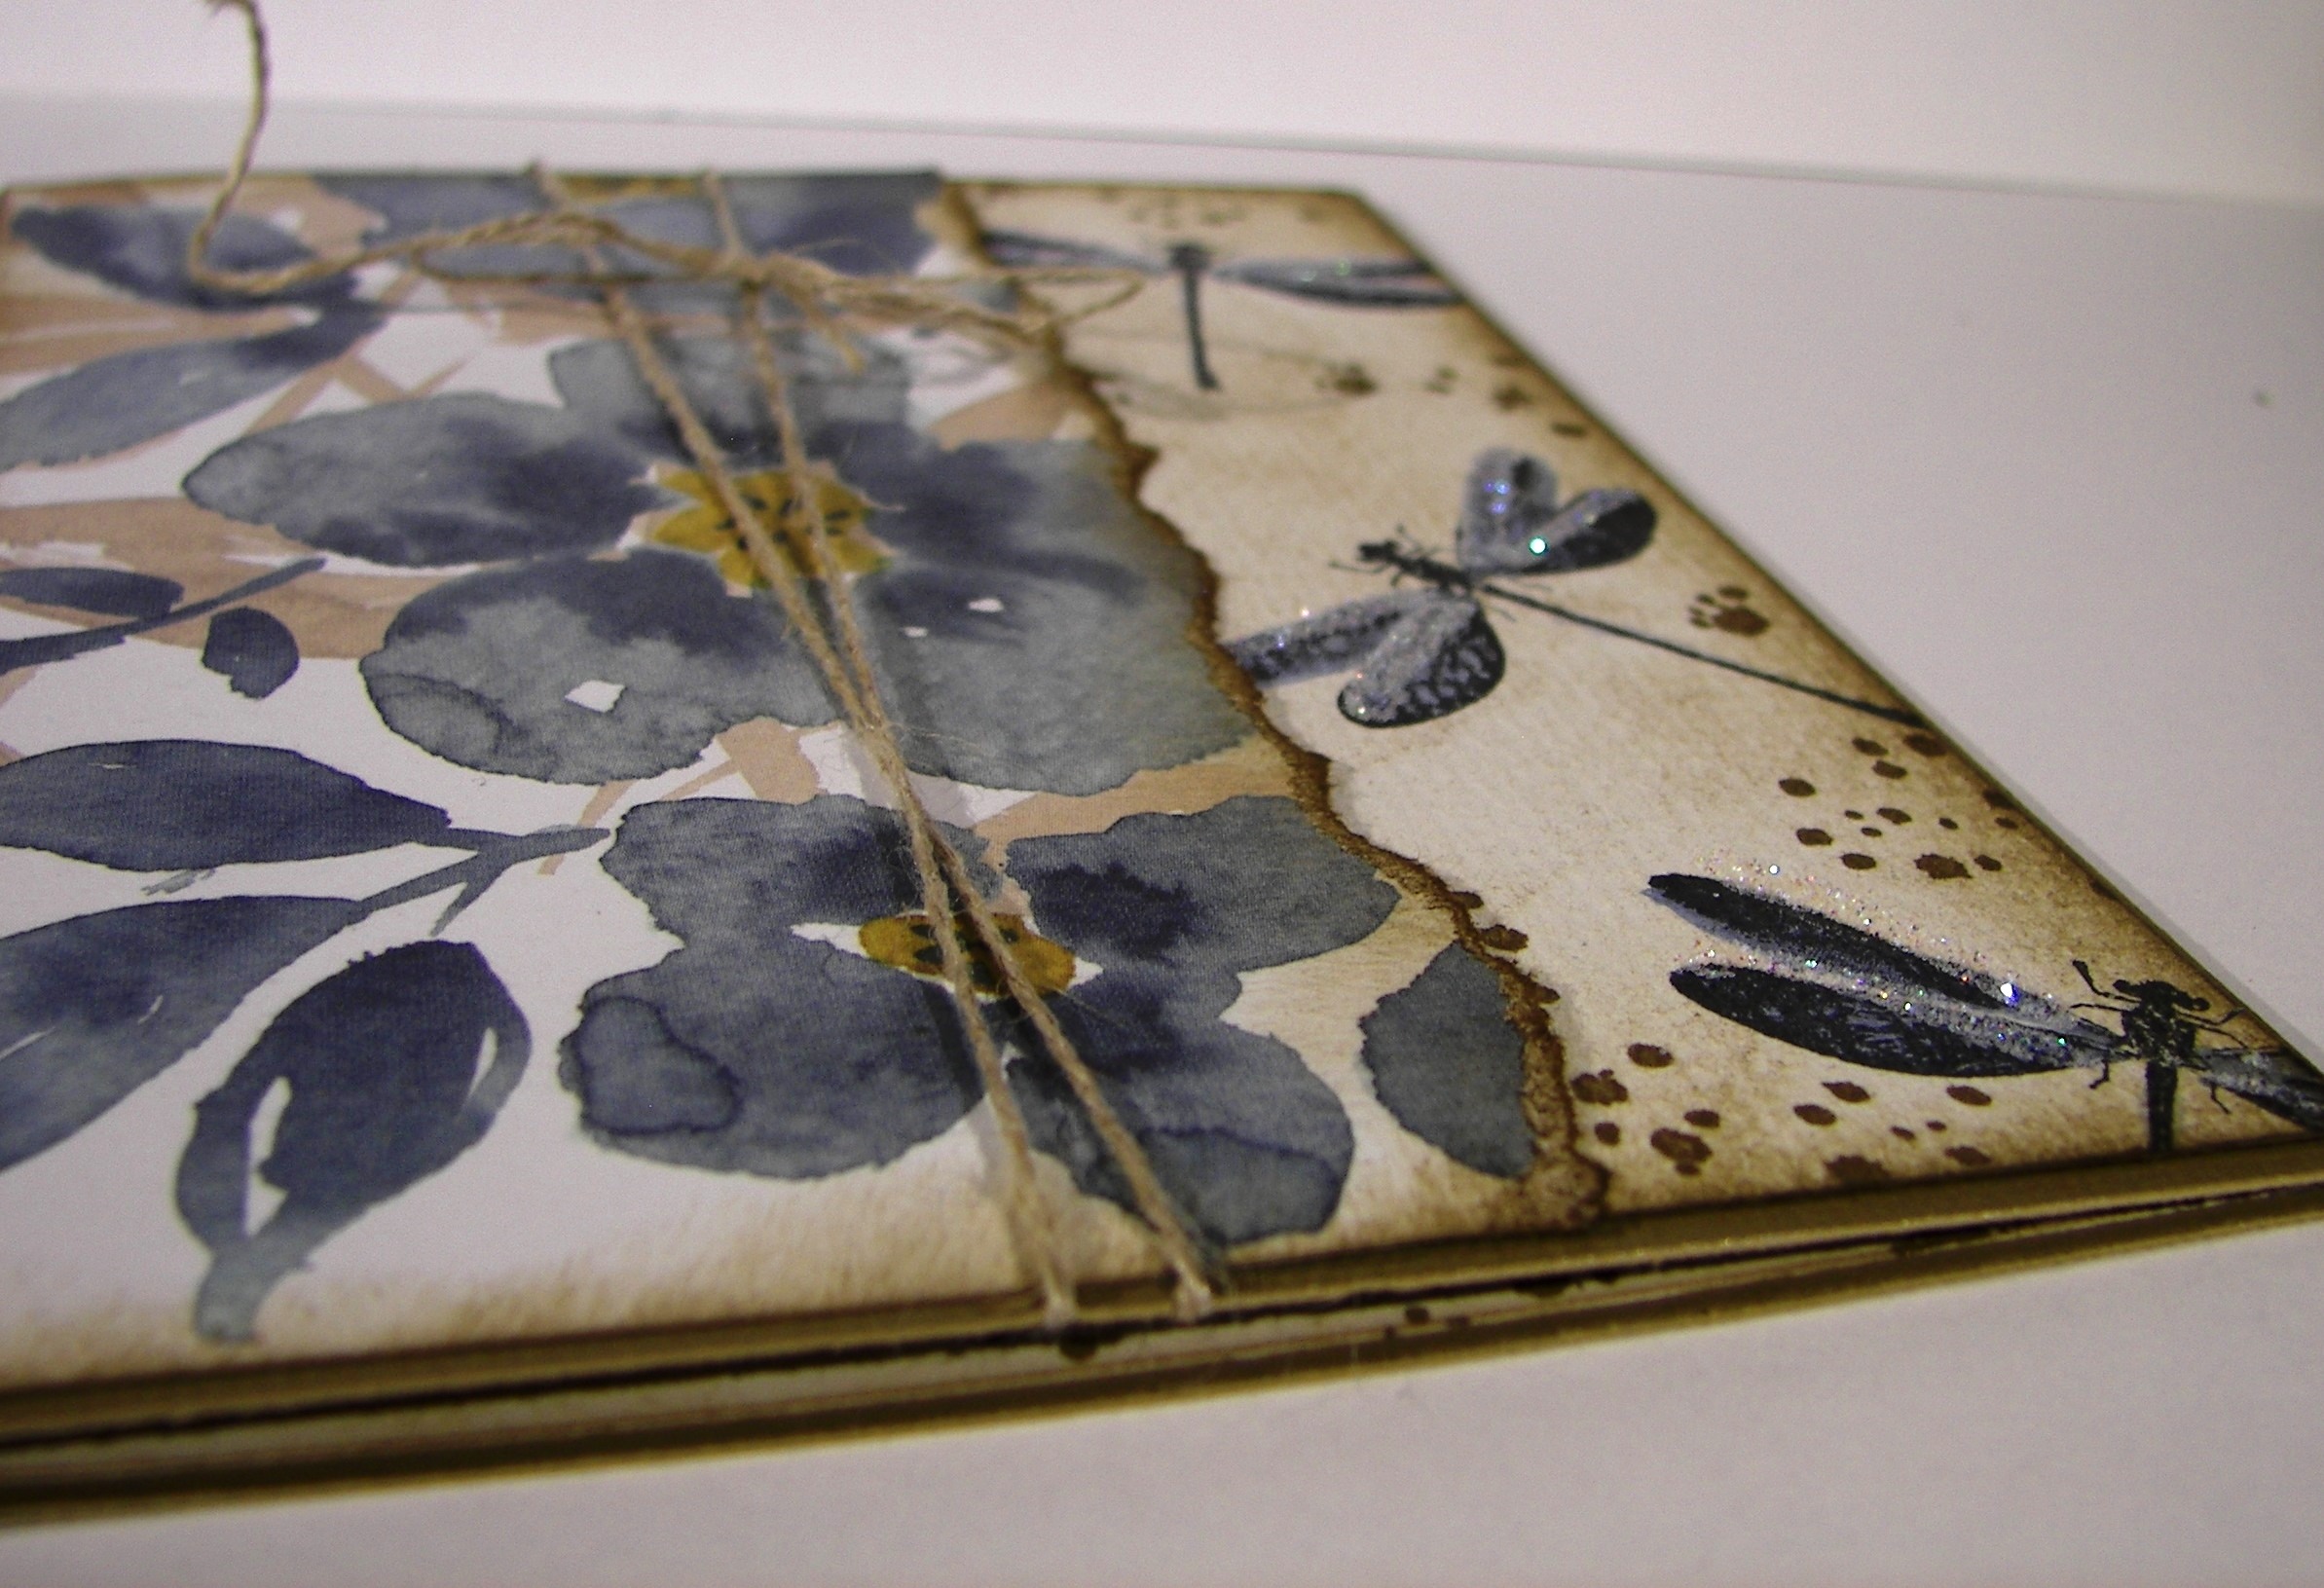
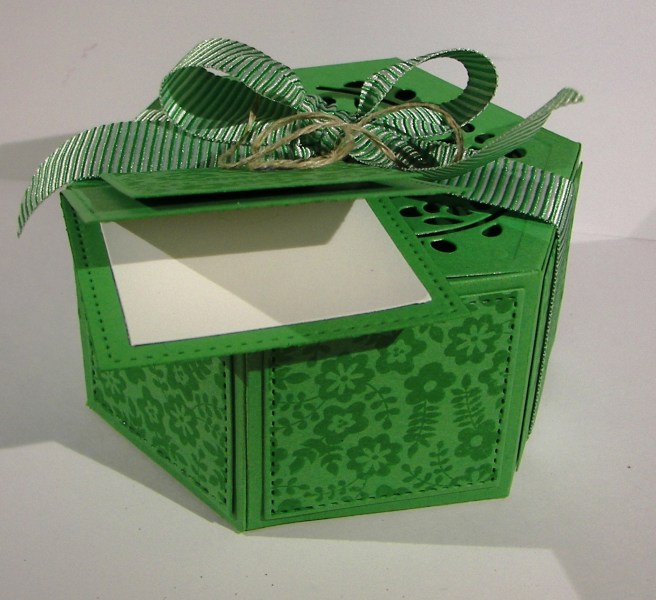
The thinlits dies that make this box are so fun.  After I fussed around a bit with the fold lines and flaps to glue in place I stopped getting cranky.  You need to do the large die cut piece twice, once for each side of the box, and then however you are going to decorate it. I made a floral top, but could have done the same for all six sides, and the bottom too I guess. I went with just the top this time and made stamped panels for the sides. The stitched shapes framelits had a square the perfect size!  I thought that was great.  I used a larger one to make a card base as well.

This ribbon is so fun to work with.  It has been fun having it, but as with this lovely green color, it will retire this summer.  So I need to enjoy it while I have it.  I punched a small hole in the card corner and attached it to the ribbon instead of tucking it under the bow.  I didn’t want to cover much of that floral top after all.  This way the ribbon will slide off and allow me easy access to fill the box with a present or maybe even some treats.

2-27-1

Have a creative day!

Moana

I Hope You Feel Appreciated

I don’t think I will ever find too many places to stamp this awesome chicken, ever.  There are two other adorable chickens and a little egg too, but this guy rocks!  So here he is peepin’ in a little window to say hello.  Too adorable.

2-3

For a very simple card, I sure did use a lot of different products.  Really though, it went together quite fast.  The card base became a one layer card.  I stamped with white stazon onto the card base using the hardwood stamp.  So cool.  It gave me a subtle woodgrain look that was just right.  I die cut the window out of the card base and again out of whisper white. I glued those two windows together so when I nested them back into the opening, the white one would layer up just ever so slightly.

I backed the window with velum to create the ‘glass’.  I traced the window pane openings on my inside piece of cardstock so I knew where to stamp the trees and chicken.  They got a little ink and a little water color pencil activity and then I glued them in place.  I could have left them on the inside back of the card, but I knew I wanted to cover up the back of the window and have plenty of space to write to my friend.  So I adhered it to the inside top flap of the card and put another blank piece down on the inside back.  Then I had double the space to write and my window stuff all covered up.  Total win!

2-3-1

Have a creative day!

Moana

Fruit Stand Delight

This project is a different take from a prior card I made.  The first one was a full water color card front, stamped and water colored.  This one uses the coordinating designer series paper with a single pear stamped and water colored.  I like the difference, and so did my card workshop ladies.  They are the best!

8-24

I added an extra layer, but the process was the same.  A single pear stamp in pear pizzazz, and water color the lighter areas of the image with daffodil delight and blend it together. The leafs and stem were done in garden green and blended a bit too.  The background was a light wash of daffodil delight.  Then, top the pear with a tiny bow of linen thread with a glue dot and grin at your work.  What a fun way to spend time with friends, making cards like this.

8-24 (1)

Have a creative day!

Moana

I’m Here For You

Don’t you just love these two?  I am not one to fall for whimsy stamps, especially cutsie animal ones.  But these guys got me.  The whole set is that way and I have used it so much. It is only a host set, so you can’t just buy it, but need to host a workshop to get to it. Totally worth it though.  Who doesn’t love a fun creative workshop though, right?

8-5 (2)

I was actually able to put to use an old workshop kit for this project.  It was a sympathy card with a totally different look, but it worked great for this one too.  I sometimes put leftover workshop kits back into my supplies, but sometimes I just keep those kits separate.  They have come in handy more than once, so I keep a small stash on hand.

Simple stamping and light sponging across the embossed folders was really all there was here.  I did run the linen thread across a bone folder to help get the kinks out and give the ends a curl as well.  I didn’t paint or sponge these two, amazing for me really, but I managed.

8-5 (1)

Have a creative day!

Moana

Comfort & Healing to You…

There are so many talented people out there that love to share their projects like I do. Sometimes one will come along that I not only enjoy, but have to give it a try.  This project is a mix of a couple of different ideas with my own twist.  I do love how it turned out.

7-21

One of the projects I studied had the card base smooth, which was lovely, and no extra layers, just the circle tag.  The other had the same layers I used with a different embossing folder, but I didn’t want to use that one.  I decided on the brick wall folder, but thought it still looked a bit plain.  After it got a good sponging and distressing I was much happier.  I even sponged the die cut piece because it just didn’t match the rest.  A healthy dose of basic pearls finished everything off.

7-21 (1)

The inside of a card almost always gets a whisper white or very vanilla piece, but I went with the card front color of so saffron like another example showed.  The color is light enough to be written and stamped on equally well.  A very nice touch.

Have a creative day!

Moana

It’s Your Day!

Yesterday was one of my TA’s birthdays.  Boys turning 14 don’t want a lot of fluff, just cut to the good stuff.  I stopped on the way to school and picked up a large chocolate bar and wrapped in this awesome, retired, water color patterned dsp.  He is also an artist, so I knew he would appreciate the water color theme going on.

3-22

It was so easy to assemble.  I placed tear n’ tape along three sides and wrapped the large candy up.  First I wrapped the paper around fairly tight and sealed it like a flat tube.  Then, I just removed the other strips of tape to flat seal the ends.

I took the scraps of my linen thread and wrapped them around and tied a knot.  I just took my hand painted, and stamped of course, gift tag and looped it through one of the extra strands.  Another simple knot and this lovely package was ready to go.  Sorry I didn’t get a photo of the finished product, but I wasn’t sure just what candy I would be able to get. Stores out in the country don’t always have a large selection.  The way the paper was prepared I could have turned it into a large sour cream container styled  box and been just fine as well.  For the win!

3-22 (1)

Have a creative day!

Moana

Hello and Bonjour!

Can  Sale-a-bration be any more fun?  How about getting another free stamp set just so you can have it in french?  I saw another awesome demonstrator, Mary Fish, use this set with the bonjour stamp and I knew I wanted it as well.  Isn’t that just how we work?  Well, it was worth it.  I love it!

3-9 (3)

The dsp I am using here is also from a free Sale-a-bration set.  Most of the patterns are floral, hence the wildflower fields title, but not all of them.  These simple stripes are adorable.  I thought I would create two color choices and a gift bag that could go with either one.  It worked out great.

3-9 (1)

I thought for sure the bonjour card would be my favorite, but the birthday boy is also very adorable.  I think the party hat stamp really made it.  You can never have enough birthday cards, especially when I get to share most of them with my mother-in-law.  She is so good about remembering literally everyone’s birthdays.  And she loves sending out special ones much more than a store bought card.  Who wouldn’t?

3-9 (2)

Have a creative day!

Moana

Hip Hip Hooray for Today!

What kind of fun events do you get excited for?  There are so many special days to celebrate it is hard to choose just one.  For me?  Well, today is all about celebrating the special meeting of my future daughter-in-law.  I have to admit, there is a bit of nervous energy going on there, more than I am aware of I am sure.  But still, what a wonderful day to celebrate.

2-12 (2)

I am in love with this tiny little balloon punch.  It has two friends, a tiny cupcake and a tiny candle, but I can’t get past the balloon.  I have a thing with tiny things and this fits the bill perfectly.  They are just big enough to fit a dimensional behind so they get to look like they really are floating.  And if you use your bone folder across the linen thread it will curl just a bit.  It makes me smile.

The framelit is from a set two piece set that makes pop up card centers.  I trimmed the sides to give me this huge tag.  It was very difficult to throw out the inside cut pieces.  They were perfect!  I played with them, told myself to throw them in the bin, I did, then I got them back out, played again and tossed them again.  Seriously, get a grip.

2-12 (3)

Have a creative day!

Moana


My Heart Smiles

As my husband and daughter were heading out the door early this morning, I asked them to pick a pattern for today’s project from the Love Blossoms DSP stack.  Didn’t they choose awesome ones?

2-3

I was initially thinking of a Valentine’s Day card, but this quickly changed into more than that.  It definitely has that vibe, but not exclusively.  I do enjoy a project that is versatile. I used new product like crazy today.  The paper of course, I hadn’t taken one piece out of the stack yet.  Such pretty patterns.  This stamp was a first too.  And wouldn’t you know it, the sentiment fit perfectly inside the extra-large oval punch.  Too perfect!  I hadn’t tried the fine tip glue pen yet, but it was perfect to stick down my tiny baby linen thread bow.  Can’t see my adhesive, can you.  Nope.  And of course, the lovely blushing bride glimmer paper.  It is so fun.  I know we can’t have glimmer paper in all of the colors, but wouldn’t that be fun?

This card was just blocked on heavy weight whisper white card stock, with the base also being heavy.  I really enjoy a white card, but the paper has to be heavy enough to hold up all the fun stuff on the front.  This paper is totally up to the task.

2-3 (1)

Have a creative day!

Moana

Paper Pumpkin Makes Me Smile!

While I was visiting my children and parents during the Thanksgiving break I had a little fun with my November Paper Pumpkin kit.  My mother and I love to craft, differently mind you, but love it still the same.  So we sat down and did half of our kits together.  It was so much fun.

Paper Pumpkin Makes Me Smile!

Yes, this is only half.  The kit came with materials to make ten cards, two different designs.  I just loved them.  I usually don’t share these unless I do something different than the kit suggests, but it was the time spared that was the fun share.  My favorite part of crafting in any form is sharing it.

Paper Pumpkin Makes Me Smile!

And when you have kits as adorable as these, it is easy to share more than you might think.  These will be going to some special people, but not until they get some candy to go with them.  I will blog that part tomorrow.  I am going to turn the other five cards into candy bar wraps for the gift part and give them with these cards.  Fun stuff, right?  See you tomorrow then!

Paper Pumpkin Makes Me Smile!

Have a creative day!

Moana

No Peeking

Planning ahead and definitely working ahead is what works best for today.  As this posts, I will be heading back home from my wintery holiday with family back to sunny California.  Not really good timing to let myself enjoy early morning blogging like I do.

No Peeking

For a simple card, there is a lot of dimension going on.  The ribbon and thread work great together with the tag duo and still manage to lay flat.  Three strands of ribbon were poked through the tags and then bound in linen thread.  I left the lengths of linen thread rather long and just curled them a bit with my bone folder.  Love it!  The ribbons were cut at different lengths to add interest and that finished the tag.  I thought it would be an adorable gift tag too.  Might have to make more of those.

Well, of course I sponged this lovely plaid paper before adding it to the card base.  A few wraps with even more thread were just what I needed.  I certainly have enjoyed this holiday card series, but we aren’t done yet!  Still five more cards to share.  So much fun!

No Peeking

Have a creative day!

Moana

Sparkly Seasons Pumpkin Patch

It may not look very busy, but these little pumpkins almost did me in.  I nearly got to the point of just showing you how frustrated I was and that there was not much to show for it.  Then I thought about iridescent ice, and the world came together.

Sparkly Seasons Pumpkin Patch

I love that stuff.  It can make the most simple things look almost magical.  I used three different framelits for my pumpkins and got to work.  I used a large stylus to create grooves and texture to the surface, but from the back side.  It really broke down the fibers a lot.  Then I began to water color streaks to give dimension.  That didn’t do a whole lot.  Then I spritzed water and swiped ink on with my finger.  It got better.  Then I sponged with pumpkin pie and added early espresso too.  At that point they looked okay, but still kind of sad.

Sparkly Seasons Pumpkin Patch

That is when I tried the iridescent ice.  I daubed the whole surface with versamark and sprinkled on the powder.  I only used one coating and thought that would be enough.  It was just right.  I did sponge a bit more with early espresso afterwards.  I layered the pumpkins together using dimensionals, with the stems too, and wrapped them all in linen thread.  I wanted to leave it then, but decided on a simple word phrase.  And there you go!

Sparkly Seasons Pumpkin Patch

Have a creative day!

Moana

Neutral Toned If the Broom Fits

I know today is Halloween, but I was just feeling a bit mellow about it.  Could that be a result of being with students all day that were super costumed out and completely mental about it?  Or maybe because I went back to take yearbook pictures that evening during the carnival and dance?  Sounds about right.  Let’s just settle down a bit, but still enjoy the holiday.

Neutral Toned If the Broom Fits

This stamp is just too funny.  I think that I have shown myself that even though there is definitely a Halloween theme with the stamp, it doesn’t have to be used that way, and that always makes me happy.

Neutral Toned If the Broom Fits

Instead of focusing on the holiday, I went with a focus on the brooms themselves.  This included giving the background a run through with the woodgrain embossing folder, wooden handles on the broom.  Also, I did  a little piercing around the brooms themselves so I could thread some of the ever so lovely linen thread around the bristles and give it some dimension.  I think that looks pretty darn cool.  All kinds of dimension going on here.  What a great card!

Neutral Toned If the Broom Fits

Have a creative day!

Moana

Vintage Butterfly Basics

This project started out as something entirely different, but I love where it ended up.  Would you believe I thought I was going to make something dark and dreary with a Halloween theme?  Well…like I said, it ended up lovely.

Vintage Butterfly Basics

The floral images were stamped in black and water colored with blackberry bliss and mossy meadow.  The ferns were also stamped in blackberry bliss.  Then the soft suede ink was put to work.  Lots of sponging and swirling and edging went into image.  I ended up with something that look almost tea dyed.  Just what I wanted.

Vintage Butterfly Basics

A double layer of blackberry bliss became the frame for the card front.  Linen thread was pulled through my blackberry bliss sponge to give it a tint to coordinate.  The tan color it comes in didn’t quite go with the soft suede.  Extra attention went into dimensionals to give  lots of height.

Vintage Butterfly Basics

A narrow boardered piece of soft suede card was embossed with the brick wall embossing folder and then sponged to give additional detail to the embossing.  All together, these elements created something lovely, just lovely.

Have a creative day!

Moana

Sheltering Tree

Who doesn’t love the look of the beginning of fall?  The leaves are just starting to turn in my yard.  Some bright, some darker, and then there are those lovely dark ones that look almost burgundy.  Those would be my favorite.

Sheltering Tree

The tree is stamped in tip top taupe, the leaves in pear pizzazz and the turning leaves in perfect plum.  The card base is also in perfect plum with a slight framing in tip top taupe.  Very clean look for sure.  A few wraps with some linen thread and it was nearly done.

Sheltering Tree

I did a little echo stamping inside the card with the accent leaf color, just a bit in opposite corners.  I like to have enough there to connect to the front, but not so much that it interferes with the writing room.  It is still a card after all.  The front is popped up on dimensionals and that is all there is to it.  the outer dimensions are 4 1/4 x 4 1/4, a little different for me.  I am not prone to square cards, but I was working with my scrap pile, and that is what I had at ready.

Sheltering Tree

Have a creative day!

Moana

No Bones About It

No, I don’t have little children, and yes, I did have to have this set.  I actually pegged it for a favorite when the new catalog first came out.  It really isn’t the speed of my card group I teach, but I wanted it for myself.  How cute is it?

No Bones About It

There are four different dinosaurs in the set, all with matching skeletons, some fossil plant looking stamps, some splats and these awesome footprints.  As well as a few super cool sentiments to go along.

No Bones About It

This card was done in mossy meadow and whisper white with no frills.  I embossed the base with the chevron folder and made my layered tag from the tags & labels framelits set.  Plenty of dimensionals for everyone and there you go.  I did accent it a bit with some linen thread using the 1/16″ hand held punch for the knot to show through.

No Bones About It


I am going to really enjoy this set a lot, and I mean a lot.

Have a creative day!

Moana

Remarkable You

Working with great paper makes everything so much more fun.  Colored embossed paper, in such pretty colors?  Of course, why not!

Remarkable You

The project began with the new heavy weight whisper white cardstock, I love having such a heavy base, and gathered layers of stamping and more color.  The image and sentiment come from the same set, which is delicious by the way, and were stamped in black stazon.  I knew I would be water coloring, so that is the perfect ink to work with.

Remarkable You

I blended watermelon wonder with a touch of crumb cake and it turned out so nice.  I chose crumb cake because I was using linen thread and wanted to tie in the colors.  A large ribbon wasn’t going to work here.  It took too much focus away from the flower and sentiment.

Remarkable You

I think I would add a mat or two behind the flower next time, but left it alone for now.  It turned out nice, just right.  I do love a simple water color.

Have a creative day!

Moana

That Thing You Did

This stamp set is just the best.  The combination phrases really get me laughing.  This one in particular is my favorite.  You’re on my mind, but not in a creepy way.  How great is that.

That Thing You Did

I like how it looks all pretty and then this secondary saying just throws it off like crazy.  Almost like if you aren’t really paying attention, you will totally miss the joke.  My favorite.

That Thing You Did

A simple embossed background with the new cool boho chic folder.  I wasn’t sure at first, but that didn’t last long.  It is way cool.  Lots of options there.

That Thing You Did

This is short and sweet today because first, the card just doesn’t need a lot of explaining.  Second, I am posting ahead because I am taking my girls to a concert, that they have been waiting for since Christmas, and I wanted to focus on that.  I made this card as a thank you for my sister-in-law for letting us stay over at her place after the concert.  I also made a little matching tote with a bunch of other cards for her to use as part of the thank you.  Good stuff there!

Have a creative day!

Moana

My Dear Friend

I focused on one image for today’s project.  It initially reminded me of a Japanese maple tree as it starts to change colors.  They are so vibrant.  As I started to paint them I noticed the flowers and the leaves looking different.  I thought it was more of a shrub.  Put your glasses on, right?

My Dear Friend

I put the aqua painter to work here.  I stamped the image in cherry cobbler and brought the color in with just water.  Then I added in old olive and mixed the colors, just as the leaves would be looking.  I decided I wanted the flowers to stand out more, so I darkened the centers to bring out the detail.  I can’t believe I didn’t notice the flowers the first time.

My Dear Friend

Talk about being generous with the basic rhinestones, but I wanted all of the centers to sparkle.  Such a pretty look.  Is it over the top?  Well, if it is for a dear friend, you want it special.  The friend stamp seemed a bit lonely, so I wrote in above it using an old olive stampin’ write marker.  First try even, not bad.

My Dear Friend

There are so many new products used today.  The framelits, the embossing folder, the stamp, and they work together great!  I even got all nostalgic thinking about an old friend that I just don’t get to see anymore.  Guess I know where this one is going!

Have a creative day!

Moana

Awesomely Artistic at last!

I have made it through my June adventures and have finally been able to sit down with a long awaited stamp set and designer series paper.  I am still way beyond tired after completing a sixteen mile handcart trek, so it took me longer than normal to get going, but I did it.  It kind of feels a bit vintage and a strong nature theme.  So pretty.

Awesomely Artistic at last!

I learned my lesson with the last designer series paper that I loved too much to use for way too long.  I opened this pack up, took out my favorite pattern, and cut it for the card front.  Quite brave if you ask me.

Awesomely Artistic at last!

I stamped inside with two of the stamps from the set using night of navy and soft suede.  I have a hard time leaving the inside blank.

Awesomely Artistic at last!

I used a piece of water color paper to stamp the dragonfly a few times.  I started with black stazon, water colored with night of navy on the wings, then used some two way glue to attach dazzeling diamonds glitter to the wing edges.  I absolutely love dragonflies.  They are my signature mark and have been for some time.

Have a creative day!

Moana