Remarkable You

It is so nice to have a day off from school and work, but it does put things off more than a bit.  I seem to be having more and more of that as of late, but I do keep trying to get it back in the right gear.  Now I have wedding reception plans to toss into the mix.  Exciting!

2-15

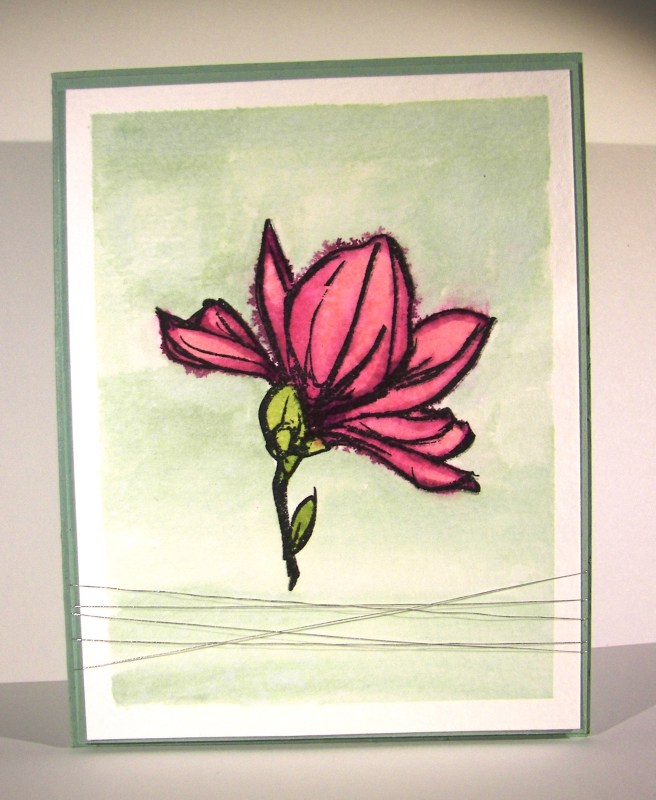
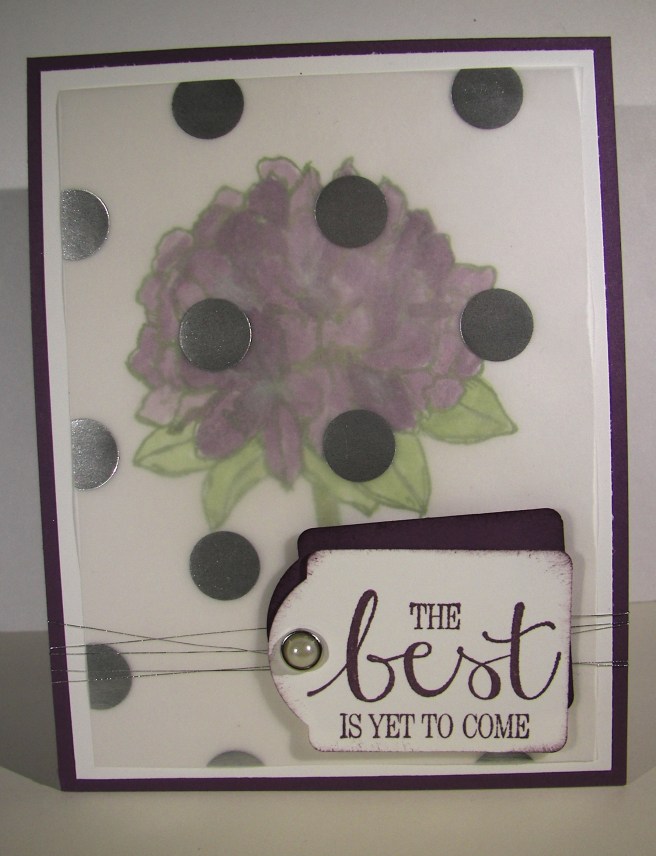
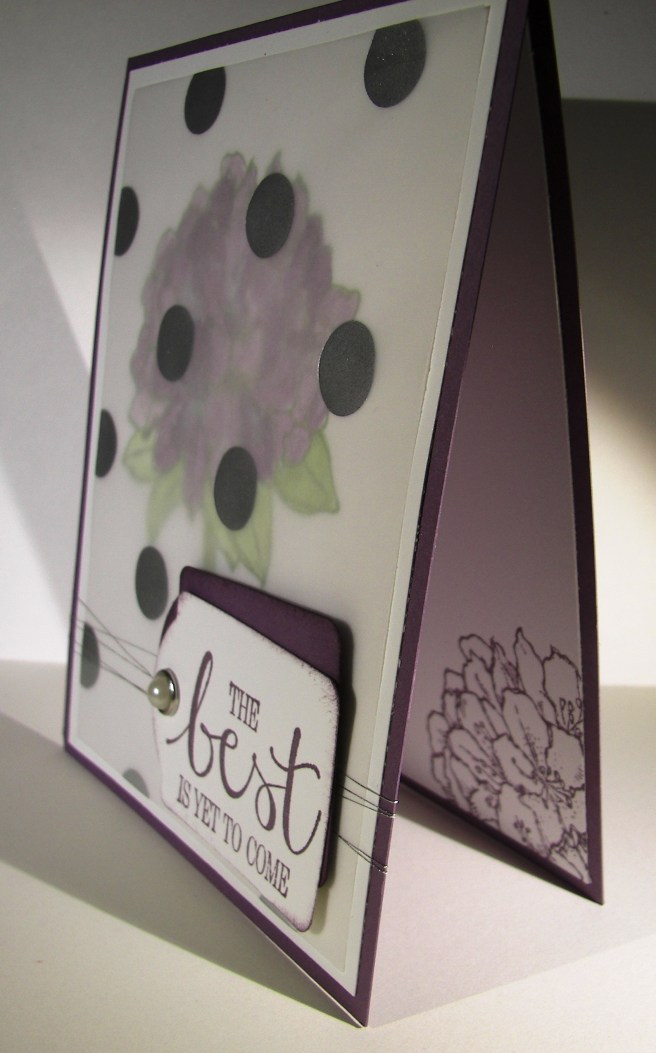
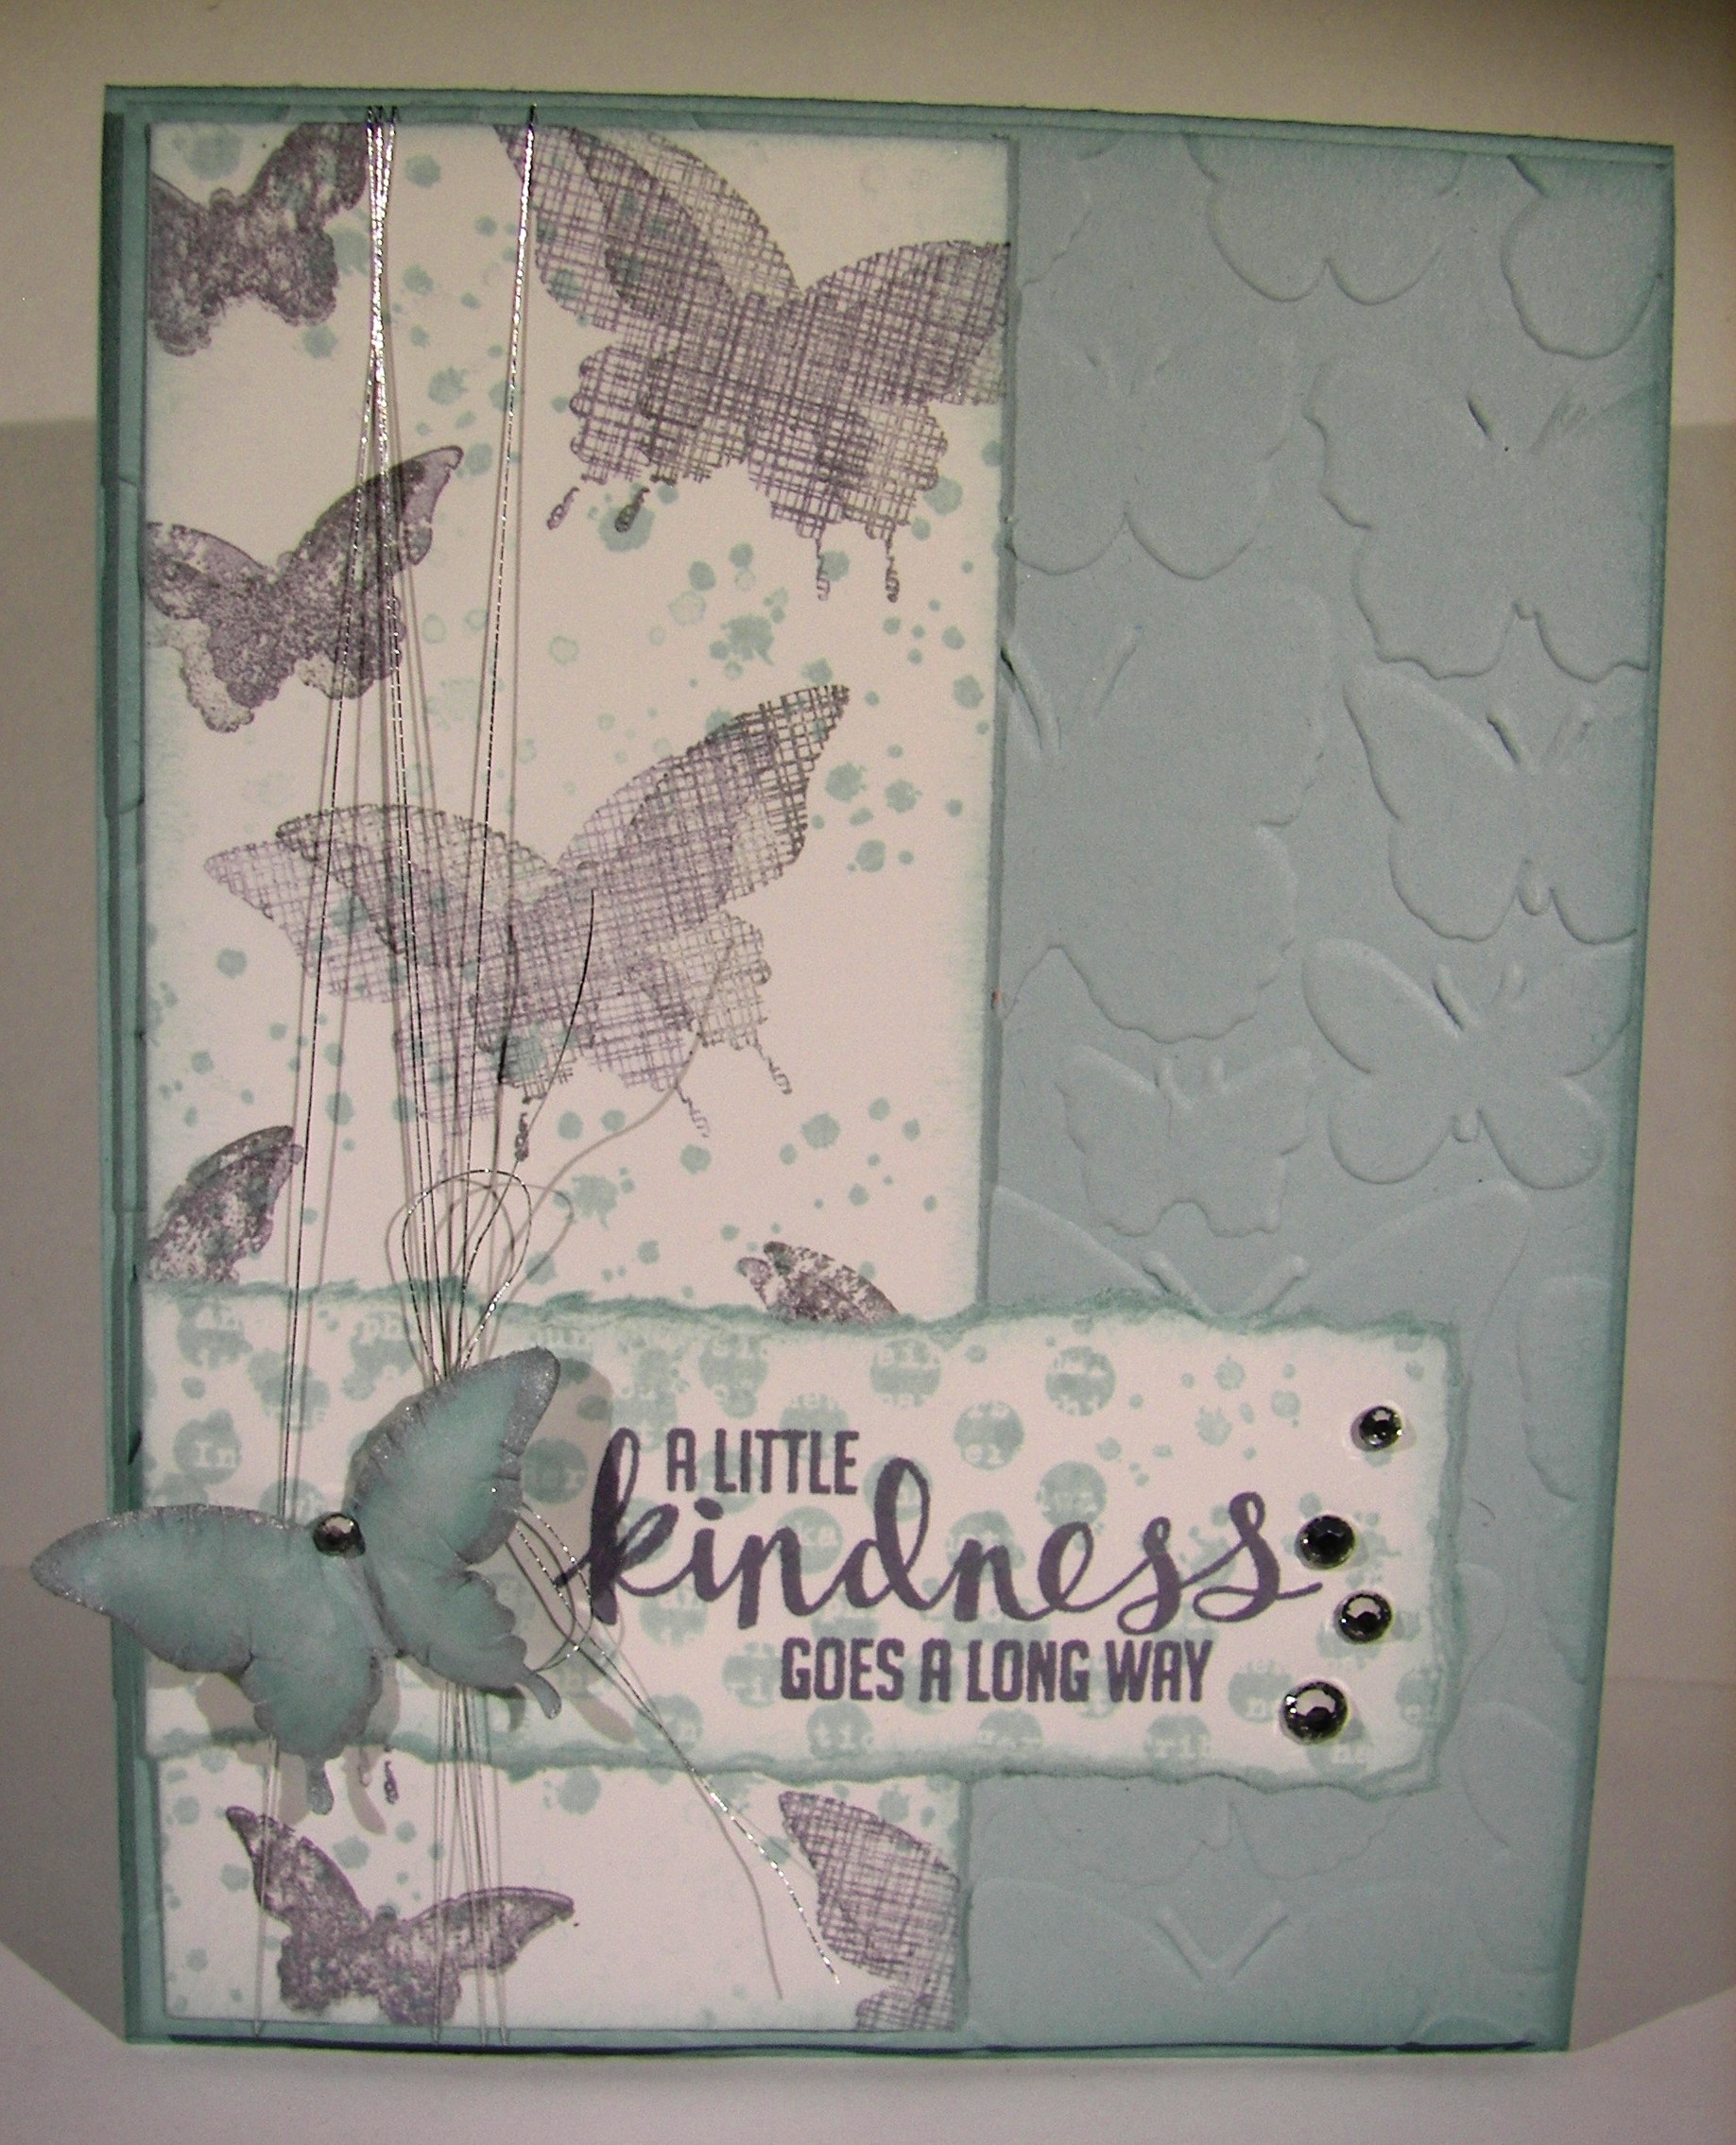
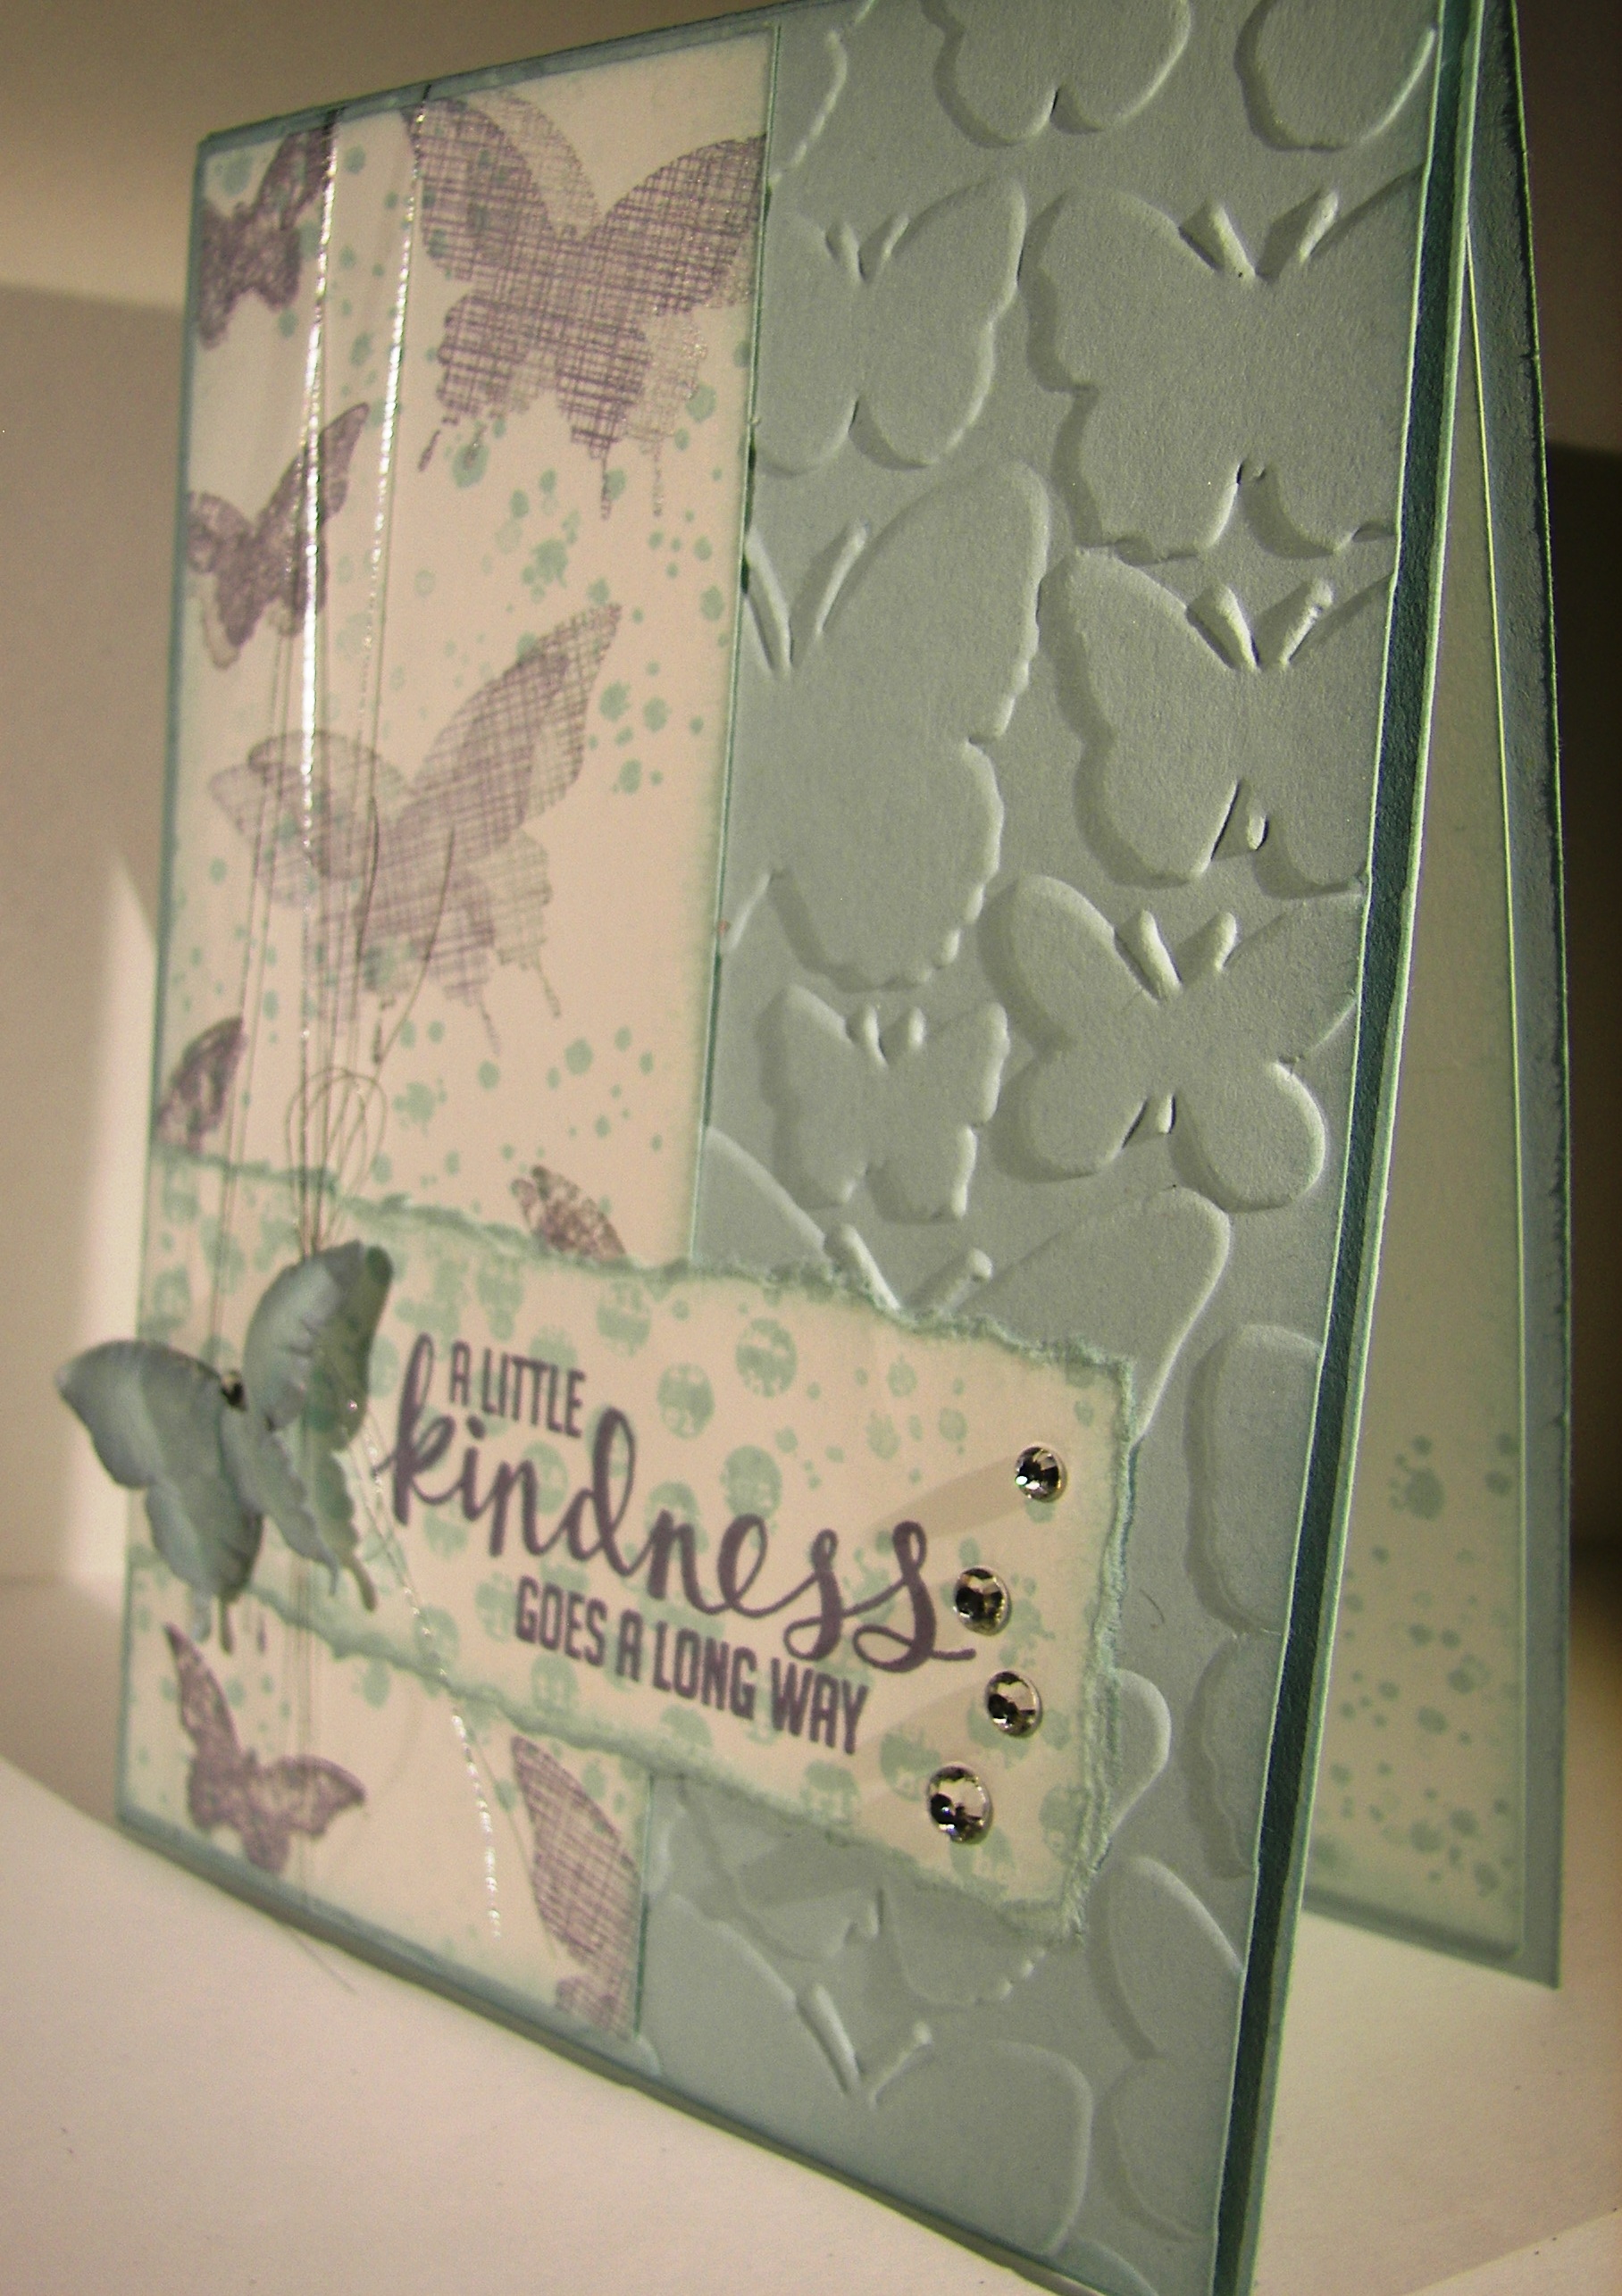
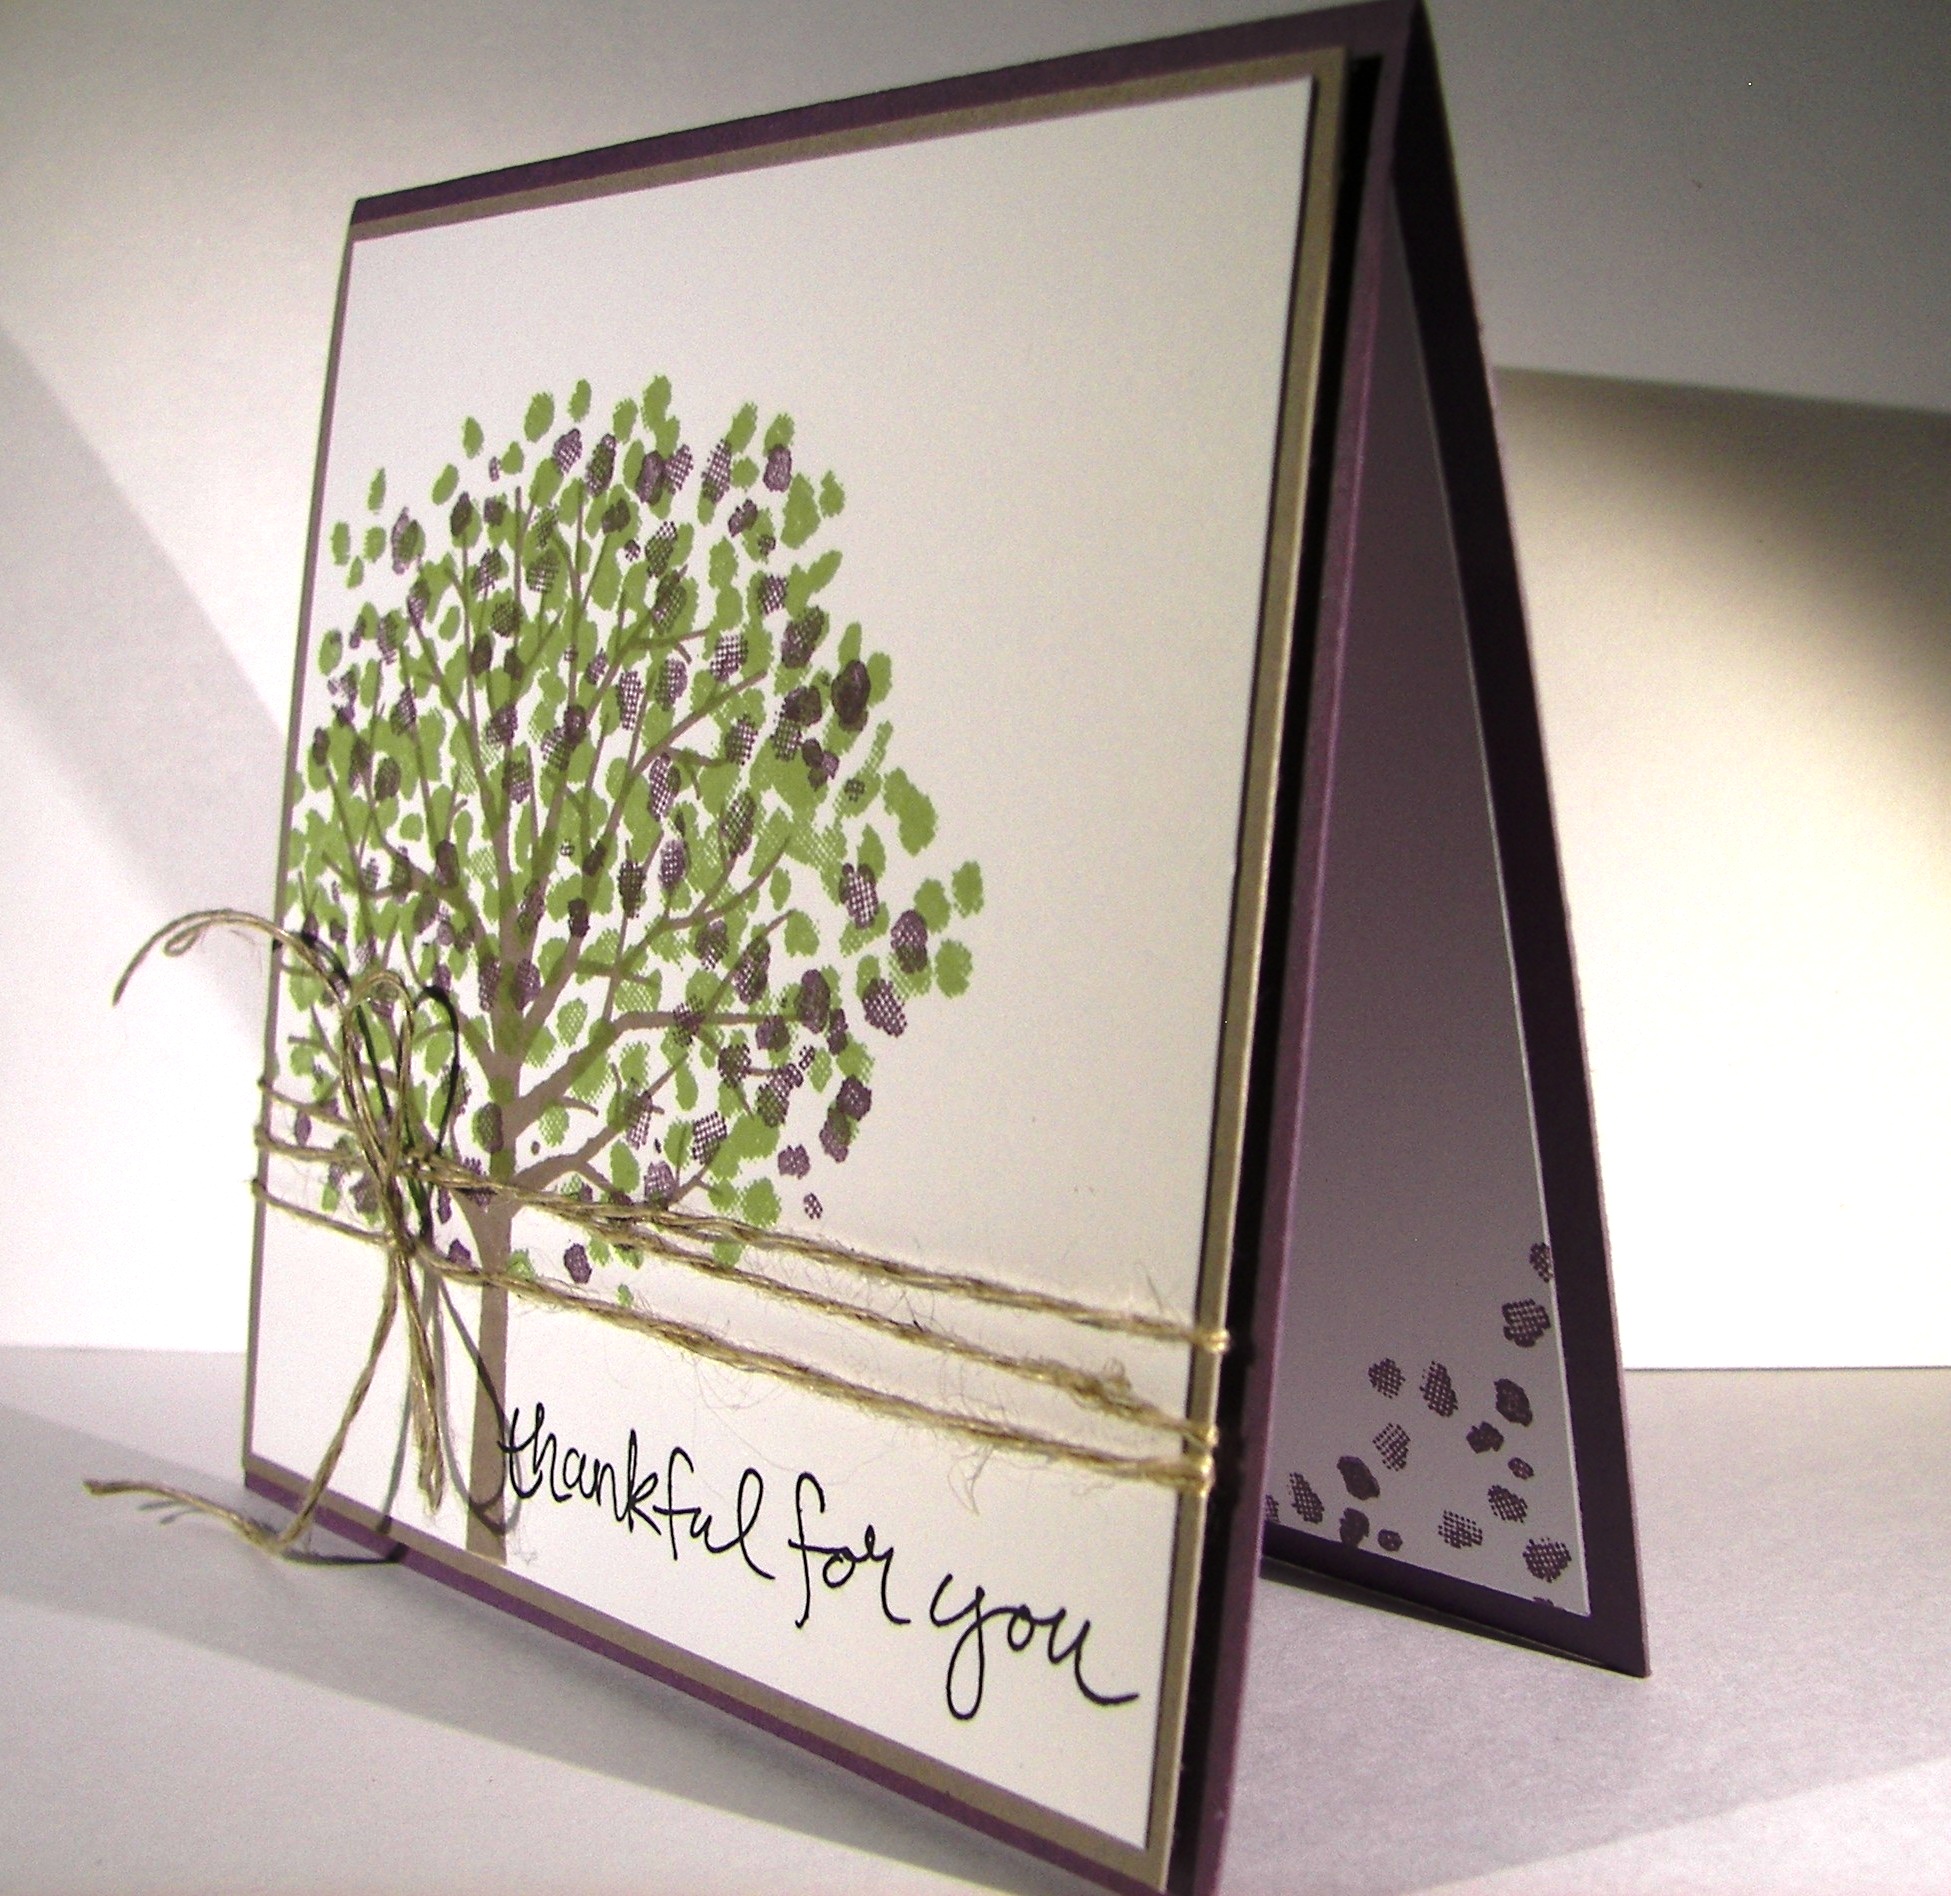
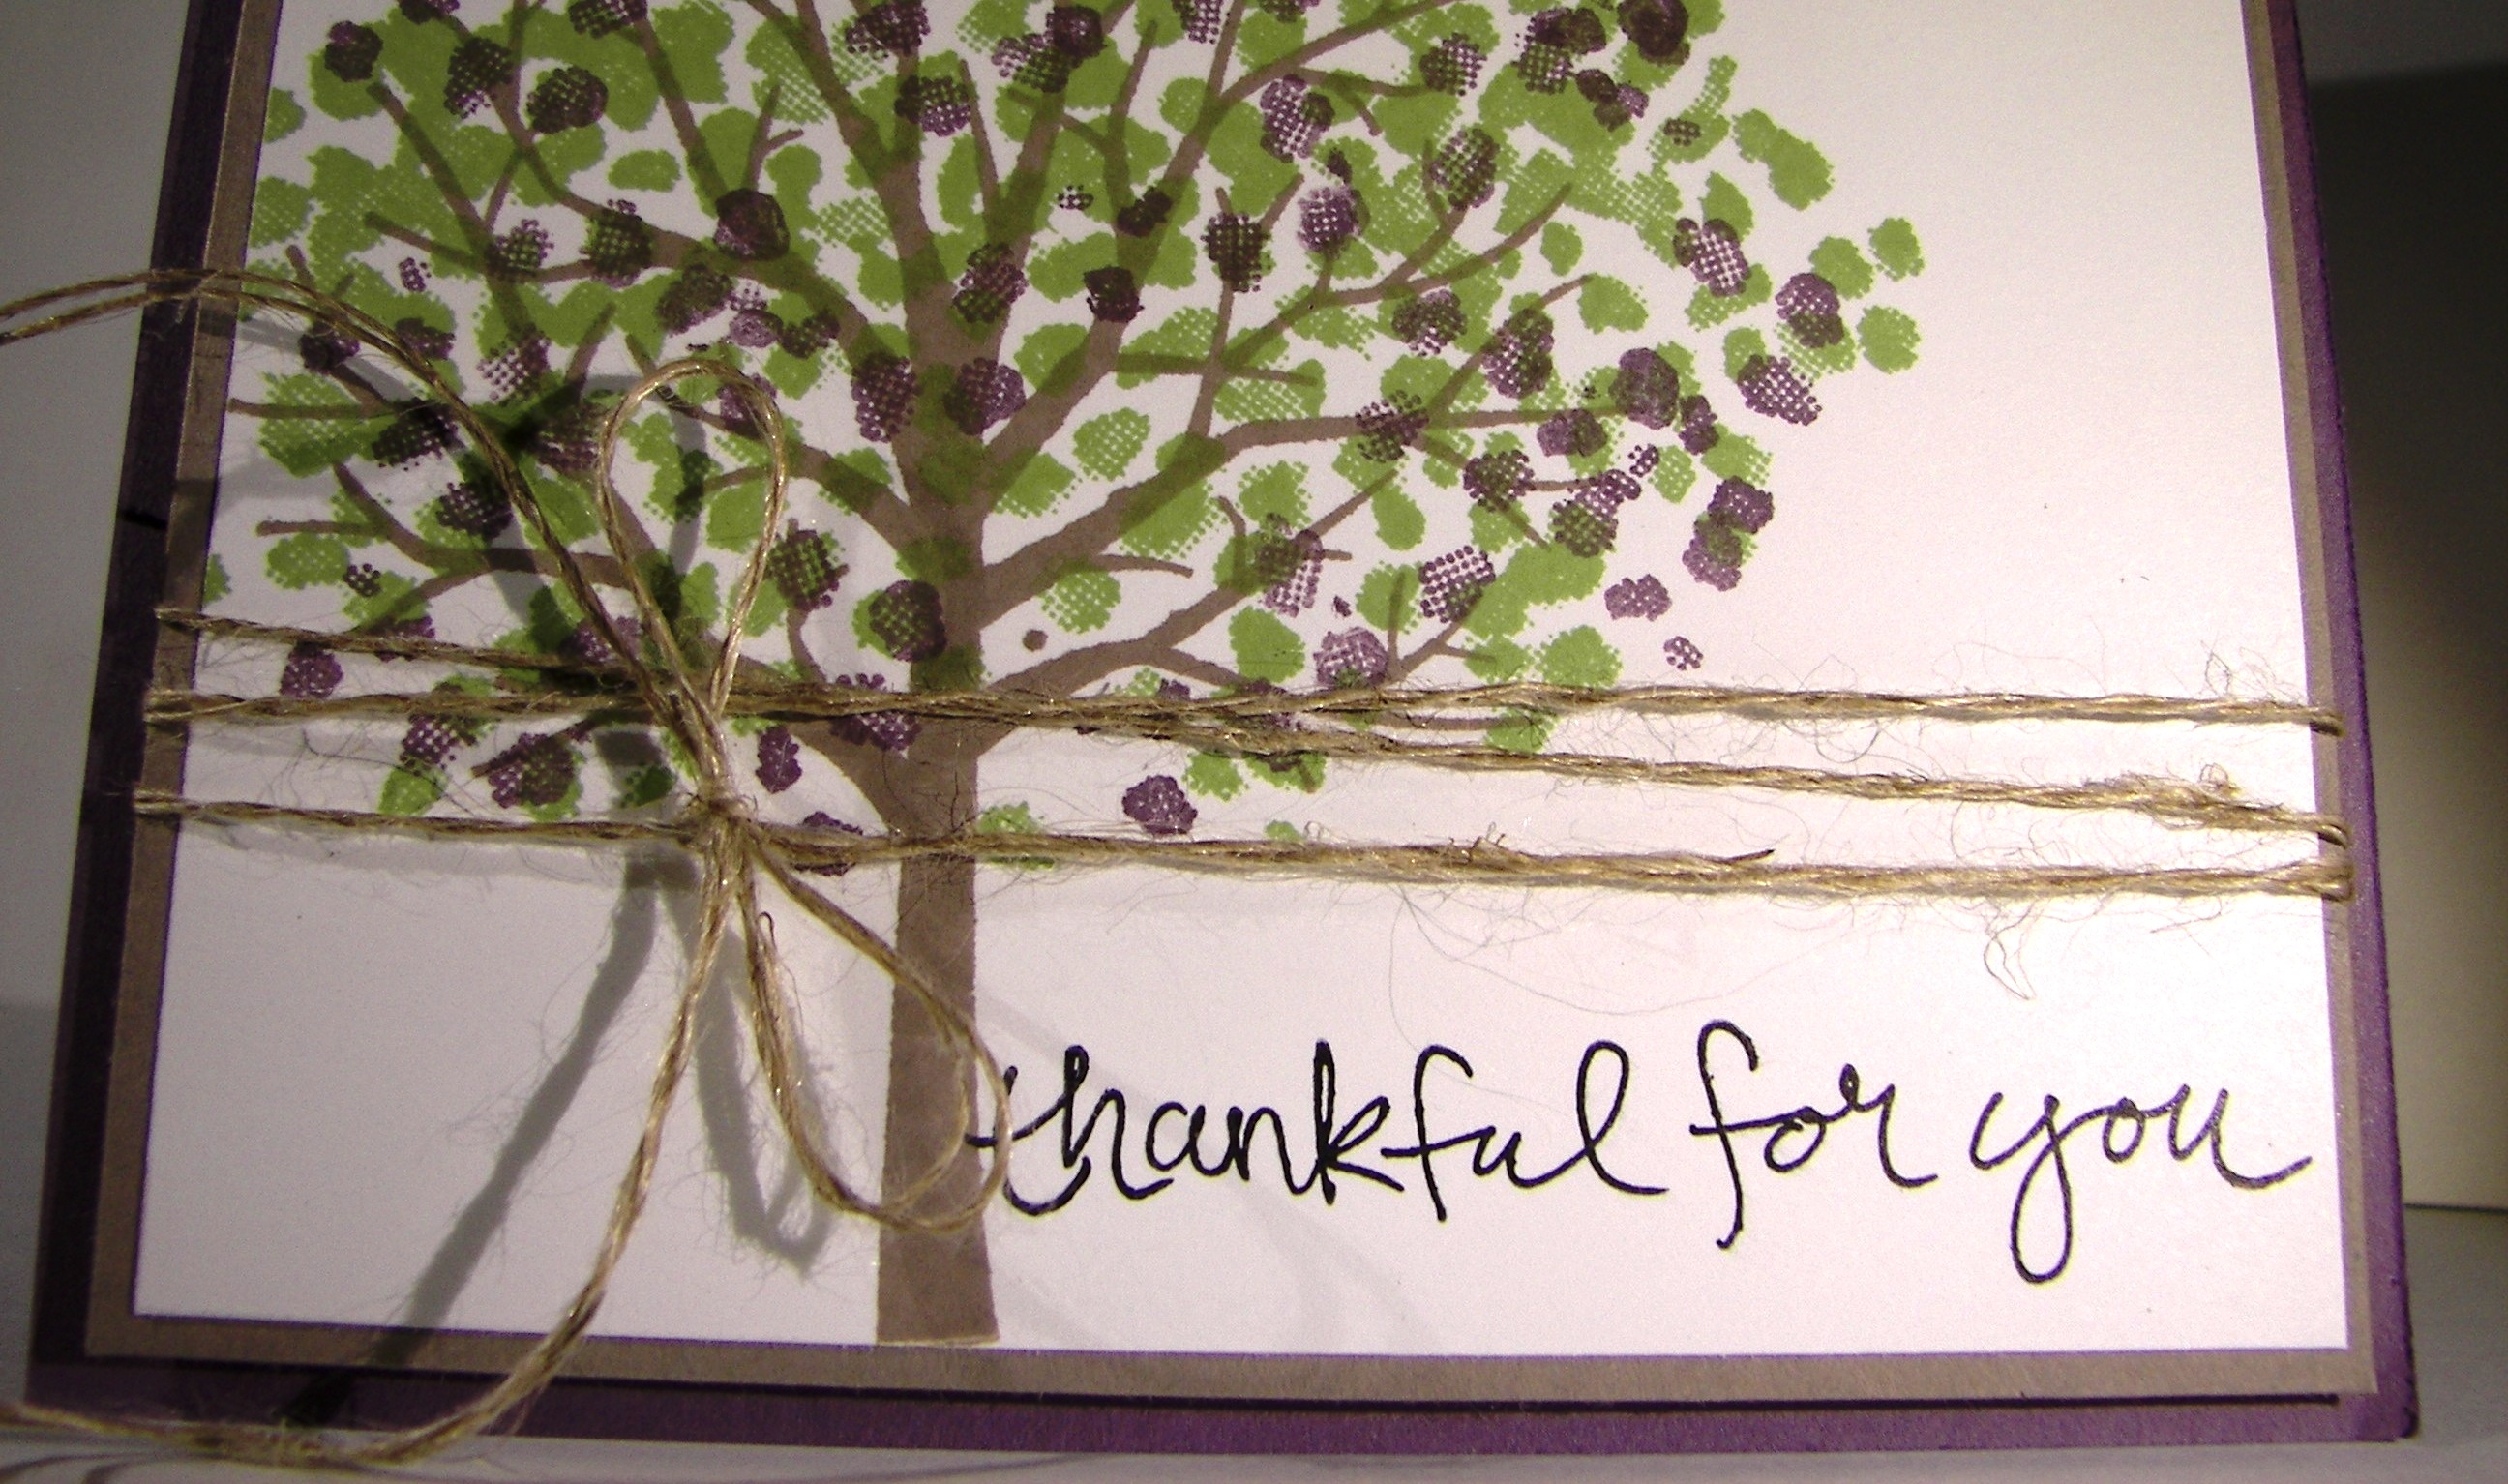
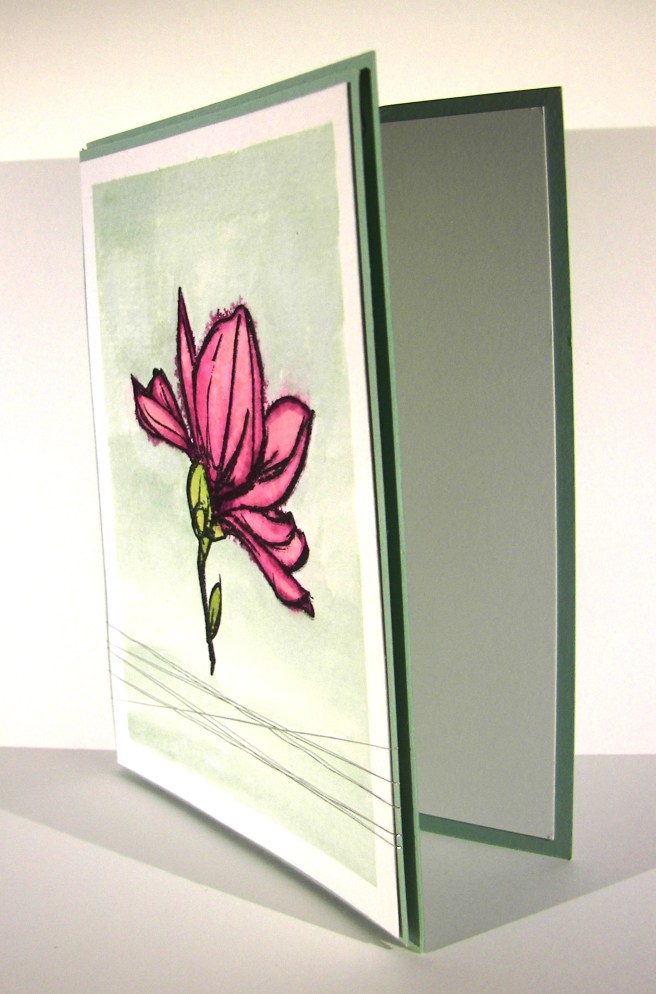
I pulled a few ink colors that I wondered about going together.  Blackberry bliss is such a strong color I hesitate sometimes to put it with others.  This pastel grouping compliments it nicely though.  I don’t think I have watercolored with it yet either.  That was fun for sure.  I used a basic card front made from cold pressed water color paper, masked a quarter inch border off and got to work.  This project was one of the times I just let it happen without too much planning or thought.  I find that less stressful because you don’t have an exact finish in mind, just simple imagery and colors.  Works well for me.

I layered my front on a backgroun of mint macaron with a narrow 1/8″ border, and then placed it again on the card base.  I didn’t do any inside stamping this time.  Just a simple and clean piece of whisper white waiting to be written on.  I think that was all it called for.

2-15 (2)

Have a creative day.

Moana

You’re a Whole Lot of Lovely

When I was cleaning up my desk I came across several kits left over from workshops that hadn’t been filed away.  Usually I just break down the kits and put the supplies back. This one had the stamping, punching and they were layered together.  So I thought I would make something with them.

2-9

I do not remember what the original kit was at all.  It had two pieces of 6 x 6 paper, ribbon, and the stamped embellishment.  So, I decided to not bother looking it up on my blog and make something new. My go to projects are cards with matching tiny gift bags. Mission accomplished and kit used up.  I still don’t know what the other one was, but I am quite happy with this little number.

2-9 (3)

Have a creative day!

Everything Botanical

Well, this project started somewhere else, but the results are great.  Sometimes it is hard to see past your ‘opportunity mistakes’, I managed though.  Once I fussy cut designer series paper I am totally committed.

2-8 (3)

The free items you can earn from Sale-a-bration are all unique, but this one caught my eye right away.  A patterned velum paper that not only coordinates, but actually outlines designer series paper, well that is amazing.  I fussed a bit matching it up, but found the exact spot.  I almost did a 6 x 6 card just so I could see the whole pattern line up.  It would have been worth it, it looked so pretty all lined up.  I moved on though.

2-8

My opportunities came from the glue experience.  I thought I could put tiny tiny dots of glue on little flowers and it would look kind of neat, and hide the adhesive at the same time.  Well, my tiny dots were not as tiny as they needed to be.  Several fixes later, it worked out.  Basic rhinestones, a larger sentiment with tag layering, and using one of the many coordinating framelits.  Phew!

I added a touch of inside stamping with a leaf from the coordinating stamp set.  I don’t usually go for a whole suite of product.  This one is different, I loved all of it.  However, it is my favorite color pallet, floral, and it goes together so wonderfully.  I couldn’t resist it.  So I didn’t.

2-8 (1)

Have a creative day!

Moana


Oh Hello Baby Box…

When something is this tiny, all you can do is giggle.  Especially when you are greeted by an adorable little smiley face that is just large enough to fit inside a 1/2″ circle punch.  The ribbon is just 1/4″ wide.  I absolutely adore tiny things.

1-23

This is made entirely from my to be filed scraps on the side of my desk.  Just like the flowers from my last project.  I guess if I keep pulling from there I won’t have anything to file back.  There is a thought.  I am hoping to spend some time cleaning up a bit today.

The dimensions of this box are 1″ x 1″ x 3 1/4″.  How about that?  I wasn’t sure if the striped dsp would match up okay, but it did pretty darn good.  I tried to save on dsp and cut only a strip off the end to snip up into place.  If I had cut a square and then my strips they would have lined up better, but I chose to save the dsp.

A double layer of the bitty banner punch with one tiny little stamp.  The image is from the Hello free Sale-a-bration set.  As I have said before, I love it when a stamp fits into a punch.  Makes my life easy and keeps the images super clean.

I thought about putting candies inside, switched to a chapstick, but I think I could even put a lovely lipstick inside.  I will have to see what I get up to on this one.  Love it though!

1-23 (1)

Have a creative day!

Moana

Forever Begins Today

This was for yesterday, however, yesterday was for my family and there wasn’t time to share this with you.  I am sure it was worth the wait though.  Aren’t these flowers just the best thing ever?

1-21

One framelit set gives you all of these pieces, plus a couple more.  And they coordinate with velum, designer series paper just to name a couple. I have been planning this one for a while now, with a very specific goal in mind.  I am fortunate enough to have my son getting engaged and this is how I am going to approach the second reception.  What else could I possibly use for my inspiration piece, right?

1-21 (1)

I do admit that once I cut into a piece of designer series paper for a card front, I look to the remainder of the sheet and immediately think of a bag or box I can make to coordinate.  I have a hard time stopping myself to be honest.  I also have a bit of a problem filing back my scraps of cardstock when I work.  All of these colors were available to me in my stack of put me away papers.  I put them to good use for sure.

1-21 (2)

Have a creative day!

Moana

The Best is Yet to Come

The project I had in mind for today was just too time consuming.  That will have to be later on, perhaps Saturday.  It was floral, so I still had to get my fix in there.  The main stamp from this lovely hostess set was perfect.

1-20

I try to work when my family is busy, but this was done in the middle of a rushed morning.  So, as I tried to accomplish a quick water coloring, I created something that made me less than happy.  I was doing the no line technique and well, my lines got lost, almost completely.  It looked like I was looking through a frosted glass.  Instead of starting over, I just embraced the look and put some velum over the top.  Win!

The project was just about some simple layers, nothing too tricky.  I love being able to hide my adhesive well when working with velum.  Yup, glue dots underneath the lovely silver spots.  How great is that.  I wanted to use the thread, but with the tags I usually punch a hole and make a bow.  The card is too large in scale for a tiny bow like that, so I tried to go without.  That did not work.  A metal rimmed pearl came to the rescue and finished it off.  Even though it wasn’t quite what I had planned, I do love how it turned out.  What a great all occasion card to have on hand.

1-20 (1)

Have a creative day!

Moana

Courage Doesn’t Always Roar…

I wasn’t sure about posting this one, it is definitely not my usual type of project.  And if I am being totally honest, it is a bit of a mess.  It wasn’t my idea, but I needed to make a sample, so it happened.

1-15

I work with the youth in my church, specifically the young women ages 14-15, and this was our project last Wednesday night.  One of the girls had suggested this activity and we went at it.  I was to make the sample and I rushed through it a bit too quickly.  We only have a little over an hour to work with, so I was on a timer.  Also, this wouldn’t be my best crafting area.  It is so okay to know there are areas to improve in, and I don’t mind sharing my learning opportunities. (I don’t like to call them mistakes.)

I used two sheets of dsp for this project.  I love the paper. I did get a bit of teasing from the girls.  “Are those artichokes?”  Yes they are, and I love them.  The back side of the paper reminded me of a double wedding ring quilt pattern, so it was a win all the way around.  We were to modge podge pretty paper to a clip board, add some decoration, and finish it off with a favorite inspirational quote.  I have creases and bubbles, but I still love it. I also got into my retired stash of ribbon and found a bunch to use.  I will be happily using this clipboard.  I do need to sand the edges a bit, but otherwise, it is all done.

1-15 (1)

Have a creative day!

Moana

Joy, Plain and Simple

As we have been showered with much needed rain here in Northern California, all I feel is joy and gratitude.  We have a long way to go, but every little bit helps.  I thought I would put my feelings into a card.

12-10

The Color Me Irresistible  Specialty DSP is so much fun to work with.  It was actually my inspiration.  I knew it had a raindrop pattern and the project just went from there.  I sponged with a dauber in silver encore ink all over in tiny swirls to give a cloudy gray look.  Turned out fantastic I must say.

12-10 (1)

The flowers were punched with the pansy punch hovering over the large dots in the silver fancy foil designer velum, using the dots as the flower center.  Nice idea, right?  I used a bone folder to curl the petals of the velum and decided I needed more flowers.  Basic gray became the flower background color and I punched another six of those.  I distressed those with a large stylus to give them dimension and lift.  Layered with dimensionals and glue dots, the side border came together.

A single stamp from the Your Presents set put the focus just right.  It was framed with a smokey slate oval and both were sponged with more silver ink.  The “i” was dotted with a metal rimmed pearl and a tiny ribbon was wrapped around.  Add one more awesome card to the mix.  A very rewarding project to make and enjoy.

12-10 (3)

Have a creative day!

Moana

Bitty Boxy Holiday Bags

I managed to sneak yet another project out of that paper set.  I still have enough for a couple of cards or a medium sized gift bag.  Dang, what a lot of fun I have had using this paper.  But these tiny little bags certainly do take the cake.  Aren’t they just absolutely adorable?

Bitty Boxy Holiday Bags

My husband was given a large bag of candy as a thank you and he brought it home.  And he opened it.  So that is just dangerous.  I knew I had to come up with several little bags to use them up.  I am getting there.

Bitty Boxy Holiday Bags

Three different styles of box bags to get me going today.  I am partial to a milk carton style to be honest, but the tiny pinch pouch is just so sweet.  I used up three scraps of paper with a touch of glimmer paper to give them some bling.  I don’t know what I love more, the cording or metallic thread, so I had to use them both.

Bitty Boxy Holiday Bags

Have a creative day!

Moana


Sparkly Seasons Pumpkin Patch

It may not look very busy, but these little pumpkins almost did me in.  I nearly got to the point of just showing you how frustrated I was and that there was not much to show for it.  Then I thought about iridescent ice, and the world came together.

Sparkly Seasons Pumpkin Patch

I love that stuff.  It can make the most simple things look almost magical.  I used three different framelits for my pumpkins and got to work.  I used a large stylus to create grooves and texture to the surface, but from the back side.  It really broke down the fibers a lot.  Then I began to water color streaks to give dimension.  That didn’t do a whole lot.  Then I spritzed water and swiped ink on with my finger.  It got better.  Then I sponged with pumpkin pie and added early espresso too.  At that point they looked okay, but still kind of sad.

Sparkly Seasons Pumpkin Patch

That is when I tried the iridescent ice.  I daubed the whole surface with versamark and sprinkled on the powder.  I only used one coating and thought that would be enough.  It was just right.  I did sponge a bit more with early espresso afterwards.  I layered the pumpkins together using dimensionals, with the stems too, and wrapped them all in linen thread.  I wanted to leave it then, but decided on a simple word phrase.  And there you go!

Sparkly Seasons Pumpkin Patch

Have a creative day!

Moana

Believe Bookmark with Lighthearted Leaves

Welcome to my Sunday morning.  When I have the opportunity to teach a church lesson I always feel blessed.  Teaching often gives more to the teacher than to the student.  Maybe not at a school setting, but church, for sure.

Believe Bookmark with Lighthearted Leaves

I do my best thinking while I am crafting, so I almost always have some kind of handout that relates to the lesson.  It also allows me to think of who I am teaching individually, and to make sure I am taking into consideration who they are and how they feel.  Such a wonderful time.

Believe Bookmark with Lighthearted Leaves

I definitely dipped into my retired product stash for these bookmarks.  The cardstock and ink are hello honey, current, but the other color is summer starfruit.  What a great color to work with.  I thought they went well together, so I got to use some of my retired dsp stash and retired ribbon too!  Win for all.  I think people often overlook the fact that it is okay to stamp on patterned paper, as long as the pattern is small.  That was the case for this pattern for sure.  It came together so quickly.  Once the design was clear  in my mind, about five minutes, another thirty-five and I was all done.  Yup, I churned out a dozen of these in less than an hour.  Again, a win for all.

Believe Bookmark with Lighthearted Leaves

Have a creative day!

Moana

Flower Fair Gift Box

I am definitely in the mood for gift boxes.  I wanted to make a huge floral bloom and then make a box sized right for the flower to cover the whole top of it.  And here you go .

Flower Fair Gift Box

I used pumpkin pie paper with stamping and sponging in tangerine tango.  Color families make such lovely projects.  I wanted the sponging to be more prominent and give a bit more depth.  I think it worked out nicely.

Flower Fair Gift Box

The flower layers were adhered with dimensionals with the larger flowers and then switched to glue dots withe the smaller ones.  Overall, it was a very satisfying creative process.  When I scored the box, I just made sure that the dimensions allowed the right base for the flower, 2″ square.  The top isn’t sealed shut, just folded for easy opening and closing.  This great big flower is actually stuck to the ribbon, so it could slide off without damaging the box.  I also tied the ribbon in a knot so it could be folded over and appear to be leaves or a banner looking element.  Great fun!

Flower Fair Gift Box

Have a creative day!

Moana

Elegant Butterfly

Butterflies, butterflies, and more butterflies.  There are a bunch going on here, but one in particular started it all.  You might not realize it, but I played quite a bit with this little butterfly.  Lots of detailing and working it with a stylus.

Elegant Butterflies

Sometimes the attention to detail makes all the difference.  My daughter made a good observation.  She said it would be really pretty if it were glass or something so it could be a necklace charm.  I have to agree, it would be lovely.

Elegant Butterflies

I do rather enjoy working with colors that are so not of the current holiday.  Nothing more entertaining than making a spring card in late fall, or a fun Christmas project in the middle of July.  Something different to expect.

Elegant Butterflies

Have a creative day!

Moana

Neutral Toned If the Broom Fits

I know today is Halloween, but I was just feeling a bit mellow about it.  Could that be a result of being with students all day that were super costumed out and completely mental about it?  Or maybe because I went back to take yearbook pictures that evening during the carnival and dance?  Sounds about right.  Let’s just settle down a bit, but still enjoy the holiday.

Neutral Toned If the Broom Fits

This stamp is just too funny.  I think that I have shown myself that even though there is definitely a Halloween theme with the stamp, it doesn’t have to be used that way, and that always makes me happy.

Neutral Toned If the Broom Fits

Instead of focusing on the holiday, I went with a focus on the brooms themselves.  This included giving the background a run through with the woodgrain embossing folder, wooden handles on the broom.  Also, I did  a little piercing around the brooms themselves so I could thread some of the ever so lovely linen thread around the bristles and give it some dimension.  I think that looks pretty darn cool.  All kinds of dimension going on here.  What a great card!

Neutral Toned If the Broom Fits

Have a creative day!

Moana

Birthday Jar Wishes That Last

It isn’t my usual project to share, but I do make these particularly often.  The idea is lovely and I get to put a lot of retired product to good use.  I do hate to ignore it, so I thought I would share  a way to use it differently.

Birthday Jar Wishes That Last

I bought some of those washi sheets having no idea what I would do with them.  Until this fun series of projects came about.  I work with the young ladies in my church, along with several other ladies, and we come together as a team in a large variety of events from large to small and everything in between.  Of course we celebrate birthdays!  And that is what this is.

Birthday Jar Wishes That Last

I decorate jars and vases with washi paper punches to the mood I am in.  Sometimes I use framelits, or punches, or both.  I have a large collection of last springs sale-a-bration ribbon, so it always goes together.  You know how I love to coordinate as much as possible.  So these jars are created for each young lady or woman in our group.  We all then write inspirational wishes, birthday wishes, and just kind words in general to fill the jar.  Then, the recipient can read them all at once, or read them one at a time, or open them over time when a bad day happens and they need a pick me up.  Something sweet for whenever you want them.  So, try something different with the awesome product you have, either current or retired, it is all wonderful!

Birthday Jar Wishes That Last

Have a creative day!

Moana

Color Me Irresistible

Fall events are starting to pile up and that means plan ahead and get it done early.  This isn’t quite early, just one week, but that helps, right?  There is a church youth dance coming up next weekend and we are hosting the pre-dance dinner party.  The theme is black and white, so we are going along with that for the decorations, and yes, party favors.  I think these will do nicely.

Color Me Irresistible

These two are very simple, as should any favor should be, especially if you need to make several quickly.  I started both of them with paper sized at about 4 x 6 1/2.  Simple scoring for the gift bag and a hole punch to thread through the ribbon.  Done and done.

Color Me Irresistible

Can you go wrong with a classic sour cream container?  I think not, especially when you are working with this ever so lovely silver foil velum.  I think silver wrapped candies or white mints would look so pretty inside.  Maybe even both?  Works for me!

Color Me Irresistible

Have a creative day!

Moana

Sheltering Tree

Who doesn’t love the look of the beginning of fall?  The leaves are just starting to turn in my yard.  Some bright, some darker, and then there are those lovely dark ones that look almost burgundy.  Those would be my favorite.

Sheltering Tree

The tree is stamped in tip top taupe, the leaves in pear pizzazz and the turning leaves in perfect plum.  The card base is also in perfect plum with a slight framing in tip top taupe.  Very clean look for sure.  A few wraps with some linen thread and it was nearly done.

Sheltering Tree

I did a little echo stamping inside the card with the accent leaf color, just a bit in opposite corners.  I like to have enough there to connect to the front, but not so much that it interferes with the writing room.  It is still a card after all.  The front is popped up on dimensionals and that is all there is to it.  the outer dimensions are 4 1/4 x 4 1/4, a little different for me.  I am not prone to square cards, but I was working with my scrap pile, and that is what I had at ready.

Sheltering Tree

Have a creative day!

Moana

One Big Meaning Tiny Treats

Welcome back and thank you too!  Going back to work yesterday, after taking a long weekend off, left me thinking I should give a little thank you to my student TA’s.  They are a great bunch and were honestly quite happy with these treats.

One Big Meaning Tiny Treats

I kept things very simple, because I knew they would really just want the candy.  So, I used some adorable retired ribbon, with an effort to keep it neutral.  I have young men and knew they wouldn’t appreciate anything too girlie.  However, I did give them color choices and they picked the ones they liked best.  Three of five kept the little tag in their things.  How cute is that!

One Big Meaning Tiny Treats

What do we gain from this?  First of all, saying thank you is so important.  Secondly, it doesn’t have to be huge and elaborate to be appreciated.  Honestly, these took me maybe ten minutes from start to end, including a quick set of photos.  Having great tools to work with makes all the difference.  Give something like this a try.  This punch combo is fantastic!  The 1 3/4″ circle punch is large enough that lots of sentiments fit inside quite easily.  Add the 2″ circle for a tiny border and it looks so great!

One Big Meaning Tiny Treats

Have a creative day!

Moana

Lovely Amazing You

While sitting next to my youngest daughter, trying to keep her awake to finish homework, I thought I would complete my project for the next day.  Good idea, right?  I pulled two stamp sets I hadn’t used in a while and asked her for a color idea.  She said dark blue, so I went with Night of Navy.  The card began.

Lovely Amazing You

She wasn’t having the best of evenings and her older sister came to the rescue, even though she is out of state attending university.  I do think that technology can interfere with real personal relationships, but this was perfect.  The infamous ‘snapchat’ was just the thing.  The sad faces turned to happy and then on to absolutely silly.  And that is how I chose my sentiment.  Thank you my sweet daughter for being the best big sister ever.

Lovely Amazing You

The brayer was still out from workshop so I let it give me my background on the large polka dot embossing folder.  Kind of artsy looking, even if I didn’t keep it perfectly clean.  I then decided to do a lot of sponging to disguise some of that, can’t hide it all, and also sponged lightly all over the paper.  Nice.

Lovely Amazing You

The little notebook sheet was created with a stamp from the Tap Tap Tap set, offset on some Night of Navy cardstock, raised up on dimensionals and embellished with basic rhinestones.  I even used the 1/16″ hand held punch and punched actual holes over the stamped ones.  Pretty cute.  I finished off the project with a bow of seam binding ribbon and decided I loved it!

Have a creative day!

Moana

For All Things

It can be hard to get even the simple things done when you don’t quite feel yourself.  That is why today’s project is super simple, just what I needed.

For All Things

I started with a half sheet of very vanilla cardstock and scored every 2″ on the 8.5″ side which left me a 1/2″ edge to seal the box together.  I also scored along the length at 2″ to make the bottom, and at 3/4″ at the top and then 1″ over from there.  I know I am not very exact at sharing my measurements, but it works out I promise.  Oh, I did do my stamping before I scored, forgot to mention that.

For All Things

I have held the box together using the tear n tape adhesive.  I do like that stuff, easier to work with than sticky strip.  The flaps are folded together and adhered with the same and then I got to sponging.  All the edges and even on these bitty little flowers.  I love that look!  I put the largest basic pearls inside each flower and grabbed for a scrap of ribbon.  The dotted lace trim has a good bit of stretch to it, so it is held on just by that.  Not a glue dot or anything.  That makes it easy to use and re-use.  A simple bow and it was all done!

For All Things

Have a creative day!

Moana